

Learning how to draw a realistic bird in color pencil is challenging, but worth the effort. With the right approach and some patience, you can create a stunning piece of art that captures the beauty of these amazing creatures.
In this tutorial, I’ll show you how to draw a realistic bird step-by-step in color pencil, from sketching the initial outline to adding the finishing touches. Let’s begin!
Note: Some of the links on this supply list are affiliate links to Amazon, which means if you use the link, I will get a small commission. This, of course, is at no additional cost to you. Using these links allows me to keep this website running. Thank you so much for supporting a fellow artist.
Steps In This “Drawing A Realistic Bird” Tutorial:
-
Gather supplies.
-
Sketch the outline of the bird.
-
Add in a few darker anchor points.
-
Begin building a light base color layer.
-
Create texture with cross-hatching, stippling, and layers.
-
Add depth and polish with burnishing.
-
Add highlights and finishing touches.
1. Supplies Needed To Draw A Realistic Bird In Color Pencil
Click here to check out my supply list page for easy reference. The colored pencil section is near the bottom of the page.
Paper Selection Is Very Important
You will need sturdy paper for colored pencil drawings. While you can practice on less sturdy paper, I would strongly recommend buying at least a small pad of hot press watercolor paper.
I started on inferior paper scraps that I had laying around my studio. This led to a lot of frustration because those types of paper could not stand up to the multiple layers of colored pencil needed to create a realistic effect. You will want a smoother, heavier paper that is 100% cotton. The paper needs to have some tooth to it for the colored pencil to adhere properly.

I used a variety of colored pencil brands to draw this bird.
The best surface I have found to draw on with colored pencils so far is hot-pressed watercolor paper. There are other surfaces artists like to work on, such as pastelmat, sanded papers, and drafting film. I haven’t ventured into that arena yet, as I have plenty of paper to keep me busy.
The Best Pencil To Draw A Realistic Bird In Colored Pencil
So far, I haven’t found an overall “best” pencil. The reason for that is there are a lot of fantastic colored pencils on the market, each having different characteristics. The variety of colored pencils to choose from is huge.
If you are just starting out and want to see if you like colored pencils, try a small box of Prismacolor. I had some of these pencils already and got started with them. Prismacolor pencils are wax-based and have a soft consistency. Many artists love working with these pencils, so you may find that this is all you need.
The Pencils I Used For This Bird Drawing:
I was interested in using watercolor colored pencils so I could have an opportunity to “paint in” my first layer. However, I didn’t wet the colored pencils in this drawing. I’ll write about watercolor pencils in a future article. What I did was use a variety of colored pencils, mixing watercolor pencils, wax-based pencils, and oil-based pencils.
The pencils I love the most are Faber-Castell Polychromos (oil-based, harder lead), Caran d’Ache Luminance (wax-based, softer lead), and Caran d’Ache Museum Aquarelle (water-soluble, soft lead). I also used a few Derwent Studio pencils for fine details (wax-based, hard lead). Most colored pencil artists have a little bit of everything on hand. Many of these colored pencils can be bought individually, so you can build up a collection without committing to an entire set.
Set Your Expectations
It takes a very long time to create a realistic drawing in colored pencil. A drawing can take several hours to several days or weeks to complete, depending on its complexity. If you are impatient or want immediate results, save yourself the headache and try a different medium.
I was interested in using colored pencils again, as I had used Staedtler Mars colored pencils many years ago and liked the soft texture of the pencils compared to the waxy Prismacolor pencils. I also wanted to do more drawing, so I thought this would be a win-win.
What was surprising to me was how long it took to achieve the look I was going for. The approach for creating realism with colored pencils is to go slow with very light pressure and build layer upon layer. By adding layers upon layers, you can mix the colors together on the paper. You don’t need to have hundreds of pencil colors to get good results. It is fun trying out and collecting different pencils, though.
2. Sketch The Outline For The Bird Drawing
Finding Good Reference Images of Birds
The first step in creating a realistic bird drawing is to choose a reference photo. You can find reference photos online or take your own photos of birds in the wild or in captivity. When choosing your reference photo, make sure it is clear. Look for a photo with good lighting and sharp details that will help you capture the bird’s features accurately.
Sketching The Basic Shapes Of The Bird
Once the reference photo is chosen, start sketching the basic shapes of the bird. Use very light strokes to create an outline of the bird’s body, head, and wings. Focus on capturing the overall shape of the bird and its proportions. This will help you create a strong foundation for your drawing.
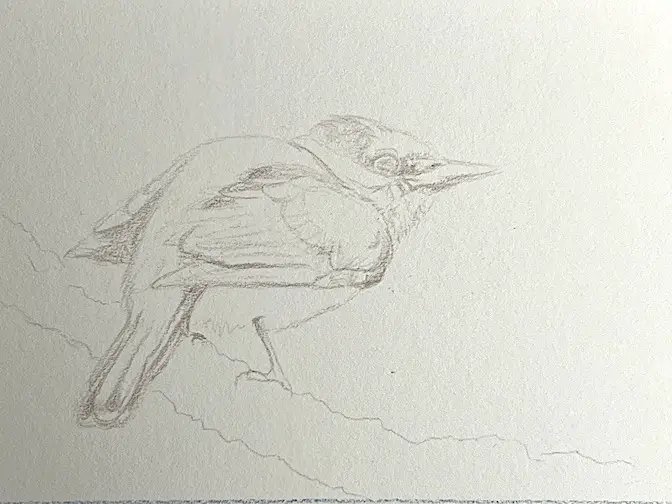
A very light sketch was done with watercolor pencil.
Many colored pencil artists will transfer or trace their sketch onto the paper. Tracing keeps you from having to do a lot of erasing. The more you erase, the more the paper breaks down. If you already have a drawing of a bird, you can use a lightbox or window to trace your initial image onto the surface you will be working on. You can also use transfer paper.
Application Thought Process
In the image above, you can see that I did a very light sketch with a sepia-colored pencil. My thought process was to start out with a watercolor pencil, blend it out with water to “erase” mistakes, and add wax and oil-based pencils on top after it was dry. I didn’t actually do this for some unknown reason. The reason I thought about it this way is because oil painters paint fat over lean.
However, I don’t see any hard and fast rules about application procedures in the colored pencil universe, so this strategy may not be valid. It doesn’t hurt to try this approach if it makes sense to you. A painting strategy that does carry over to colored pencil drawings is using light layers, similar to glazing with oil paint.
3: Add A Few Darker Anchor Points On The Bird
After sketching the basic shape, I added darker anchor points to the drawing. I used a darker colored pencil to add more defined lines to the bird’s body, head, and wings. When drawing your own bird, pay attention to its feathers, eyes, and beak, and closely examine the reference photo to help you assess those details accurately.

Adding detail little by little.
Pay Attention To Values
If you’ve followed any of my painting tutorials, you know I talk a lot about the importance of values. Shading is an essential part of creating a realistic bird drawing.
It’s a good practice to allow the pencil strokes to follow the direction of the feathers. I used light strokes to create a soft and subtle shading effect. Applying a tiny bit more pressure helps to establish darker shades and shadows, creating form.
Keep Track Of Highlights
It is important to know where the highlights will be at the beginning of the drawing so you can leave them untouched. For example, you can see in the bird’s eye that I left a couple of white areas of paper showing through. I also did this for lighter details on the wings as I continued drawing the bird.
4: Add The First Layer Of Base Colors
What Exactly Is Layering With Colored Pencils?
Layering is the process of putting on multiple layers of the same or different colors on top of each other to create a smooth effect.
In this drawing, I started by applying a light layer of a lighter color, then added another color on top. Doing this repeatedly gradually builds up the color as you draw.
I chose the base colors for the bird’s feathers and put them on the drawing with a light touch. Shades of yellow, green, grey, and brown colors were used for the first layer. I made sure to use a light touch and vary the pressure to create subtle changes in color.

Adding a light first layer of color. What a sickly looking little bird. Poor thing. Hang in there, little buddy.
To choose the base colors, I looked closely at the reference photo and picked out the lightest color I could see, then applied the first layer with those colors. The drawing looks pretty disappointing at this stage, but hang in there. There are many, many more layers to come.
5: Building Texture With Layers
To create the appearance of texture on the bird’s feathers, I used a variety of techniques, such as cross-hatching, short strokes, and stippling. I also started with small circular strokes to cover the larger area on the back of the bird with yellows and oranges.

This is about the 5th or 6th layer on this bird. You can see I’ve started creating some texture by varying the colors.
It’s OK if your pencil tip is less sharp for laying color down in larger areas. Another layer was added on top of the base layer, with my strokes following the direction of the feathers.
A good rule of thumb is to start with the lightest colors and work your way down to the darkest colors. This, of course, is exactly the opposite approach to what I do when painting in oil. It caused havoc in my mind at first, but it is one of the hazards of trying new things. It’s worth it, though. I like to mix things up to keep the creative part of my brain on its toes.

At this point, I’ve lost count of the layers. It’s a lot, though. You can see that slowly building the colors is creating a nice effect.
6: Create Depth With Darker Colors & Burnishing
To create the illusion of depth in the bird’s feathers, I used a darker color to shade the areas where the feathers overlap. It’s a good idea to pay attention to the direction of the feathers and use short strokes to create a realistic texture.
By blending and layering colors together, burnishing is a way to make a smooth, polished finish. This technique is reserved for the very end of the drawing since it would be nearly impossible to correct any mistakes.

I started burnishing colors to create a more polished look.
Burnishing involves applying a great deal of pressure with the pencil, which compresses the pigment and fills in the tooth of the paper to create a smooth, almost glossy effect. I started burnishing some of the darker colors in the wings with a dark brown. You can also burnish with a colorless blender or a white colored pencil.
Burnishing can be very helpful when drawing things that are shiny or reflective, like the eyes and beak. In my experience, wax-based colors will create a glossier finish than water- and oil-based colors.
It’s important to note that burnishing can also make the colors appear darker, so testing the technique on a scrap piece of paper before applying it to the final artwork is recommended.
7: Add Highlights & Final Details
Highlights
When the layers of the drawing are shaded and burnished, highlights can be added to create a more realistic effect. I used a white pencil along with an electric eraser to create highlights on the bird’s feathers and body. It may be hard to get really bright highlights with a white pencil or eraser at this point if you have accidentally colored in the highlight areas. I did a lot of practicing on scrap paper to make sure I would get the effect I wanted.
There are a couple things that can be done if this happens. First, a Slice tool can be used to very gently scrape away the colored pencil and then add highlights. I’ve also used a white Caran d’Ache Neocolor II Watercolor Crayon to get bright highlights. I simply dipped a fine point brush in water, got a little of the white crayon onto the end of the brush, and painted in a highlight.

Fine details are added in the last stages of the bird drawing.
Fine Details
To create the fine details of the bird drawing, I used a very sharp colored pencil on the bird’s eyes, beak, wings, and feet. I really studied the reference photo to capture the bird’s unique features. The Slice tool can also be used at this point to create various feather details by scraping off color.

The final stages of the bird drawing.
Evaluation & Adjustments
Once the details are added, I walk away from my work and come back with fresh eyes to see if any value adjustments need to be made. A clue that the values are off is that the bird looks unnatural in some way. Another good method for evaluation is to take a picture of the drawing and view it very small on your phone’s screen. This makes it easier to spot differences when compared to the reference photo. I do this with my paintings as well.
Practice Makes Perfect When It Comes To Drawing Realistic Birds
Creating a realistic bird drawing takes a lot of time, practice, and patience. Don’t be discouraged if your first attempt doesn’t turn out as expected. Keep practicing and experimenting with different techniques and styles until you find the approach that works best for you.
The one thing I didn’t cover on this bird drawing was how to use solvents to blend the oil and wax pigments. I didn’t use solvents on this bird. It is, however, a common practice with colored pencil artists and can give a very smooth, realistic effect when done properly. I have used water with the watercolor pencils to create a wash and blend colors with a great deal of success in other drawings. I’ll make sure to include this with my next colored pencil drawing tutorial.

The finished bird.
Key Takeaways For Your Own Realistic Bird Drawing
Here are a few things to keep in mind if you decide to draw a realistic bird in colored pencil:
- High-quality color pencils and paper are very helpful in creating a professional-looking bird drawing.
- Begin with a very light sketch of the bird’s basic outline, then make adjustments with a kneaded eraser.
- Layer and blend the lighter base colors using light, even pressure.
- Practice using different pencil techniques to create a variety of effects and textures.
- Create a sense of depth and polish using burnishing techniques.
- Add highlights and fine details at the end, remembering to keep the pencil tip sharp.
- Experiment with different reference images to improve your skills, and practice, practice, practice.
Thanks For Stopping By The Online Studio
I hope you found this tutorial on drawing a realistic bird helpful. If you want to stay updated on future tutorials, make sure to join the mailing list at the top of the page. If you want to see other tutorials, check out the links below.
FREE Painting Tutorials:
Click any of the images below to see the corresponding tutorial, or click here for a page previewing all of my tutorials.

Click the image to learn how to paint a sunflower.
If you’d like to learn more about how to paint a dog portrait, click the image above.

Learn how to paint a colorful landscape. Click the image above.

Black fur can be tricky to paint. Click the image above to see the step-by-step article.