


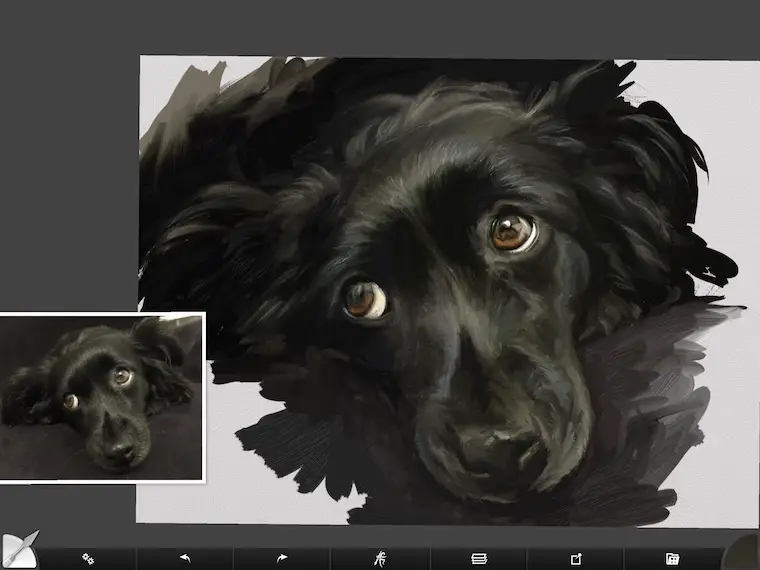
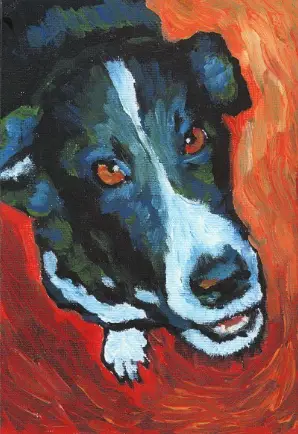
I love black dogs (and cats) so I thought I’d share some of my tips for painting black fur. I recently came across an inspiration photo on Sktchy that looked EXACTLY like my dog Claire that had passed many years ago. Claire and I were very bonded, so it was like getting a “hello” from heaven when I saw the picture. I knew right away I had to paint her!
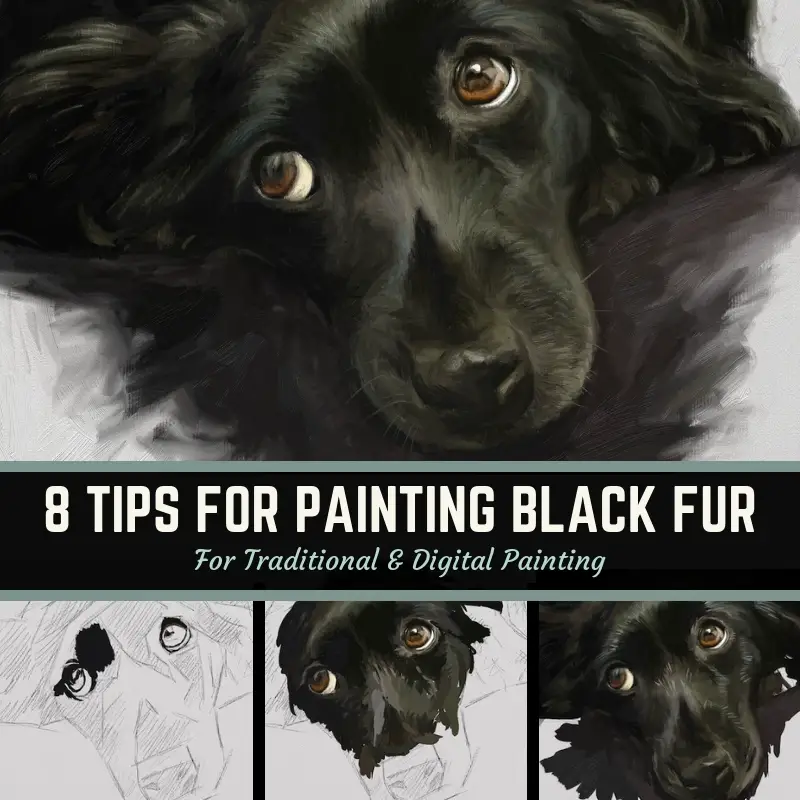
I did this quick study on my iPad using ArtRage, but the tips I’ll be giving here apply to painting in oil or acrylic as well. This is the same approach I use when I’m on the easel.
ArtRage is as close to traditional painting as it gets. It’s fun and convenient and, more importantly, keeps me painting!
1. Start with dark areas
The first of my tips for painting black fur is to start with blocking in dark areas to establish values. If you’ve gone through any of my previous tutorials, this is a drum I beat consistently. Of course, the challenge here is that with black animals, most of your areas may be dark.
You could paint everything black all at once and then go back in and paint highlights. However, if you don’t get them in the right place you could fog up your darkest black areas with light paint and lose definition overall.
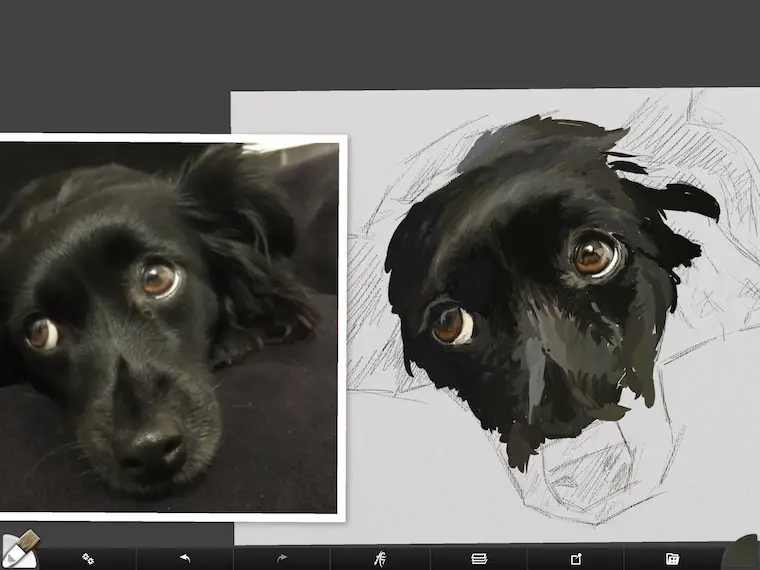
As you can see below, I roughly shaded in all of the darkest areas on the dog’s face with a pencil. For traditional painting, I would use charcoal. This helps me to create zones and see the different values in the blacks.
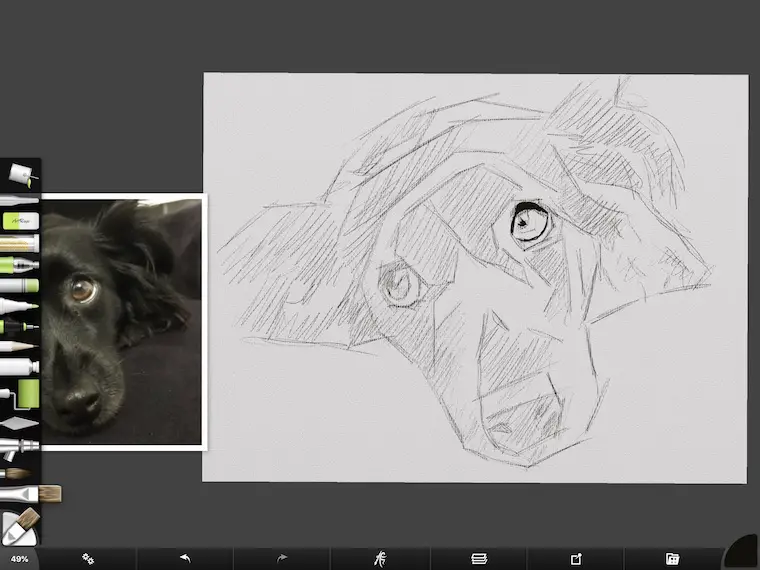
The screenshot above is from ArtRage on my iPad, which is only $4.99 for Apple and Android. I’m learning the desktop version and it’s a very robust program. There is also a “Lite” version if you want to test the waters a bit before fully diving in. I never expected to be this enthusiastic about a painting program. I tried to paint in Procreate and Photoshop, but never achieved the results I’ve gotten from ArtRage. Enough about nerdy software, let’s get back to painting!
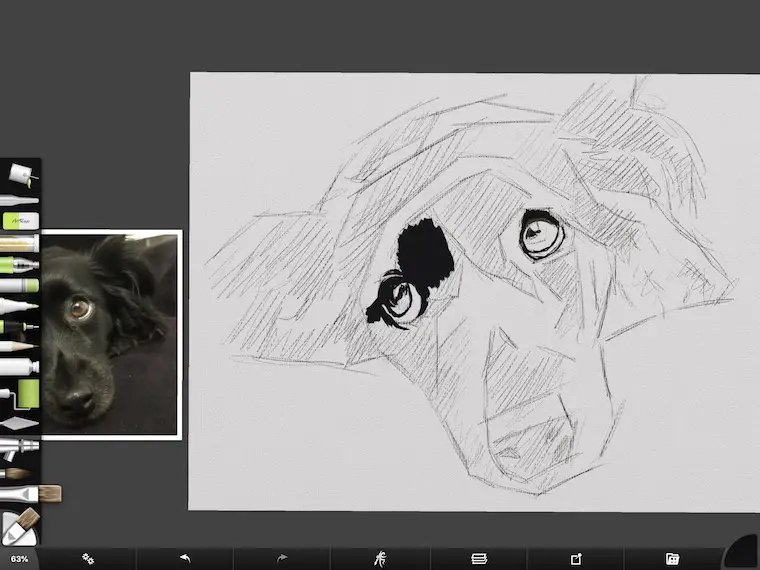
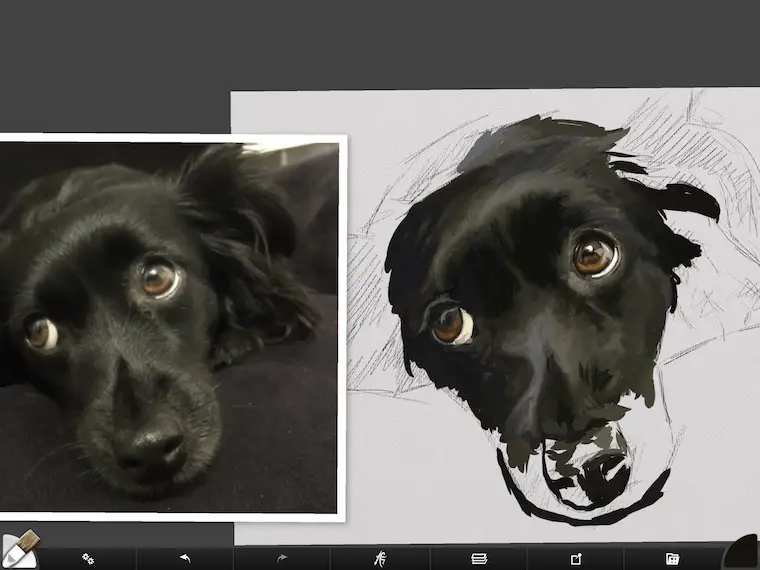
A good starting point for me is the eyes, so that is where I began with my Claire look-alike. Even loosely getting the dark areas around her eyes helps to make the portrait come to life.
I also started blocking in the blackest blacks around the eye area.
For those of you who may be using ArtRage:
I use the oil brush tool in various sizes with the pressure set to 75-85%. The thinners are set to zero and the loading is around 75 – 85%. I also keep the insta-dry feature off and auto clean on. (Oh how I wish I had that feature for my oil paint brushes!!!)
Usually, the painting is all in one layer to get an alla prima experience. I do, however, sometimes add a layer to do whiskers.
I painted this portrait digitally on the iPad Pro using an Apple pencil.
For traditional painters:
I’d start with the biggest brush possible to block in large areas quickly. This is where traditional painting has an advantage over the iPad version of ArtRage. The brushes in the program can’t get very big, which means you can’t cover large areas as fast. The brush control on the desktop version is much easier to deal with.
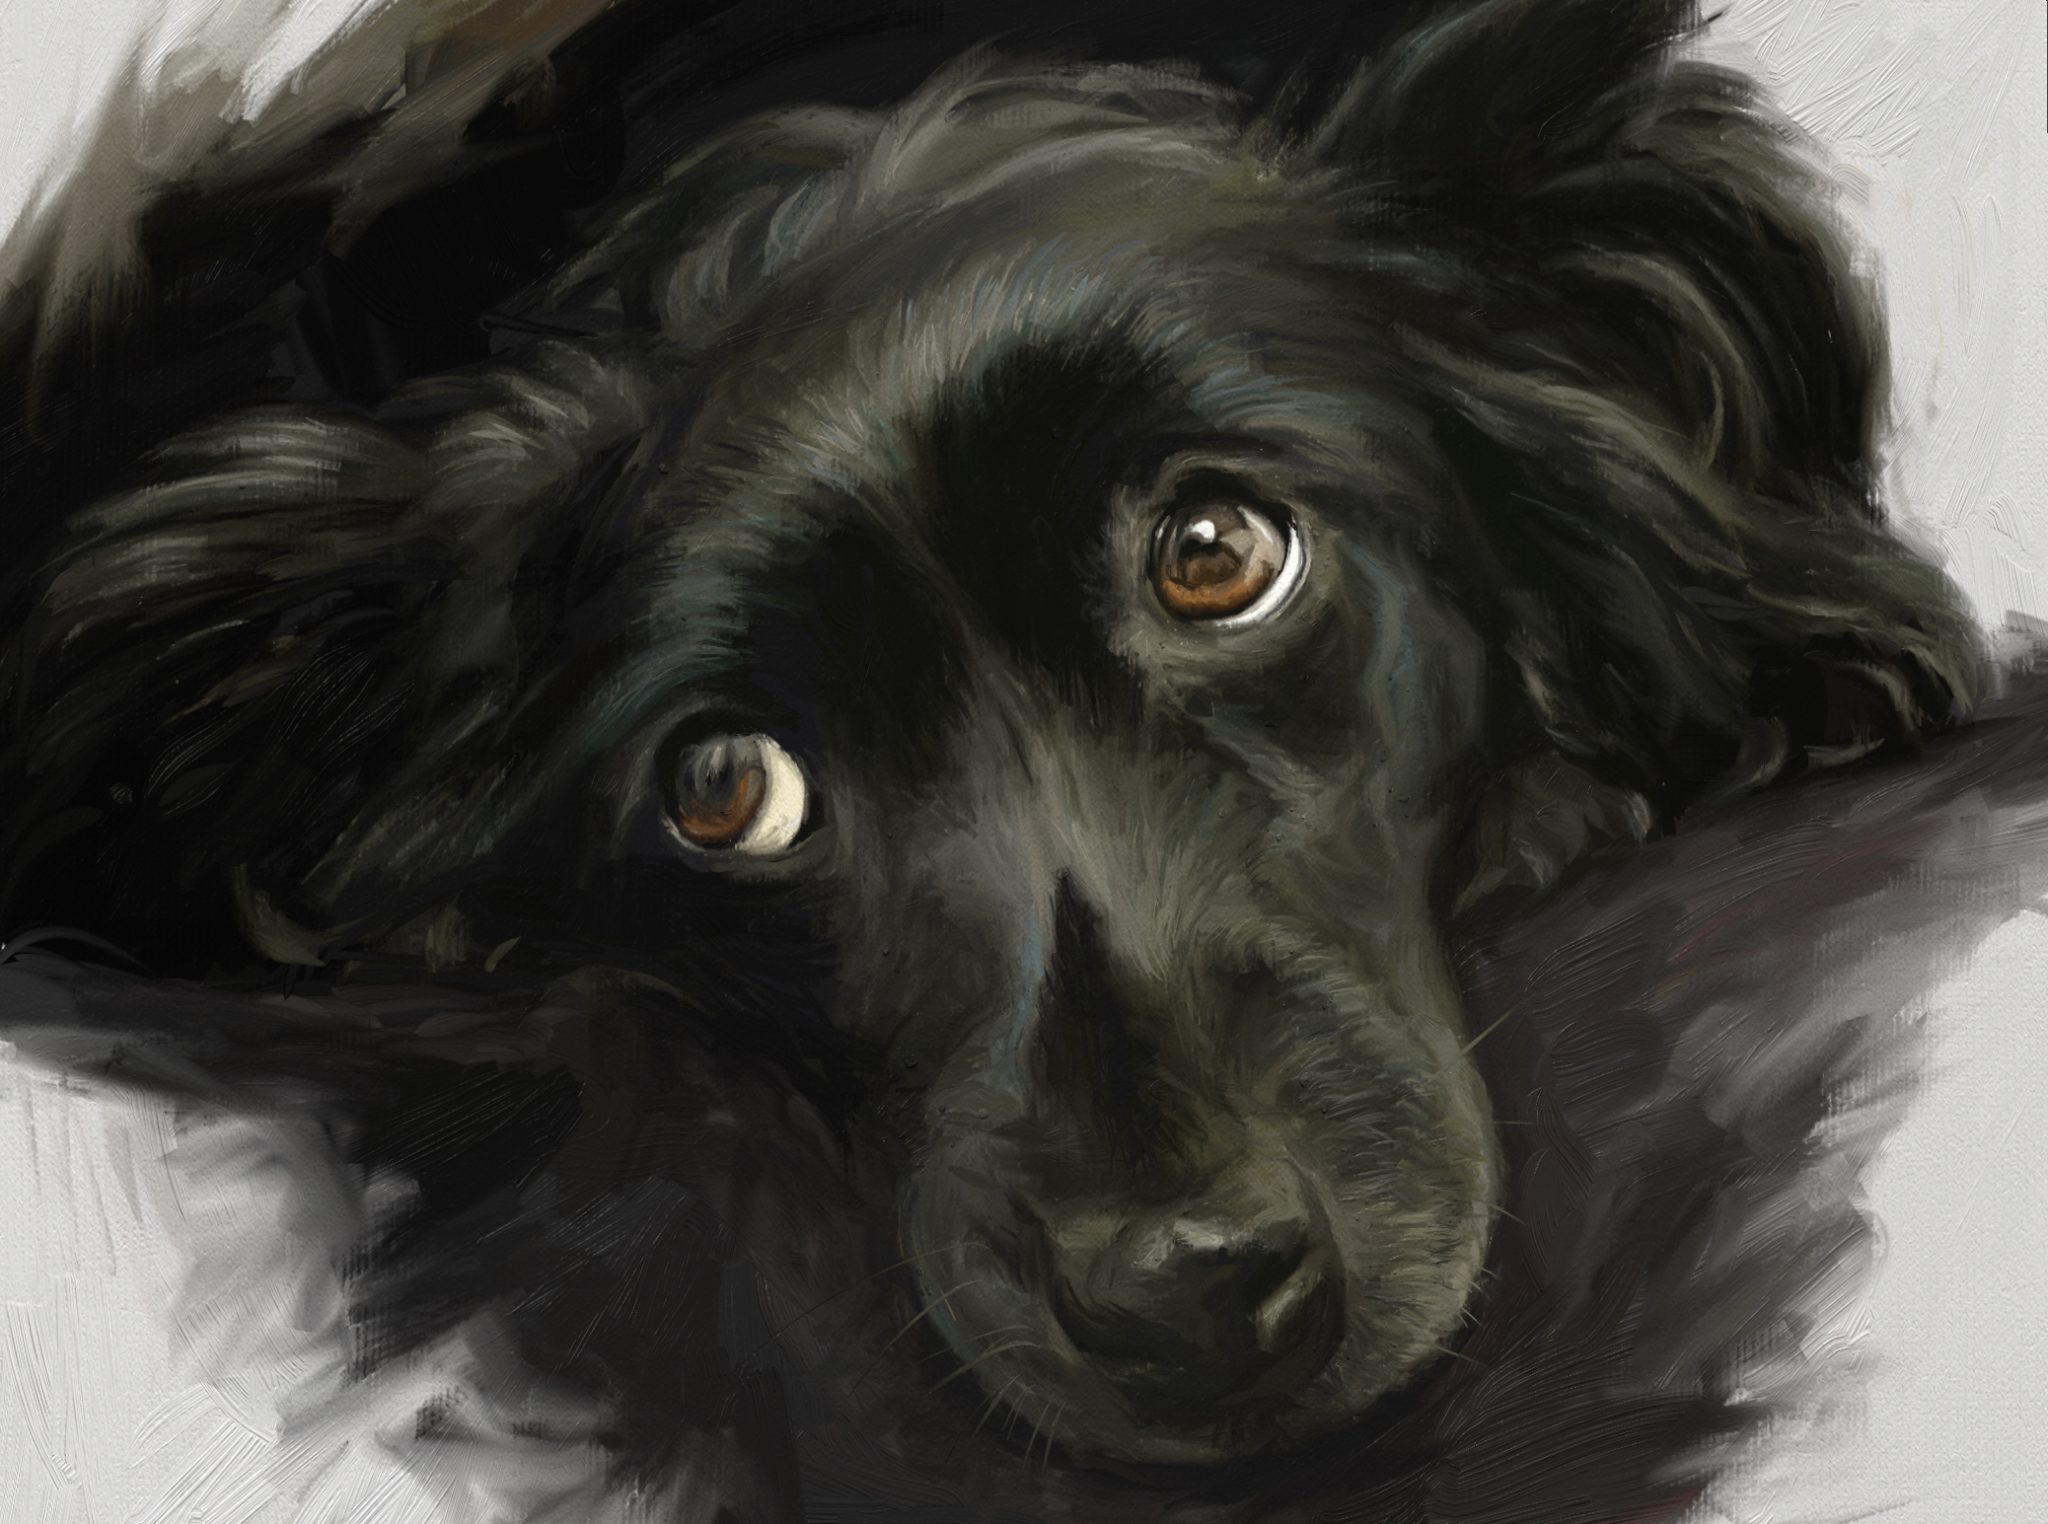
2. Don’t worry about details – concentrate on values
When painting black fur, or anything really, the hardest part is to not get caught up in the details. Ultimately, I kept this painting very loose. Up close it can look messy, but from a distance, this sweet doggie looks realistic.
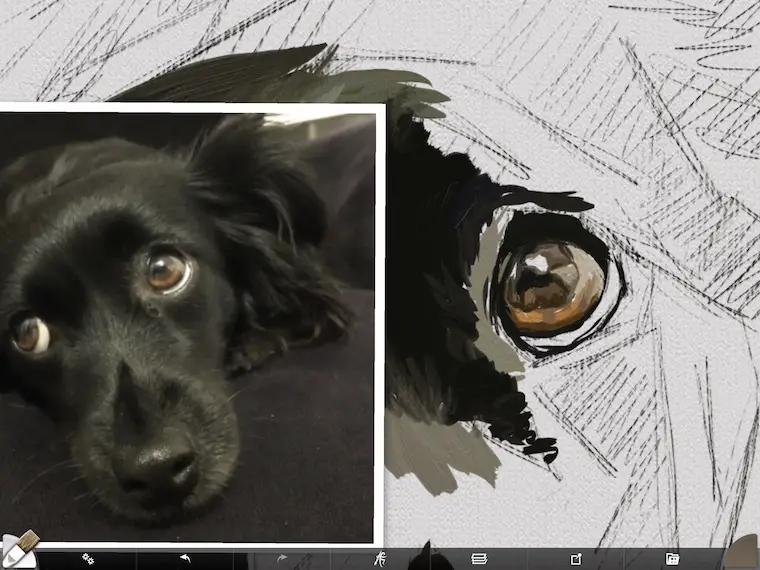
As you can see above, I jumped into painting the eye right away. However, I didn’t worry too much about things being perfect. When painting realism, it’s really easy to get swept away into making things picture-perfect. But perfectionism is a trap for me and can bog me down. This is a painting mood-killer in my world.
My definition of realism is about capturing the values correctly. When they are right I can keep things just messy enough to add movement and expression. I’m not always able to strike this balance though and that’s OK. Call me crazy, but why do everything the same way every single time?

3. Black fur can have a lot of tonal variation
When people see paintings I’ve done of black animals they always comment on how hard it must be. But in actuality, I think it’s much easier than painting just about any other color of fur. The only thing you need to be mindful of is the varying shades of gray in the fur and understand that shades close to white can be reflected off of the animal’s coat.
In the image below, you can see that I’m applying much lighter grays which are reflections on the fur.
Using a gray scale and value finder can quickly help you to identify the shade and value you need to shoot for.
Most blacks and grays are considered to be in the blue family so if your black animal leans more towards brown, you’ll have to account for that.
In oil painting, you can mix ultramarine blue and burnt umber to get a nice black. For a cool black, add more ultramarine. For a warm black, add more burnt umber. Here’s a great video from Mark Carder that shows you how.
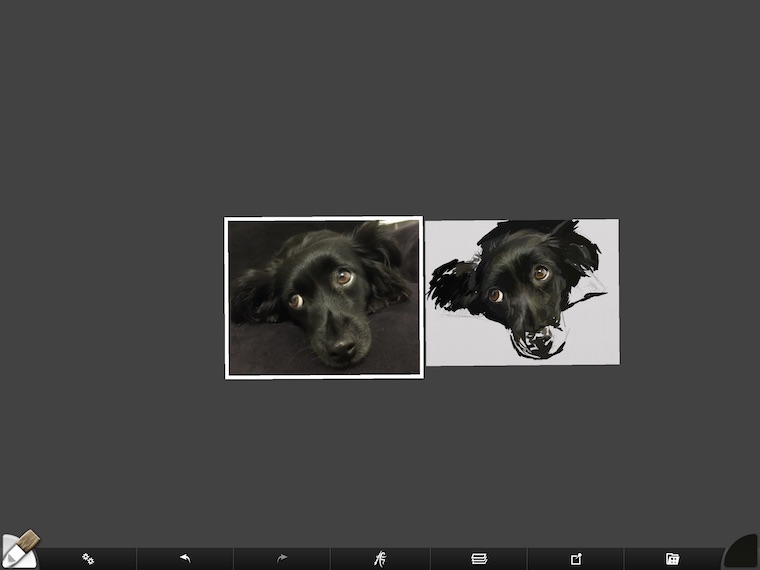
4. Don’t worry if your painting is messy
There is always a point for me during the painting process that just looks horrible. I think this is the main reason why I like to get at least one of the eyes done. If there is a part of the painting that looks good, then that success helps me to get through the “messy middle”.
As you can see in both the images above, things are looking pretty sloppy as I’m laying paint down. Blending things out a bit isn’t making things look better.
The best thing to do when you find yourself in the messy middle is to keep going, check your colors, make sure your values are matching and try not to blend too much – like I started to do.
If I had pushed through and not stopped to blend, things would have started to come together just fine. I always forget this and panic which starts me off in a blending frenzy. When will I ever learn? Probably never.
5. Take a photo and look at the image tiny
This is my favorite trick when painting and I use it ALL THE TIME. I’m sure other artists must do this, but I started to realize the benefit of looking at my work on a tiny screen when I was taking a lot of shots of my paintings for tutorials like this one.
I found that when I was painting, I couldn’t “see” what I was doing anymore. This is known as the artist’s curse. One way to get past it is to walk away and take a break for a while and then come back to the painting with fresh eyes. Standing back from the painting can help you see the work differently as well. But by far the best method for me is to view my work tiny on a small screen.
Since I’m working in ArtRage, I made my canvas size very small in the window and placed it next to my reference image. This makes it easy to see differences quickly. I also squint my eyes when it’s little like this so I can immediately see where my values are off. If something is too light, I go in and darken it and visa versa.
Other great tricks are to check your work in a mirror or turn the work upside down. It works like a charm!
6. Don’t worry about painting every hair
There is a part of me that wants to paint every single hair I see and make it picture perfect and then there is another part of me that wants to get the painting done in 30 minutes (like that is ever going to happen!) Both approaches are right, but it depends on the result you want to end up with.

I know myself well enough that if I thought I’d have to spend 40 hours painting every single hair on a dog’s face, I’d probably never get started.
Most artists are familiar with John Singer Sargent. He was a master at creating paintings that were very realistic from a distance, but sometimes very messy and chaotic up close. I don’t know how he did what he did, but trying to achieve that sort of effect on some level is what I’m always shooting for. I may never get there, but it doesn’t matter. The pursuit of that idea keeps me motivated and that’s all I need.
The reason why Sargent’s work looks so real isn’t that he painted every little detail, it’s because he took a lot of time determining the right values and put them in the right place. He knew the viewer’s brain would automatically fill in the details.
7. Add detail highlights when colors are blocked in
In the image below, you can see where I’ve started to go in and add the brighter highlights. When painting black fur, sometimes you only need to indicate a few highlights here and there to achieve a masterful effect.
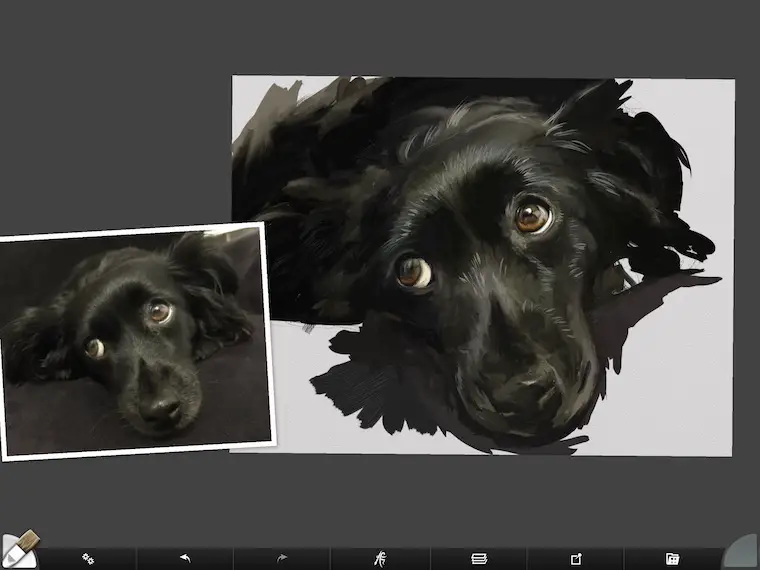
For the highlights above, I added in a blue-gray tone as a complementary color to the warm golden hues in this pup’s eyes. It’s a very subtle touch, but I like incorporating complements to help to bring a little life to a painting.
The image below shows how I blended out the highlights. For blending in ArtRage, I use the knife tool on the “blend only” setting, varying the size of the knife and pressure. When I paint traditionally, I don’t spend that much time blending colors together. I generally like to leave brushstrokes visible but will spend a little more time blending areas of focus such as eyes.
I almost left the image above as the final study. The eyes are the focal point so the rest of the face doesn’t need as much refinement.
Sometimes leaving the painting loose as I have at this stage gives a sense of movement. This is a nice contrast to the stillness of the dog’s pose.
8. It’s OK to leave things unfinished
Even though I did decide to do a little more finish work (below), I intentionally left some areas very rough. This keeps the energy of the painting up. When painting black fur, you will usually have a very limited color palette. There’s nothing wrong with that, but it can make your painting look a little flat.
Leaving brush strokes in and unfinished areas “exposed” adds an element of the unexpected. This can add a little drama to the painting.
Other Popular Digital & Oil Painting Tutorials and Articles:
The #1 Skill To Improve Your Painting – Values In Art
iPad Painting Tutorial – How To Paint A Cat
https://shelleyhannafineart.com/paint-a-cat/
Tips For Painting Silver Objects
https://shelleyhannafineart.com/painting-silver-objects/
How I Paint On The iPad – A Step-By-Step Portrait In ArtRage
https://shelleyhannafineart.com/paint-on-the-ipad-step-by-step/
7 Portrait Painting Tips For Traditional And Digital Painters
https://shelleyhannafineart.com/portrait-painting-tips/
How To Paint A Dog Portrait Step-By-Step In Oil
https://shelleyhannafineart.com/how-to-paint-a-dog-portrait/
Painting A Cat In Oil Featuring Prescott, A Gorgeous Maine Coon Cat
https://shelleyhannafineart.com/painting-a-cat-in-oil/
Gotta love those doglets!
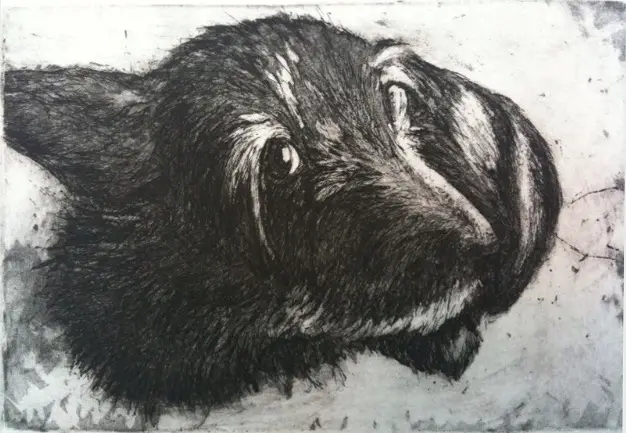
For the first time in over 20 years, I’m experiencing life without the companionship of a dog. I lost my two beloved dogs, Beardsley and Penelope, within a year of each other. Penelope lost her battle with congestive heart failure just a few months ago.
My sweet “Penelope” – intaglio
I’ve been so fortunate to have had many great dogs in my life. Candy, Eddie, Claire, Raymond, Murphy, Penelope and Beardsley. My heart is shattered not having them in my life, so I’m taking a break and allowing for time to heal. I probably won’t adopt another dog until I know I have plenty of time to spend with them.
“Rufus” a Beardsley look-alike – acrylic on canvas
For those of you who still have your fur child with you, please give them an extra hug and kiss for me. They are so generous with their love and affection. If only they could stay with us a little longer. XOXO

“Eddie” a.k.a. Edwina – acrylic on canvas
“Whispering Raymond” – acrylic on canvas
“Beardsley” my little B-man – intaglio