
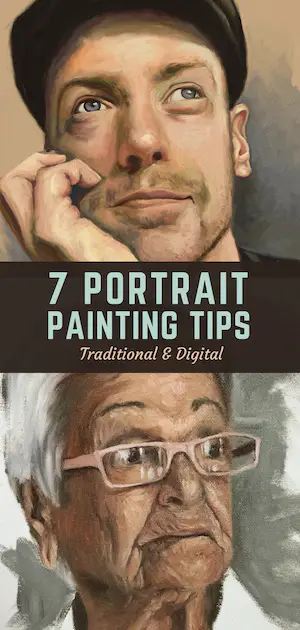
I thought I’d share some portrait painting tips since finishing the #30faces30days challenge. The challenge was fast and furious and I didn’t get as many progress pics as I wanted, but I did get a few. Most of what I’ll be reviewing are paintings I did on the iPad, but regardless of whether you paint traditionally or digitally, you will still find these tips helpful.

For the first day of the challenge, I have many more progress shots. As you’ll see, the challenge got very challenging right off the bat. How I thought things would go in my head became vastly different from the reality of how the portrait challenge progressed. I suppose that’s exactly why they call it a challenge.
Portrait Painting Tips – Tip 1: Be Flexible
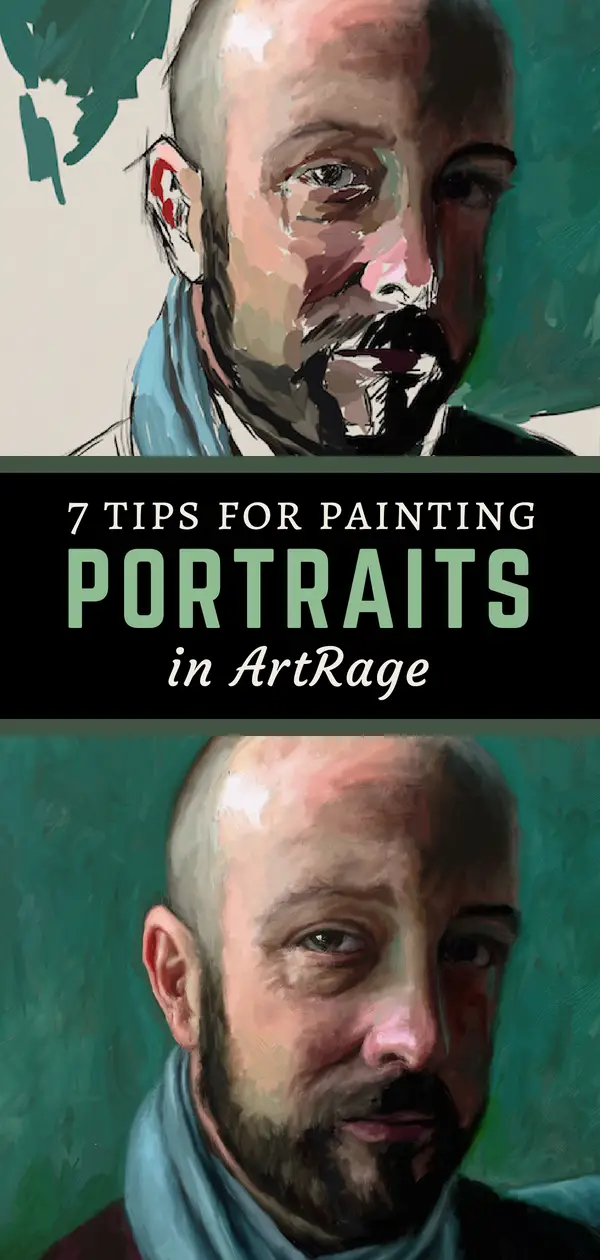
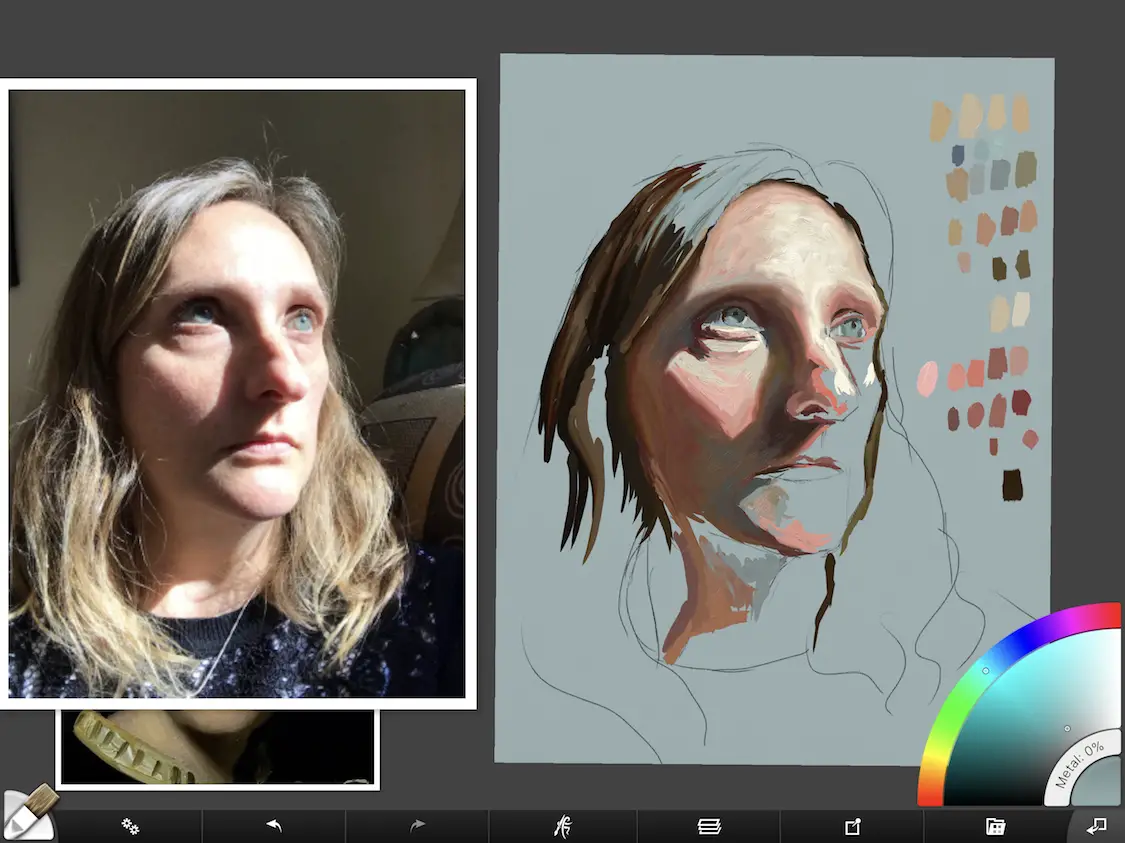
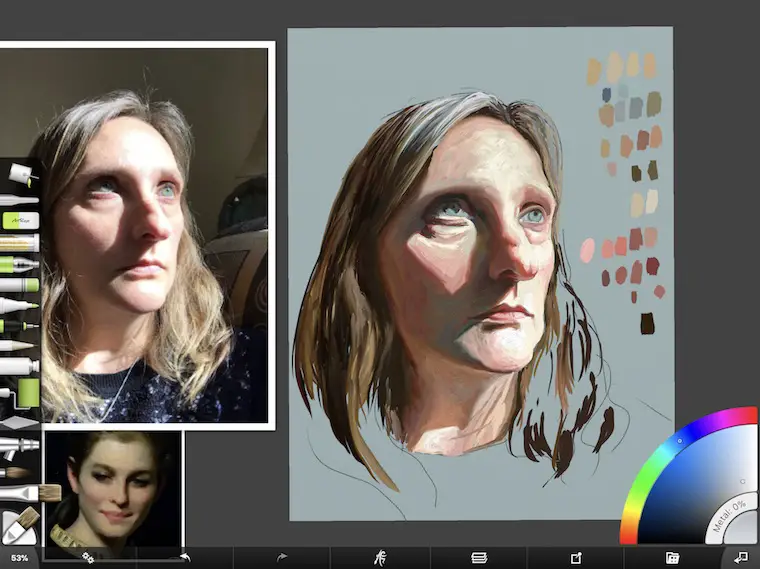
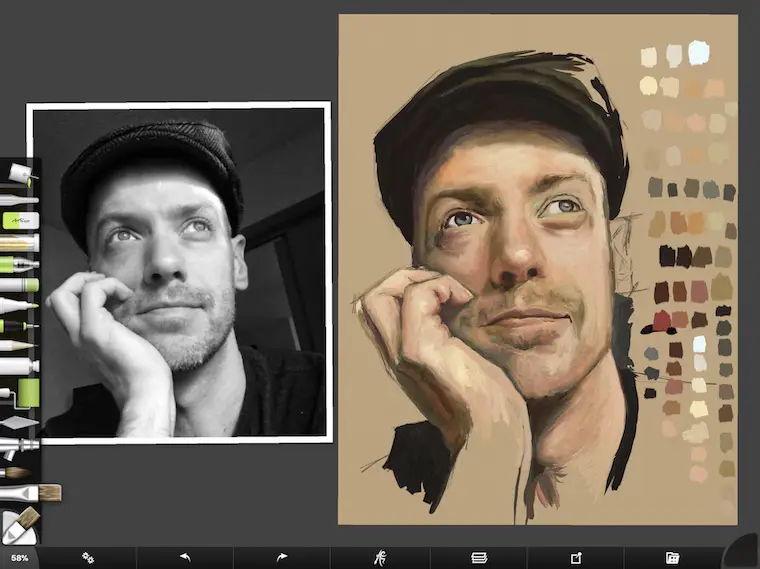
I’m relatively new to painting on the iPad, so I thought it would be fun to learn more about the features of my favorite program, ArtRage, while creating a portrait each day.
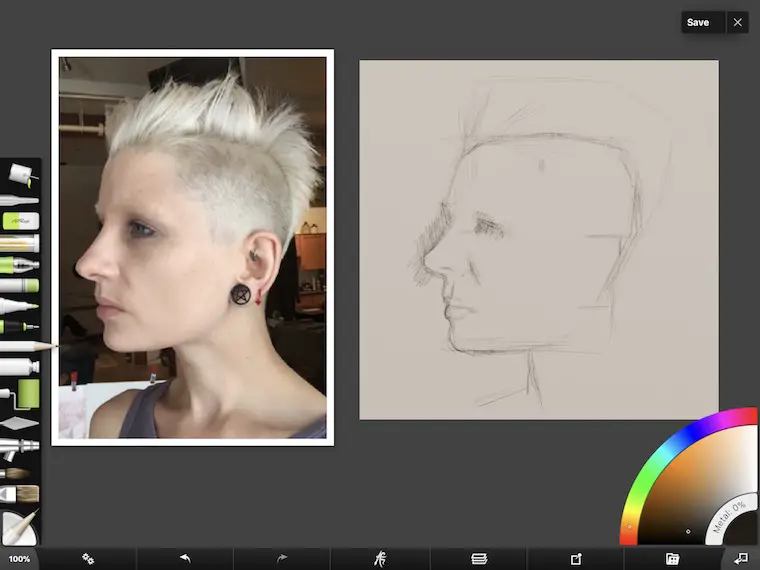
On day 1, the plan was to do a pencil sketch.
I wanted to do a pencil drawing for my first portrait as I’d never used the tool in ArtRage. As you can see above, I started the sketch using the sight-size method, measuring distances with my Apple pencil and my thumb (not the easiest thing to do on the iPad Pro, but good enough.)
I’m starting to realize the pencil tool in ArtRage was not my friend!
I don’t know if it was my settings, my paper texture or my lack of knowledge about the program, but I was not able to get the fine details using the pencil tool like I would with a traditional pencil sketch. Her eye area is a nightmare!

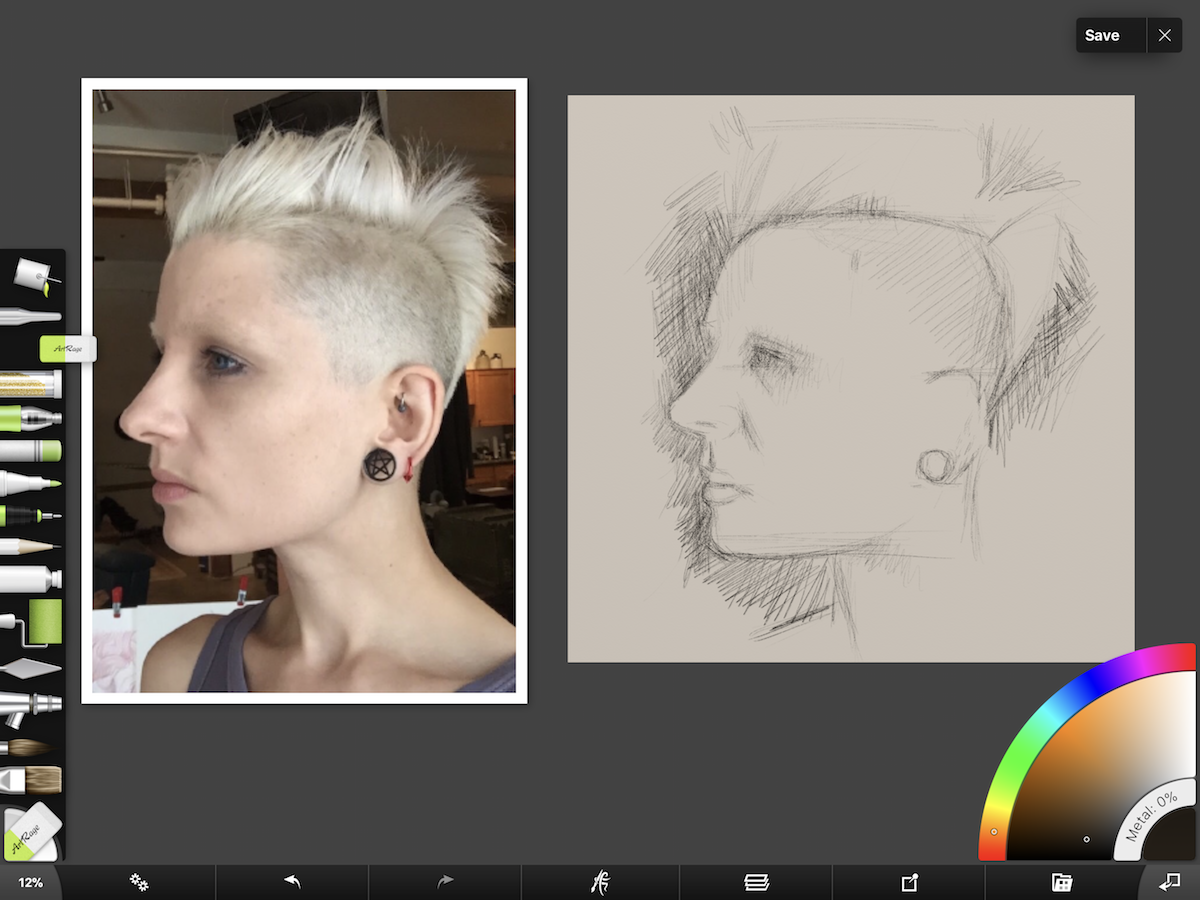
Even though the pencil was giving me trouble, I thought I could make it work – I was wrong.
Time To Change Direction
The sketch was coming together “OK”, but I was getting frustrated because that eye was not looking right. This is where I had to let go of doing a pencil sketch and decided to start painting. I knew I could control how her eye looked with paint in the program.
Ummm, ya. Time to break out the paintbrush.
Since my drawing was unsuccessful from my perspective, being flexible enough to try another approach was key to getting my first portrait in the challenge off to a good start.
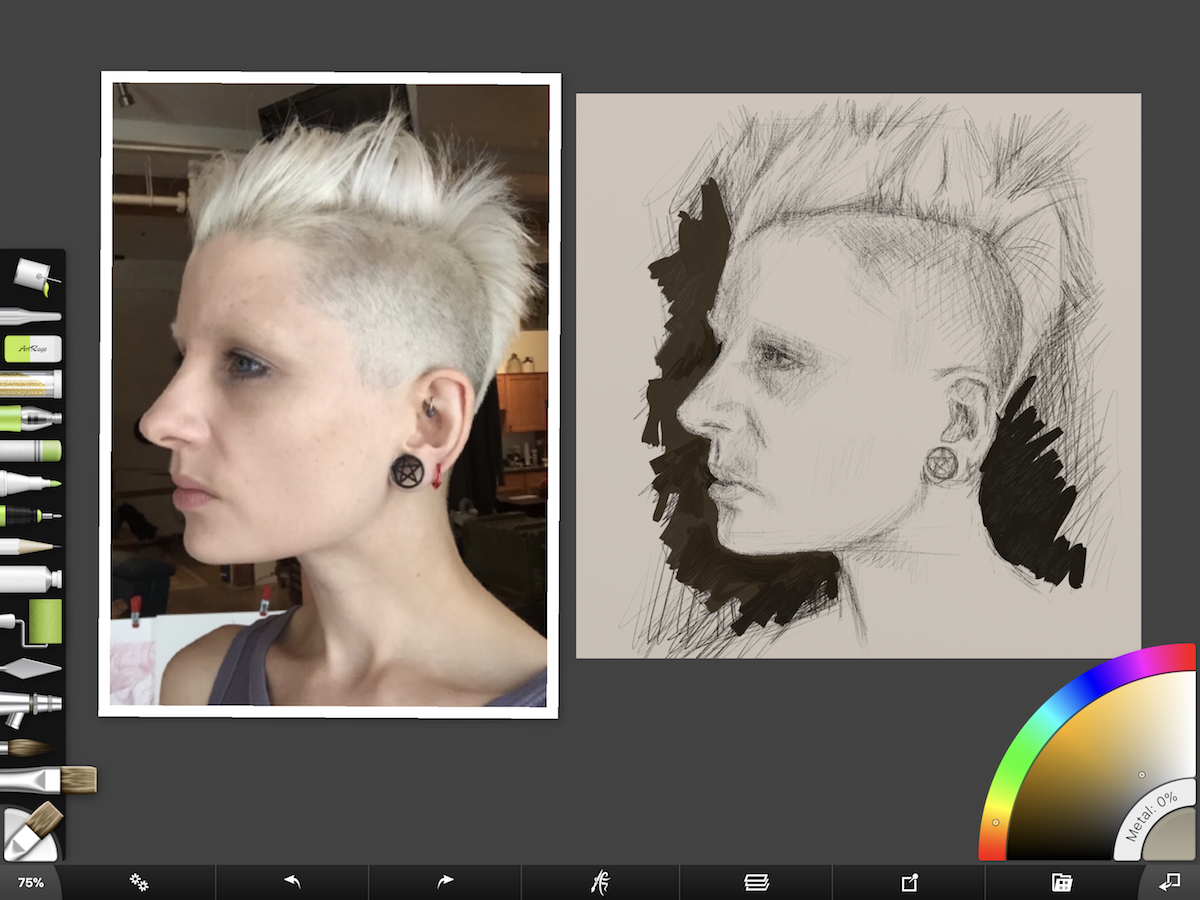
Time to scribble this out – I was running out of time!
Ultimately, I ended up doing two portraits. One in pencil and one as a painting. If I were to do painting alone, I wouldn’t have put so much effort into the pencil drawing.
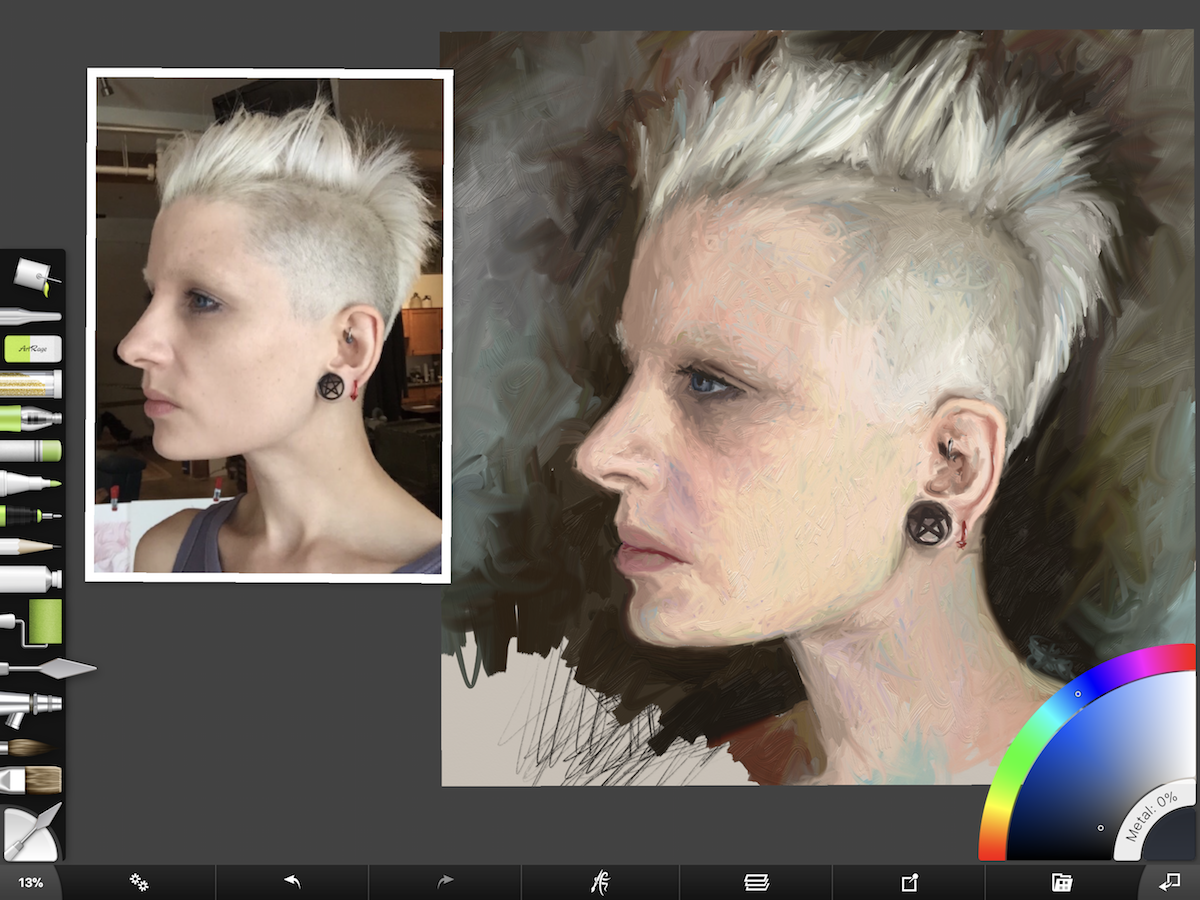
Day 1 painting challenge – I didn’t finish but it was better than the pencil sketch.
I was happy with how the final portrait turned out. If I hadn’t been flexible enough to change direction, I would have been very disappointed with this first portrait.
This was a good lesson for me about what I could do in the ArtRage for iPad app. Looking back on it, the canvas texture I had defined was probably the reason why I couldn’t draw her eye correctly with the pencil. The full desktop version and “Lite” version of ArtRage allow for more flexibility within the program. Even though I had challenges, it’s still my favorite digital drawing and painting program by far.
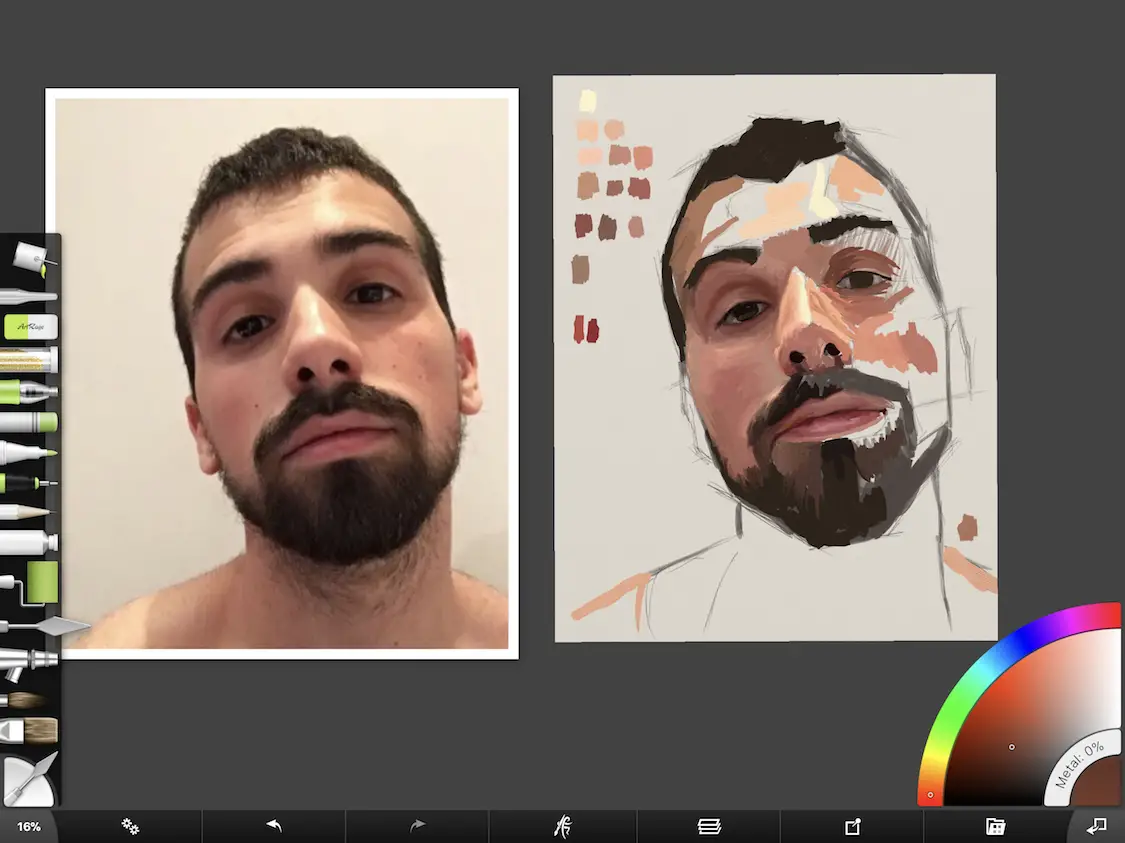
Portrait Painting Tips – Tip 2: Experiment
Experimentation is part of the fun as an artist. This is how you learn and can help you discover techniques to create your own unique style. Having just started up with my art again about a year and a half ago, I’m experimenting a lot. I haven’t landed on my own unique style yet, but I’m getting there.
Experimenting with color and technique.
With this portrait, I started with a black and white photo which helps you to see the values. Working from black and white frees you from trying to match colors to the original and allows you to create your own palette. I love doing this and have done this many years ago when painting in acrylic. As you can see, I’m working with colors that are amped up a bit from reality.
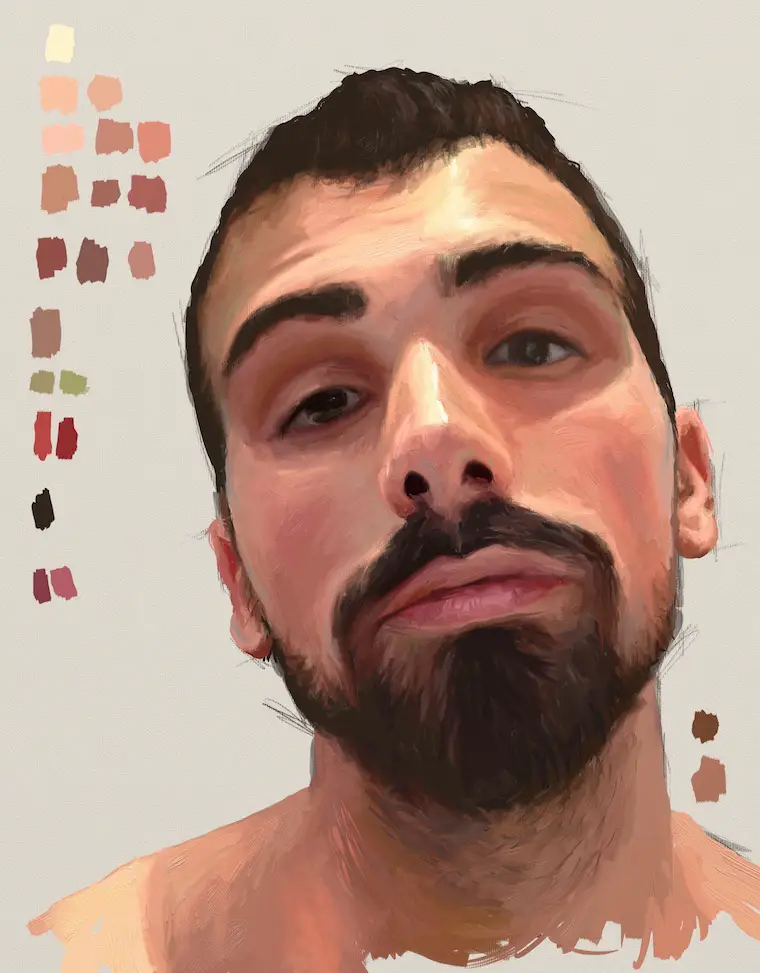
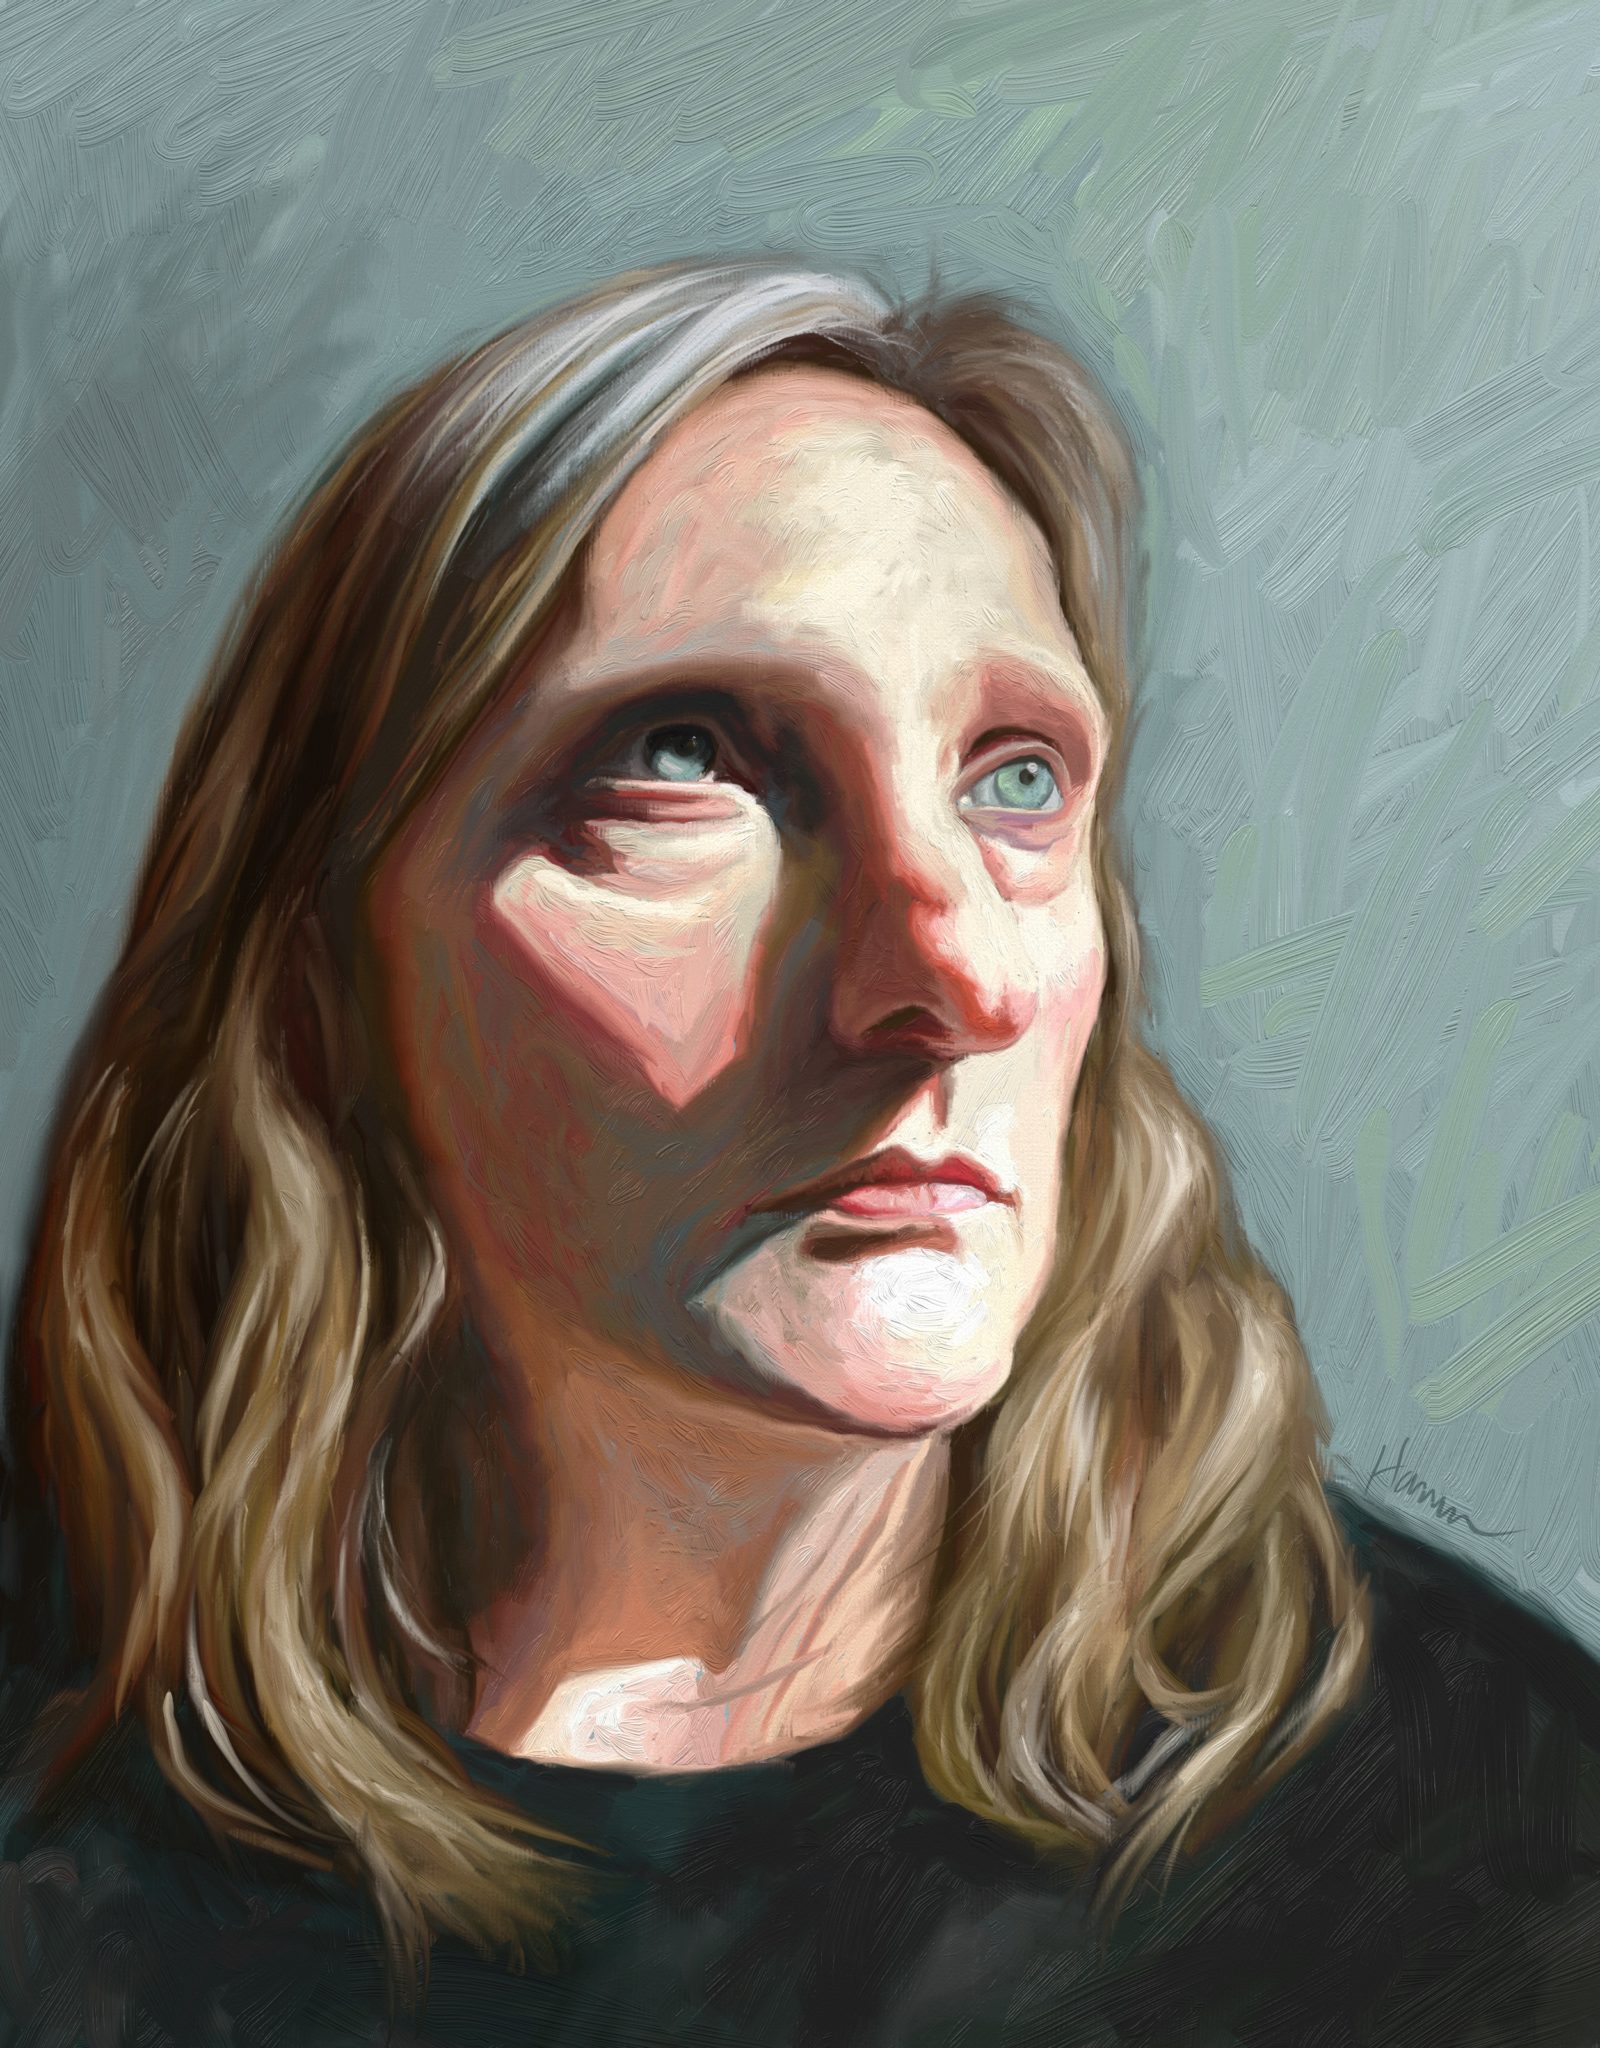
Day 3 final portrait of the challenge.
I’m also experimenting with technique. Rather than doing a smoother blend between colors I decided to make my palette knife tool really small and scribble my colors together. I love using a scribble method when I draw and wanted to replicate this technique with paint in ArtRage. I think the effect was successful and found the knife scribbling to be a fun technique to use.
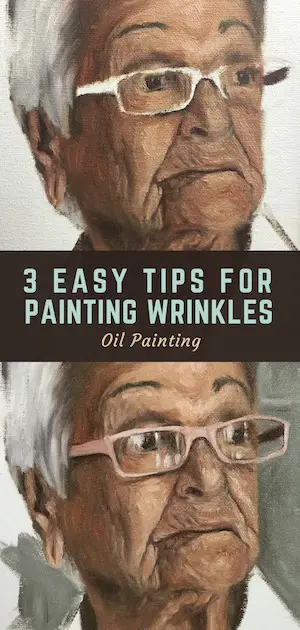
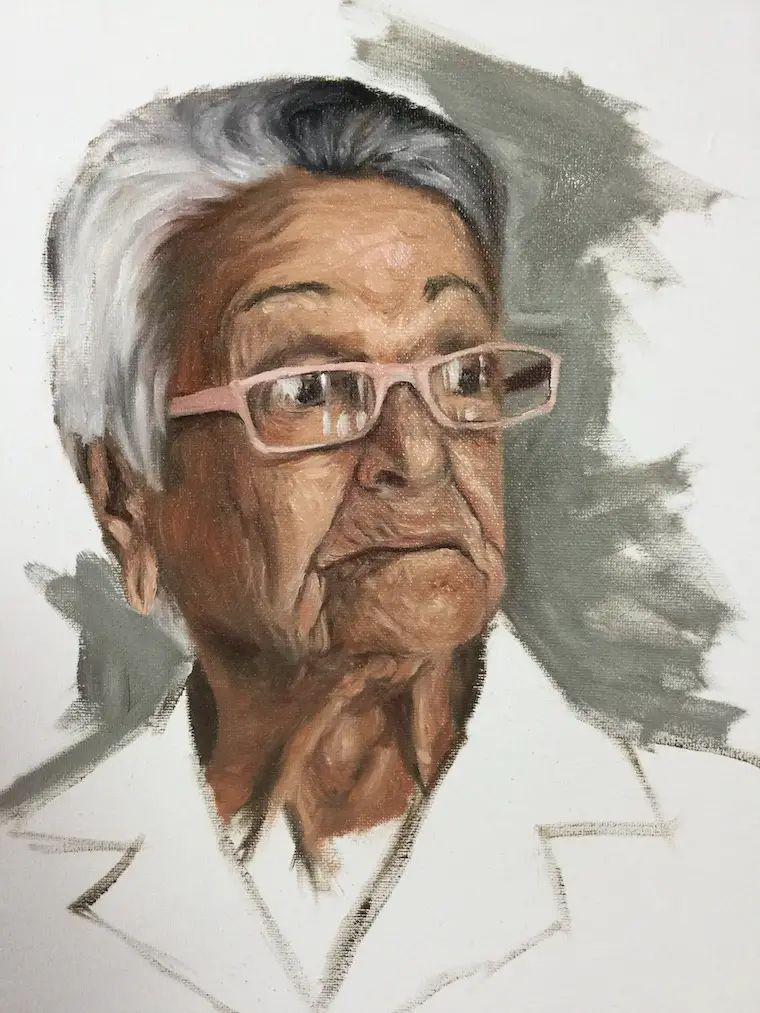
Portrait Painting Tips – Tip 3: Don’t Be Afraid Of Wrinkles
While I may not want wrinkles on MY face, I absolutely love drawing and painting them in portraits. Below is a portrait study I did in oil of this wonderful woman and her infinitely interesting face. She also had glasses on which was a bonus for me. They are a lot of fun to paint for some reason yet to be determined by my conscious mind.

Here I’ve painted in my dark and medium tones, added dark wrinkle lines and am starting to add in lighter tones on the right side of the dark lines. The light source is coming from the right so that’s where the highlights should be.
The 1, 2, 3’s Of Wrinkles
Wrinkles take a little planning and practice. Here is a simple process to get started:
- Paint in your dark and medium tones across the face, going a little darker on your medium tones.
- Paint in the darker lines for the wrinkles – it’s kind of like painting tree branches on a face.
- Start adding in lighter colors and highlights next to the dark lines you painted in, making sure your lighter colors are on the side where the light source is coming from.
If I wasn’t in such a hurry to paint this portrait, I would have taken progress shots of each stage. If you practice the 1, 2, 3’s above, you’ll eventually get the hang of it. For more tips and tricks for painting wrinkles, check out this article.
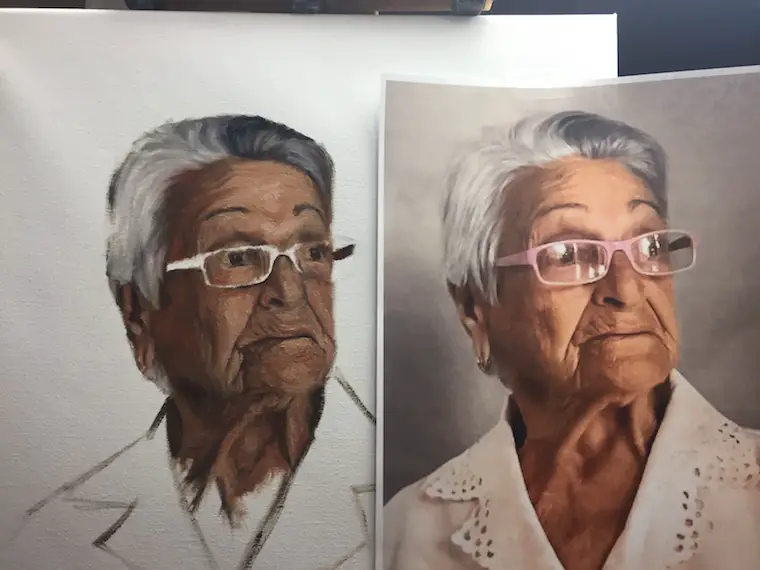
Checking my work against the original image.
The progress photos I took are terrible as the weather was dark and cloudy. Here I am checking my work against the reference photo which was too orange so I adjusted my colors a bit. I still need to add in the brighter highlights to build the form on her face.
Day 9 of the portrait challenge was a study on canvas. I love the colors on this one.
Paint Thick And Try Not To Blend
A couple of other things I did with this painting was lay on the oil paint pretty thick and stopped myself from blending out skin tones. If I had blended too much, her wrinkles would have disappeared. I only had about three hours to work on this painting, so getting super realistic with the wrinkles wasn’t going to happen. I love how it turned out even though I didn’t have time to finish the study.
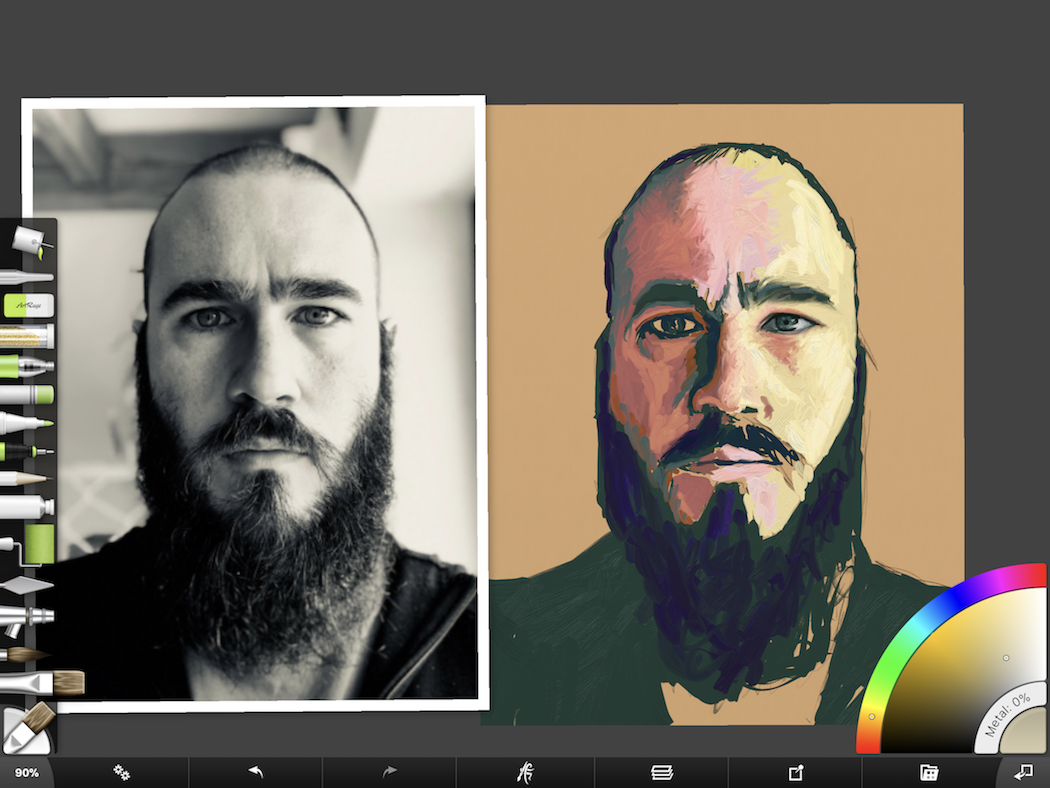
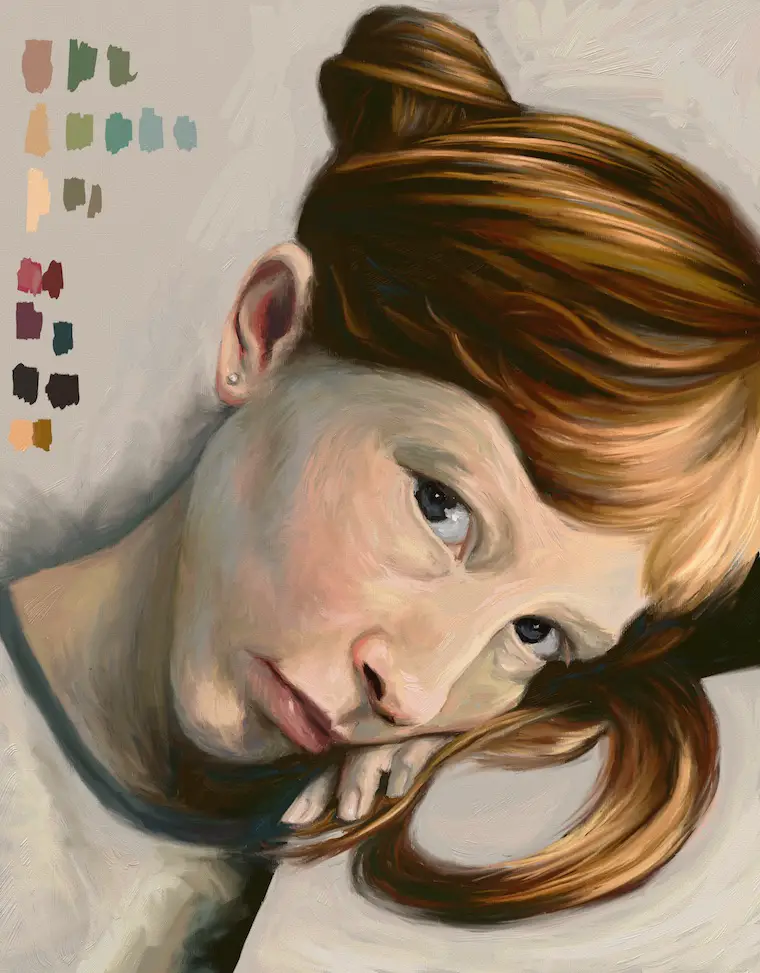
Portrait Painting Tips – Tip 4: Pay Attention To Values
Paying attention to values is the MOST IMPORTANT of all the portrait painting tips. The reason so many portraits don’t look like people is usually because the values are way off. People don’t realize how dark skin tones get in shadows and end up painting what they think they are looking at instead of what they are actually seeing. It’s perception vs. reality!
If you get the values right, you don’t need to worry about details.
In the portrait above, you can see how incredibly dark the face is on the right. I didn’t make the values as dark as they should be on the right side of the face which is making that eye look a little wonky. I don’t think I ever fixed that. Tsk tsk!
What is cool about getting values correct is that you don’t need to paint in every little hair and detail if they are right. The viewer’s brain will fill in that information automatically. If you look at the top left on his head, I didn’t have to paint in all of his individual hairs, I painted in grey tones and created the illusion of a shaved head. It’s magic!
For help with seeing values, I always recommend a grey scale and value finder. It makes a huge difference and forces your brain to see things correctly.
Trying not to blend too much!
Blocking And Blending
The real trick on this portrait was to lay down areas of paint with the right values without blending too much. With the two images above, you can see how I blocked in the values of the cheek on the left side and then with a light touch, did as little blending as possible.
With ArtRage you can sample colors from the original photo which can help beginning artists to understand value differences. This shouldn’t be relied on too heavily though as I’ve found that sampling the color isn’t always accurate. If I do sample a color, I almost always have to change it to a darker or more desaturated color. I usually go darker so I can blend lighter color in to achieve the effect I want.
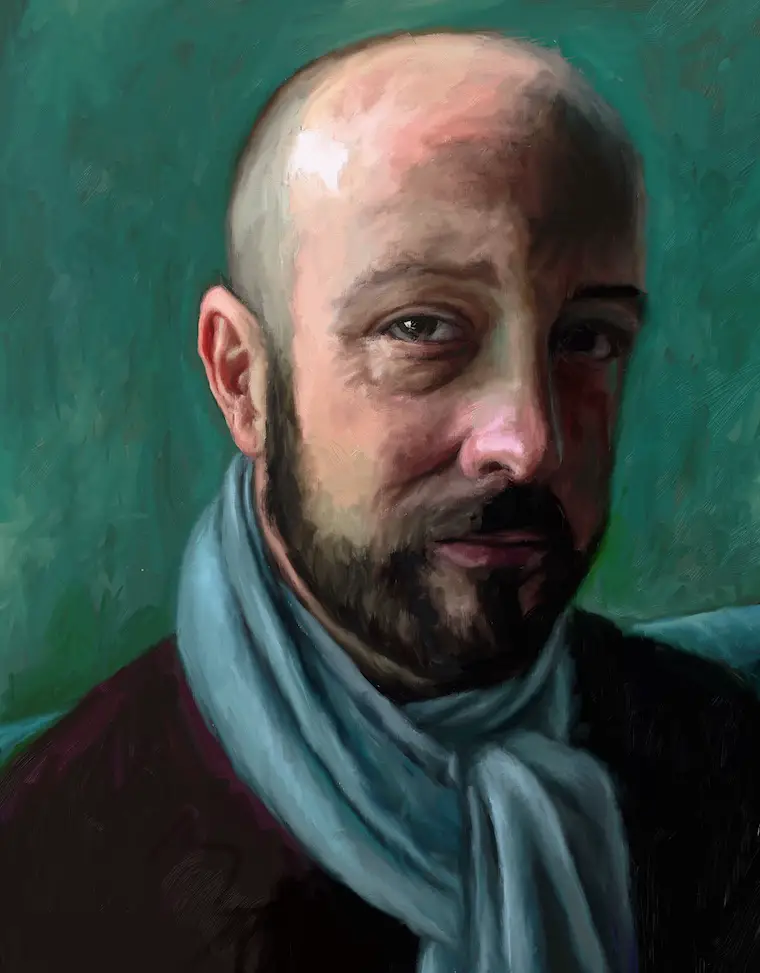
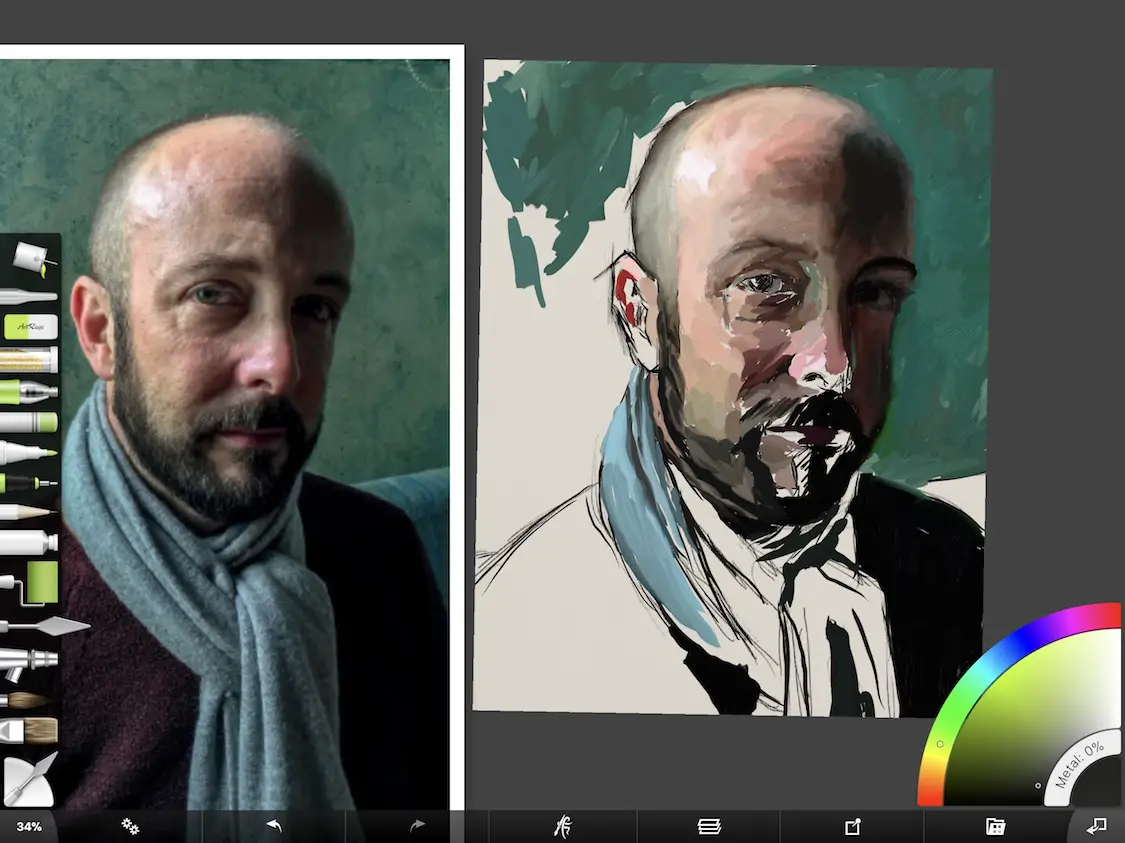
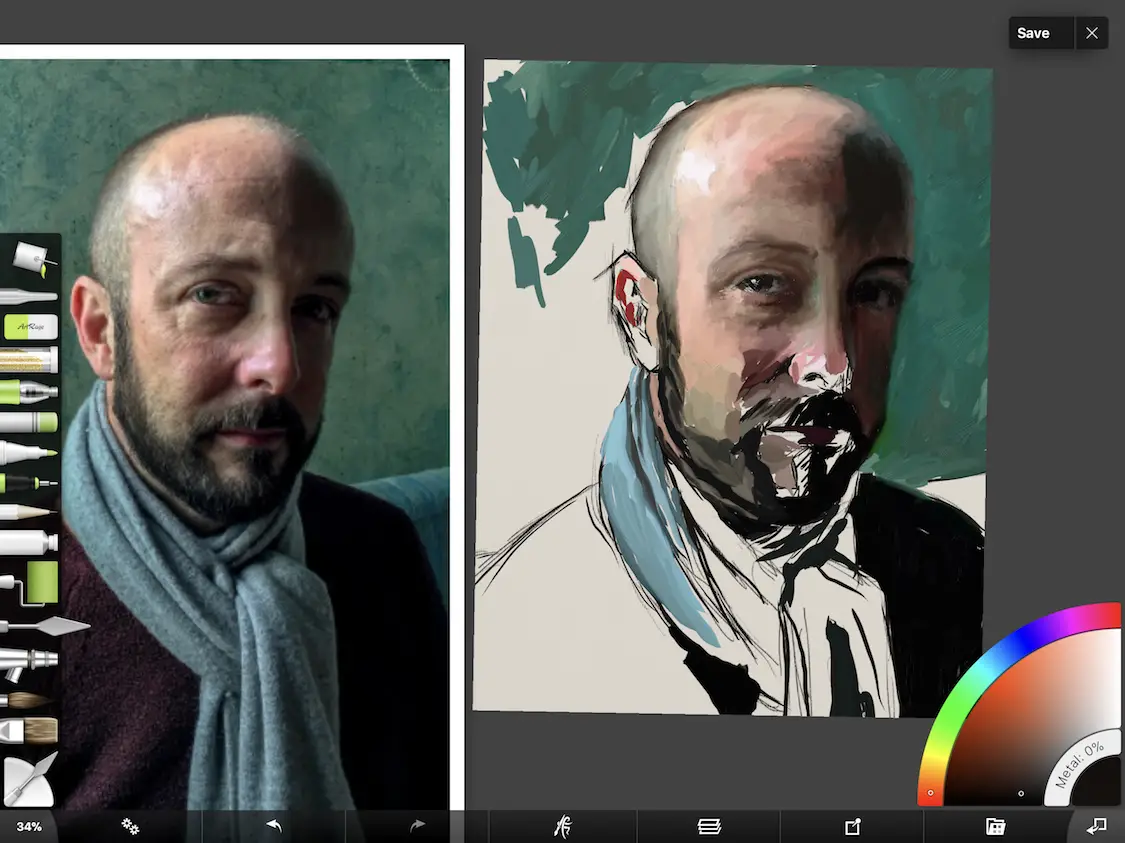
Day 11 of the portrait challenge had a lot of teals! Not a fan of the scarf so I didn’t spend much time on it 😉
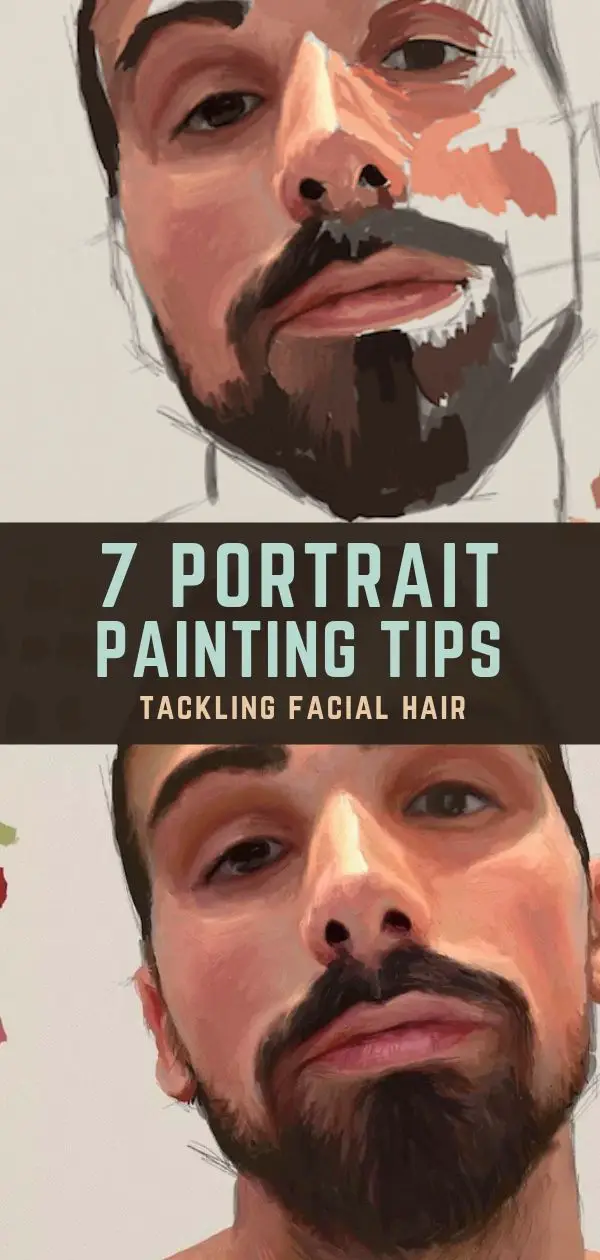
Portrait Painting Tips – Tip 5: Tackling Facial Hair
Another challenge with painting portraits is painting facial hair. Beards are a special challenge because they come in all shapes and sizes.
Facial hair is always a challenge but the trick is to not over-work it!
Some beards are full and bushy and some have thin areas like the portrait above. It is tempting to want to paint hair details, but that can be very time-consuming. Much like tip four, this tip is about painting simple shapes and seeing values. A few details can be added in here and there, but less is more when it comes to facial hair unless you are going for hyper-realism.
One way to see shapes and values is to squint your eyes when looking at your subject. Squinting eliminates detail so the shapes and values become more visible. Above, I’ve blocked in the darkest shapes of the beard and then began painting in the medium values below the mouth.
Day 12 – I didn’t finish it but that also meant that I couldn’t fuss with the hair too much!
In the study above you can see where I went back in on the medium tones of the beard, adding in loose dark marks to give the indication of hair. I then went in and blended minimally. With the hair on the neck, I kept the marks very loose and abstract to avoid getting too caught up in the details.
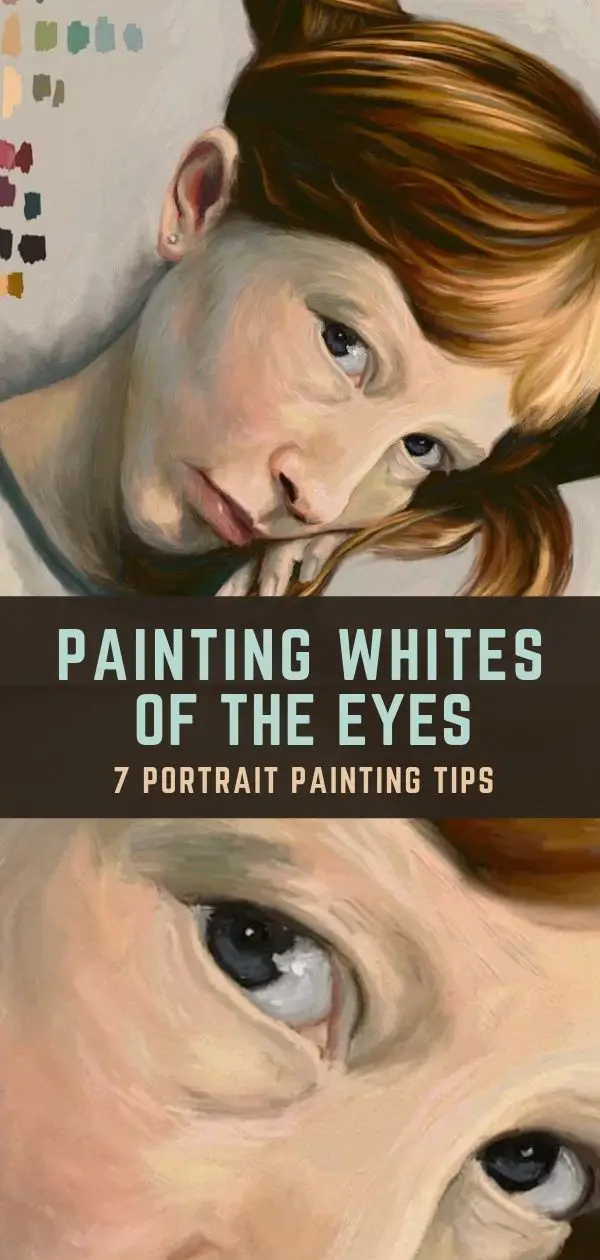
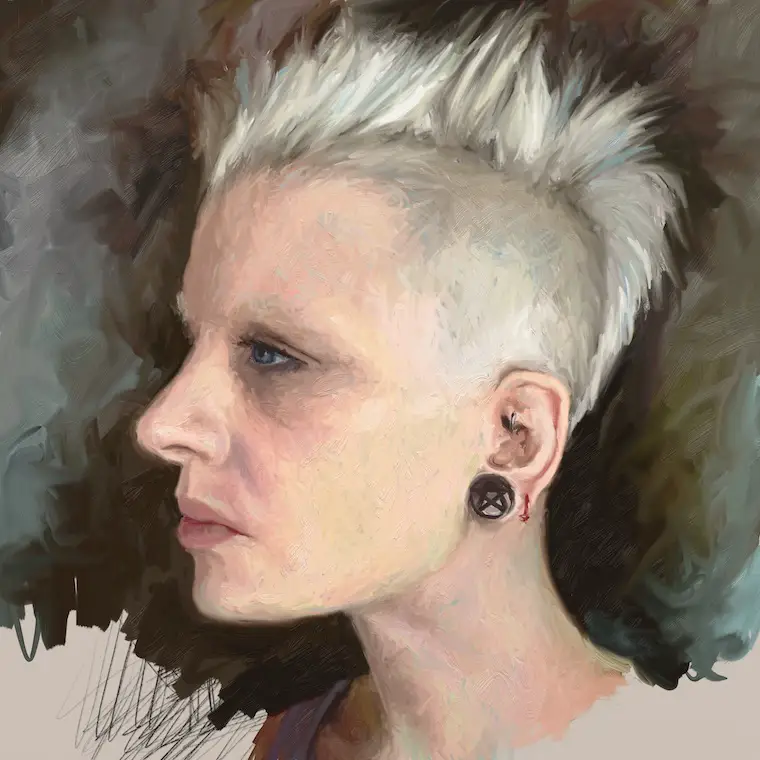
Portrait Painting Tips – Tip 6: Seeing The “Whites” Of Eyes
The whites of the eyes are rarely white. Generally, they are a mixture of greys and sometimes a reflection of surrounding colors.
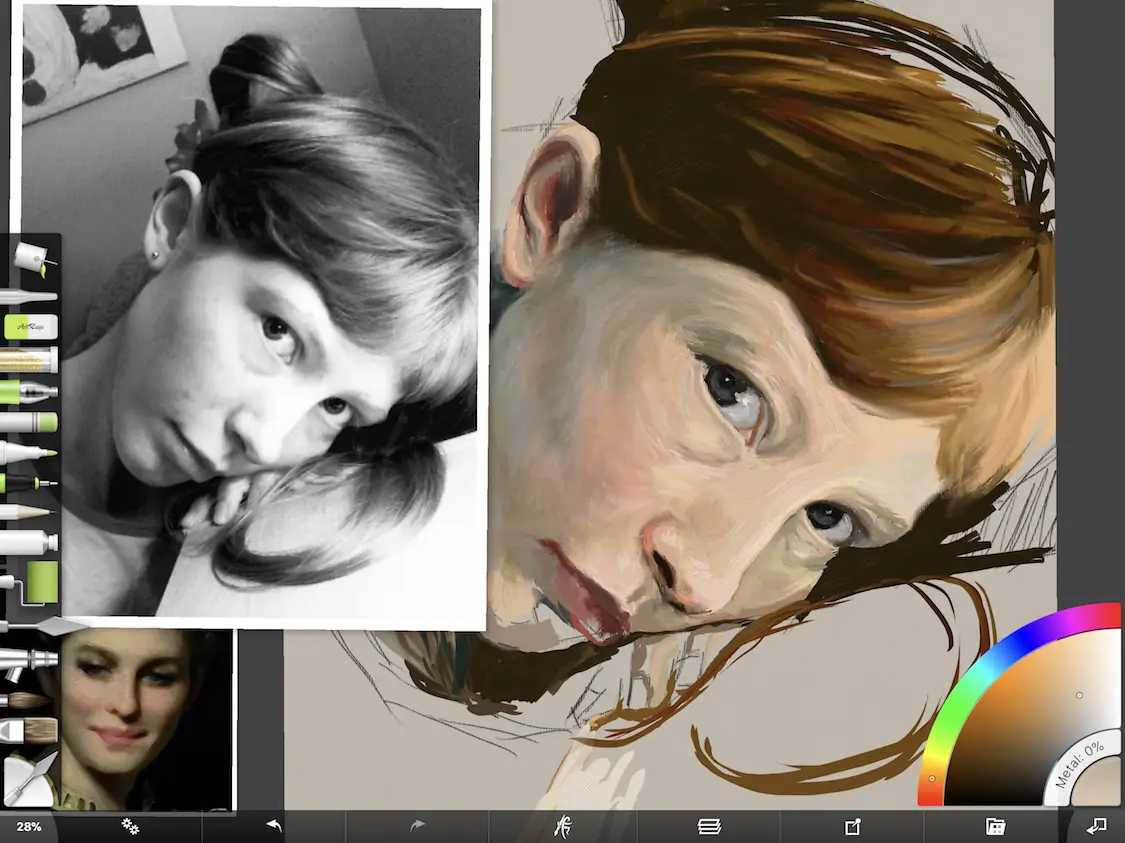
Work in progress
In the detail of the work in progress below, you can see how blue/grey the whites of this girl’s eyes are. If you look at professional portraits, such as those of John Singer Sargent, the whites of the eyes are surprisingly dark. Interestingly, you would never think “those eyes aren’t white” when looking at them.
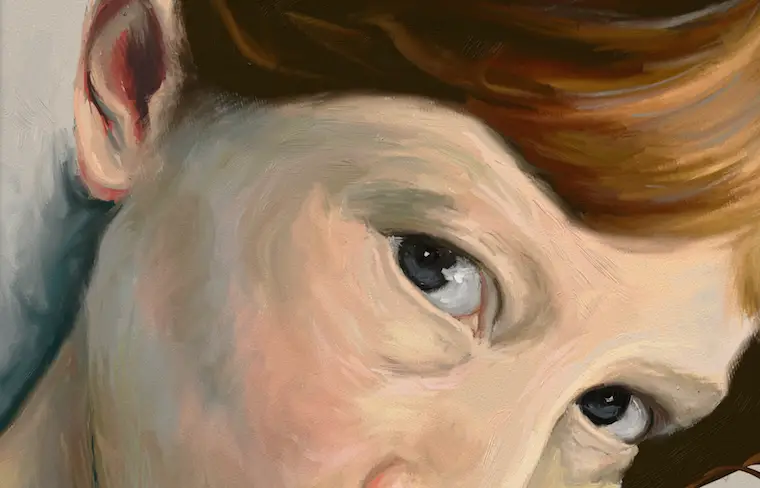
Is there any white in her eyes?
By painting the “whites” of the eyes darker, it allows for bright highlights to be added to create the glassy, wet look on the surface.
Day 14 of the portrait challenge.
Another tip with painting eyes is that most of the time the light source is positioned above or to the side of a person’s face. Because of this, there will be a shadow created from the upper lid. Getting that shadow in helps to create a realistic-looking eye. Honestly, looking at the portrait above more closely, I could have added a little more cast shadow from the upper eyelid on the top of the eyeball. I’ll have to fix that! 😉
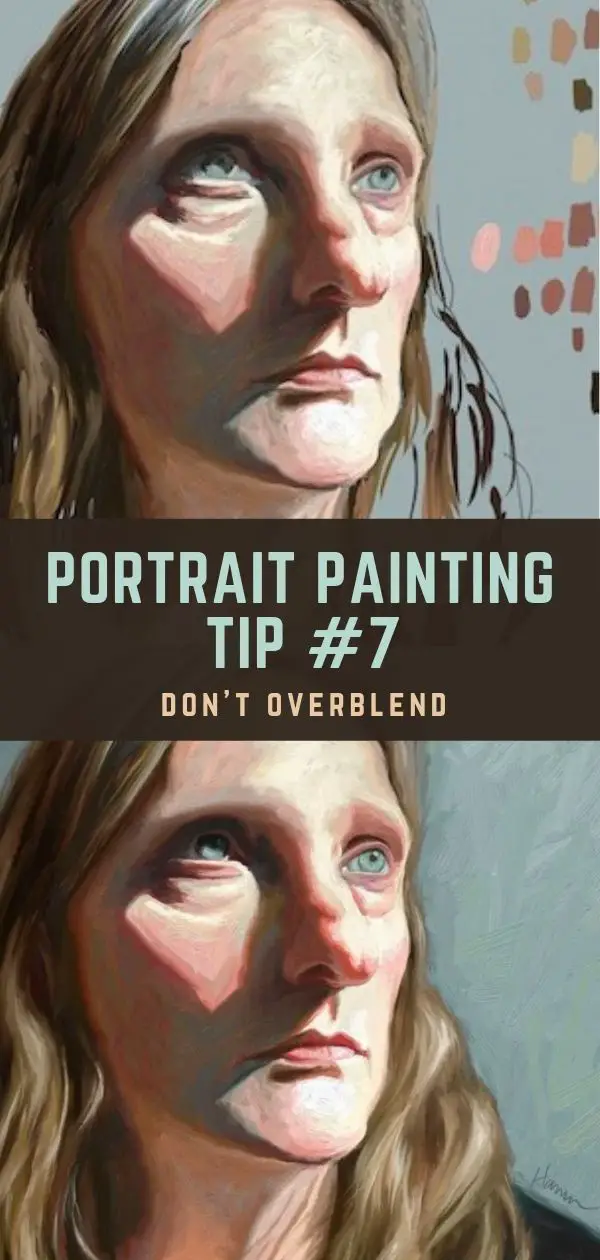
Portrait Painting Tips – Tip 7: Don’t Over-blend
The hardest thing to do when painting is getting the values correct and putting them in the right place. The second hardest thing is to avoid blending those colors too much. Leaving brush strokes keeps an abstract quality to the work and creates a sense of movement and energy.
Laying a lot of color down.
With this painting, I tried to put color down and leave it. Only after the paint was laid in did I go back with the knife tool and lightly blend areas, being careful not to over blend.
Here I’m consciously sticking with the brush tool instead of the blending tool.
As you can see in the finished painting below, I’ve left a lot of unblended areas and visible brush strokes to create energy and visual interest. Of course, this is a style that I like. It doesn’t mean it’s the best style. There are thousands of brilliant works of art where the paint is blended flawlessly, such as the Mona Lisa. I’m certainly not going to say that Leonardo da Vinci didn’t know what he was doing!
Day 21 of the #30faces30days challenge – the final painting
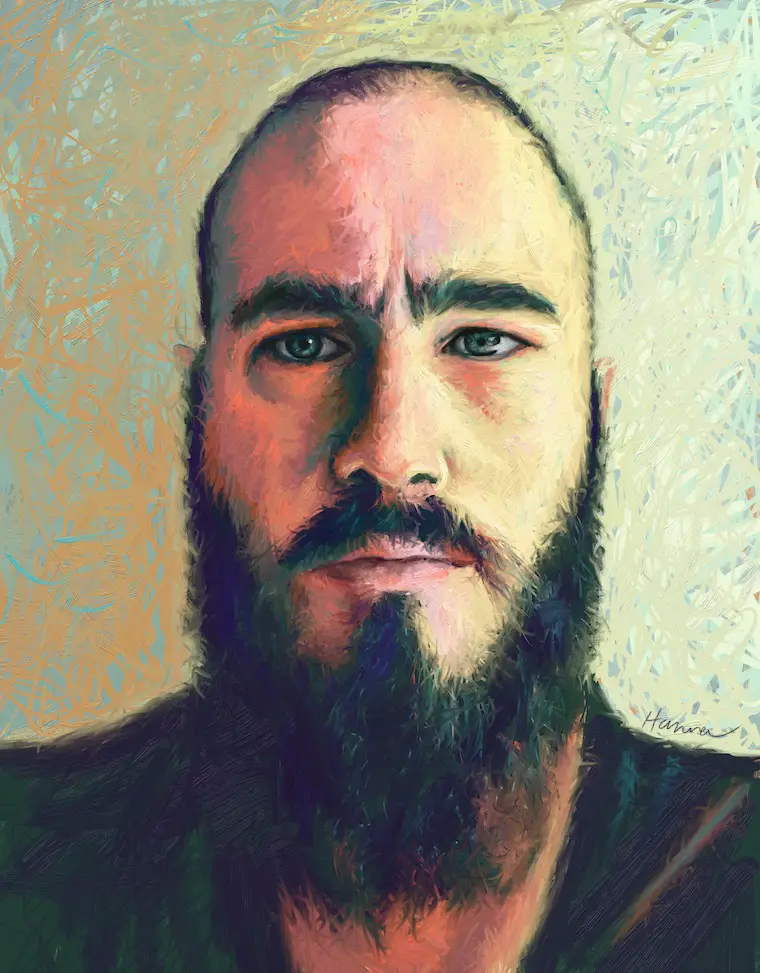
A Bonus Tip! Add Complementary Colors
What would “portrait painting tips” be without a bonus tip? One thing I always like to do is to add subtle complementary colors in the flesh tones of the skin.

Laying down swatches of color, making sure to add in complementary colors as I go.
With the portrait above, I created my own color palette since the photo was in black and white. I made sure to include complementary colors in my swatch palette. On the left side of the face, you can see where I have orange tones that transition down the temple into complementary blue/gray tones.
Blending out a bit to create subtle color transitions.
There are also blue tones around the eyes and mouth. These subtle complementary colors are a part of natural skin tones but are often missed because our brains – which crave efficiency – have simplified skin color to be one solid, even tone. However, this is far from reality.
Day 24 turned out to be one of my favorites of the series.
By adding in the subtle complementary colors, the painting seems more alive because the colors visually “dance” with each other.
That’s All Folks!
This was a lot of information and I hope you found these portrait painting tips helpful. I’m working on some more step-by-step posts that I will share in the near future. Until then, check out some of my other articles that I’ve recently revised on How To Paint A Cat and How To Paint A Dog. I’ve also recently written about how to paint a portrait digitally, so make sure to check that out too. Traditional artists will benefit from that post as well!
Other Popular Digital & Oil Painting Tutorials:
How To Paint White Fur – Painting A White German Shepherd Step-By-Step
The #1 Way To Dramatically Improve Your Painting
How I Paint On The iPad – A Step-by-Step Portrait In ArtRage
https://shelleyhannafineart.com/paint-on-the-ipad-step-by-step/
How To Paint A Cat On The iPad Pro – Digital Painting Tutorial
https://shelleyhannafineart.com/paint-a-cat/
Tips For Painting Silver Objects
https://shelleyhannafineart.com/painting-silver-objects/
8 Tips for Painting Black Fur
https://shelleyhannafineart.com/8-tips-for-painting-black-fur-traditional-digital/
How To Paint A Dog Portrait Step-By-Step In Oil
https://shelleyhannafineart.com/how-to-paint-a-dog-portrait/
Painting A Cat In Oil Featuring Prescott, A Gorgeous Maine Coon Cat
https://shelleyhannafineart.com/painting-a-cat-in-oil/
