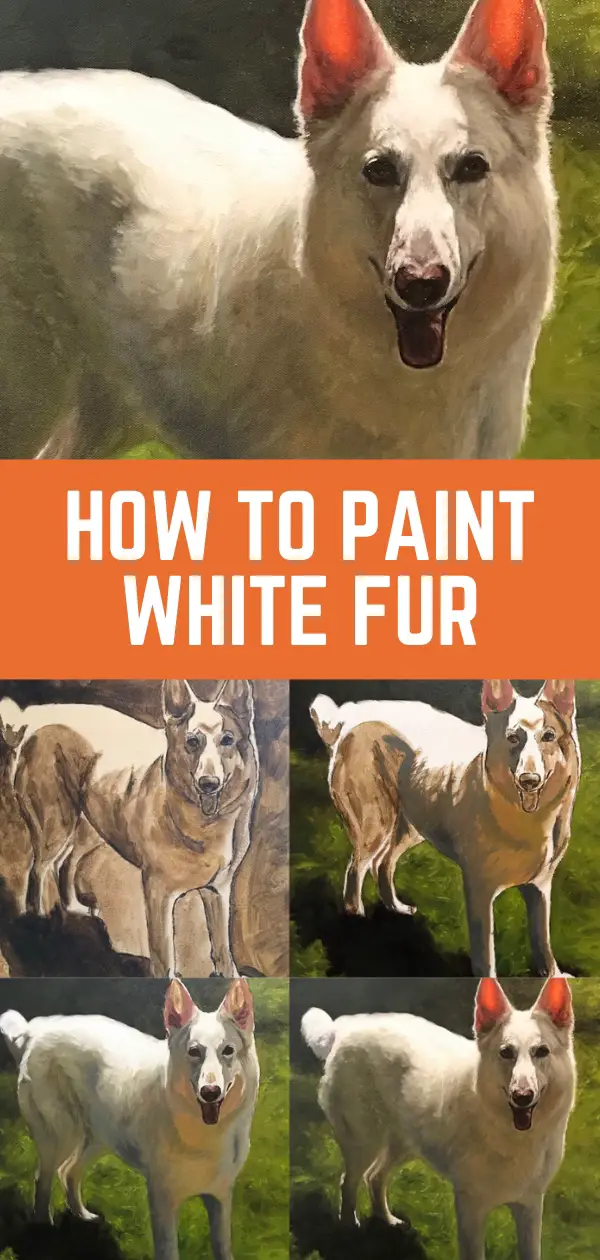
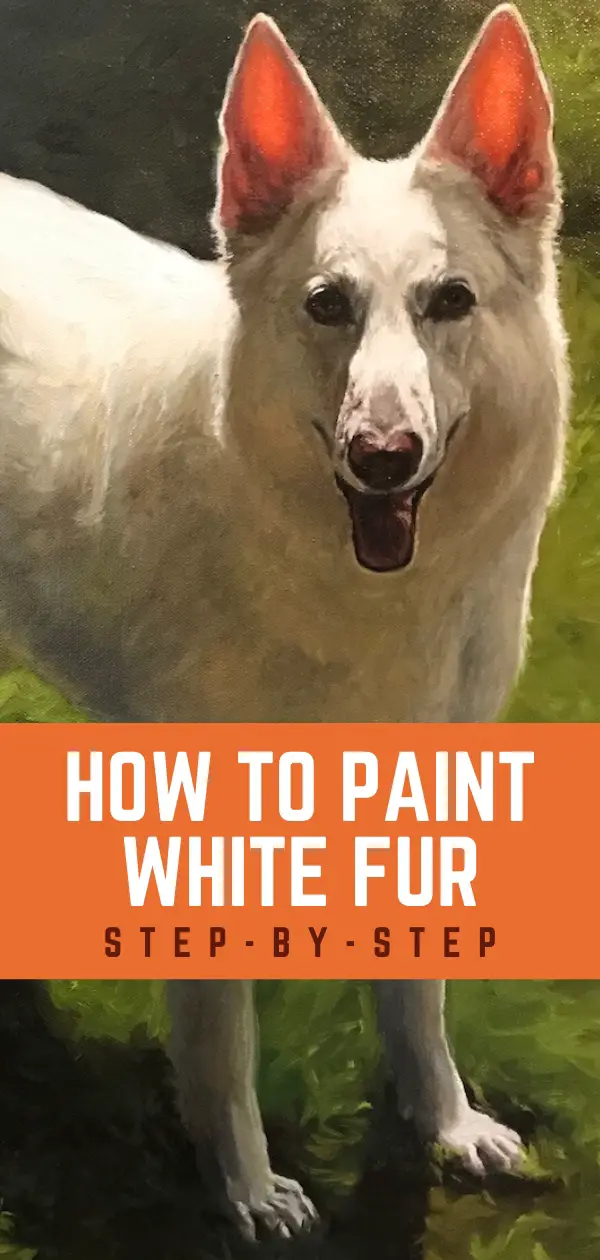
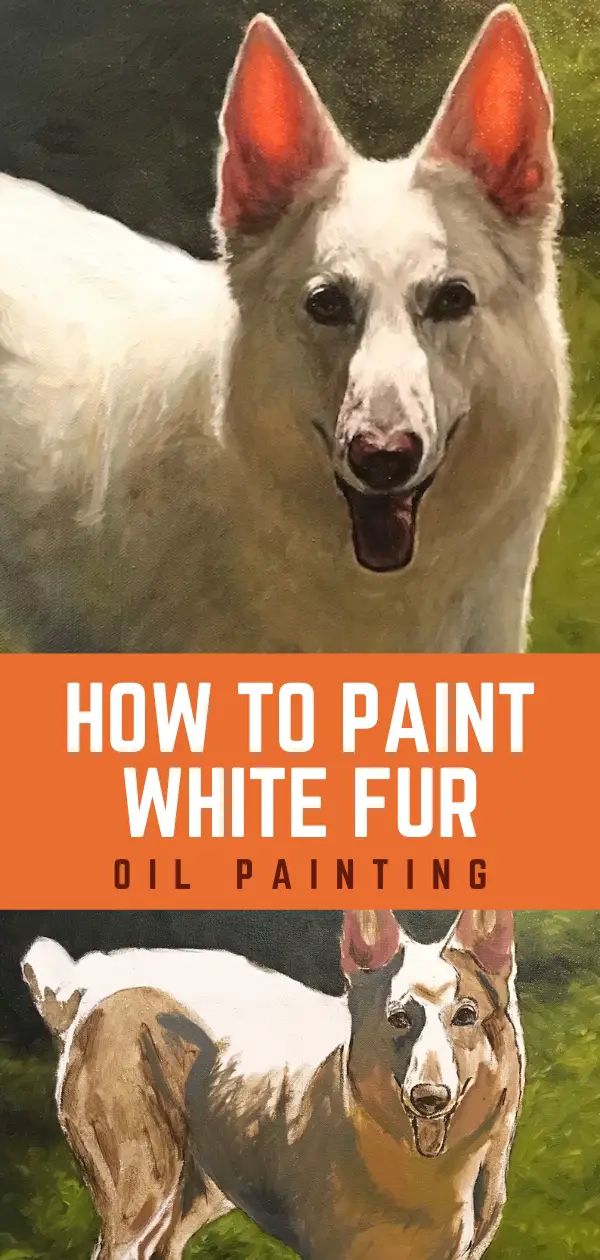
Knowing how to paint white fur may not seem like that big of a challenge until you try it. The trick is to not paint white fur with white paint – at least not at first.
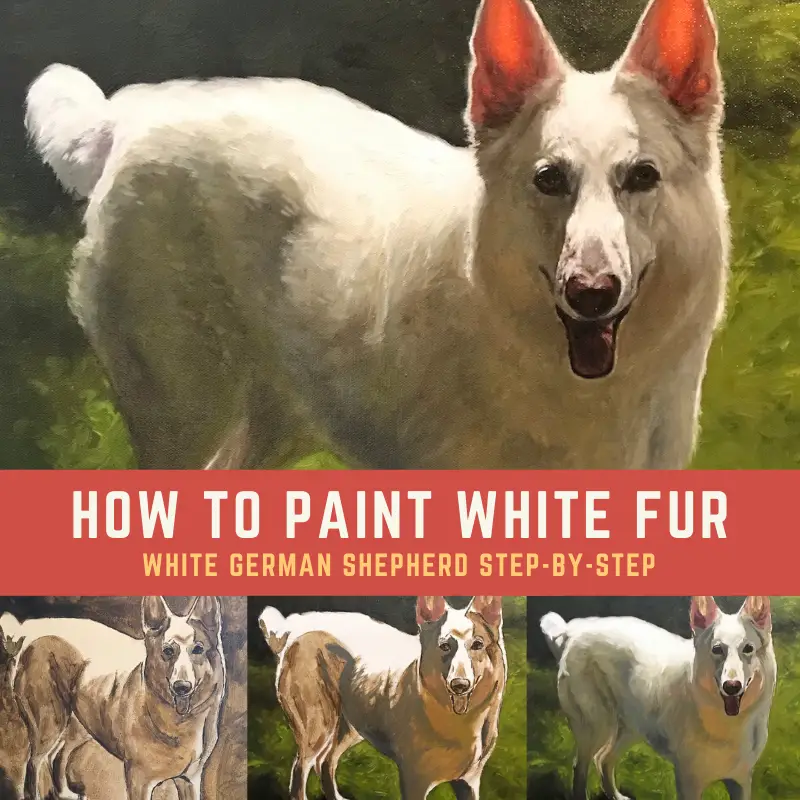
In today’s tutorial, I’ll walk you through step-by-step how I painted this beautiful white German Shepherd named Maiden. I’ll go over some of the challenges I had with the lighting of the fur and how to model it. I’ll also talk about how I decided when to do detail brushwork on the fur, when to keep it more abstract and why.
Step 1 – Canvas Considerations And Tips For Drawing Proportionally
I started out by doing a sketch of Maiden in vine charcoal on a 16×20 stretched canvas pre-primed with acrylic gesso. I would recommend a professional grade canvas rather than the super cheap bulk canvases you buy in multi-packs. Linen canvas is my favorite surface to work on, but for this portrait, I used a professional grade cotton canvas. Canvas panels are an even better surface to work on because they are more stable, but aren’t as readily available in art stores. If you like to try out an oil primed linen panel, the Raphael Oil Primed Panel is fantastic and worth the extra expense.
To get proportions correct, I used a grid and I also printed out the photo of Maiden to the size of the canvas I was painting on. This isn’t necessary to do and I don’t always have the benefit of sizing my reference photo to my canvas, but I went ahead and printed out the photo to 16″x20″. Since my reference was the same size as my painting, I used a proportional divider as well to measure out key points.
You don’t need all of these tricks and tools, but sometimes these things come in handy when you want to get your drawing done and your painting started as soon as possible.
Step 2 – Block In Values With Underpainting
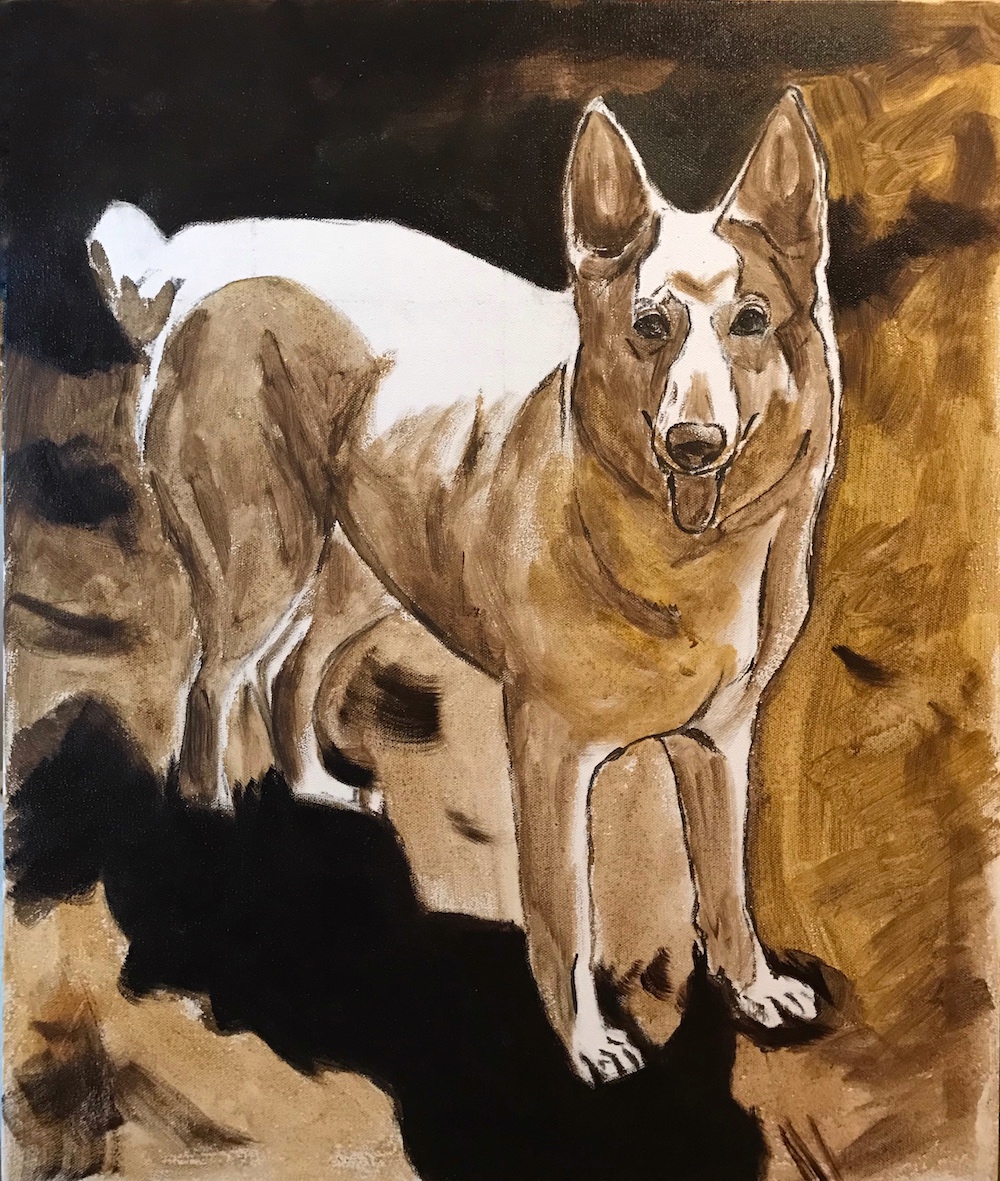
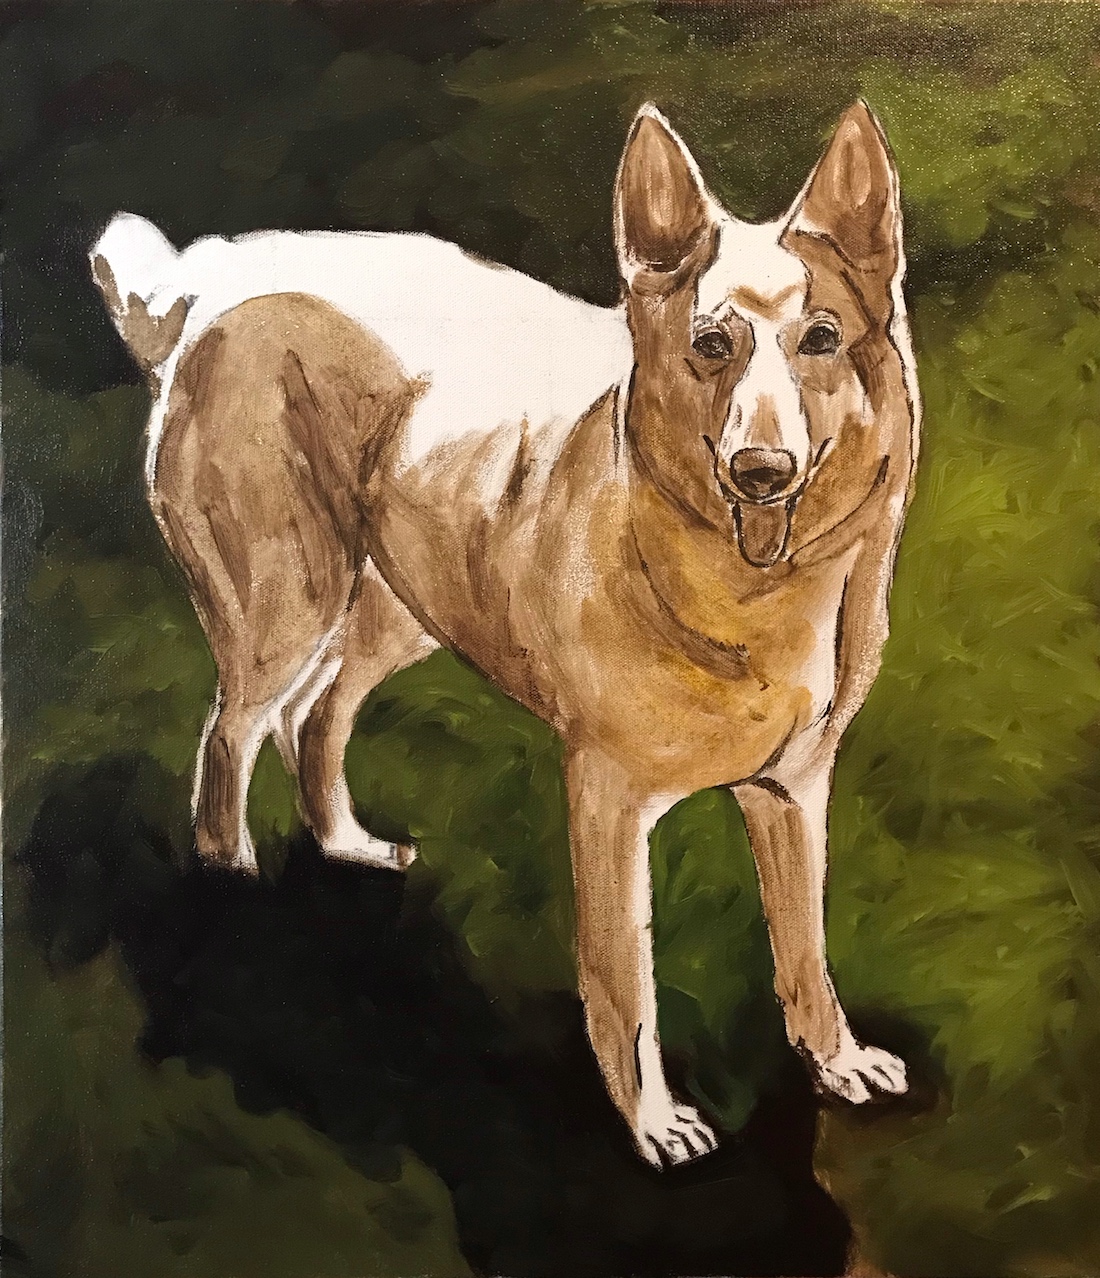
If you’ve been through any of my previous tutorials, you know I stress the importance of getting the values right. Below, I painted over my charcoal drawing with burnt umber and then blocked in the values using a larger brush and thinned out paint. While doing the underpainting, I made sure to squint so I could block out details and see basic shapes created by the lights and darks.

Underpainting in burnt umber
For this painting, I used very light washes of burnt umber and black in acrylic. It’s important to keep the underpainting thin if you start in acrylics. I talk more about this in my article “Can You Paint Oil Paint Over Acrylic Paint”, so feel free to check that out to learn more.
After I blocked in this step, I let the underpainting cure for a couple of days before I moved forward with oil paint.
Step 3 – Block In The Dark Shadows In Oil
I started this portrait painting by blocking in the dark shadow areas. Since this is a white dog, it is really important to get the background values painted correctly. I mixed burnt umber with ultramarine blue and a little Gamsol to lay down this layer of paint. Burnt umber and ultramarine blue make a very nice, rich black. Since the source of light is coming from behind Maiden, the lights and darks were very distinct creating a striking image.
Painting in the darkest values in oil
It looks like I put some white paint down in the image above, but adding the rich dark areas caused the exposure of the photograph to be higher in contrast. This is why it’s important to get your dark values in first. Cameras aren’t the only lenses that will see a higher contrast. The human eye will notice it right away as well. If I didn’t get the darks in, I may start out too light with my paint colors, causing the values of the entire painting to be off.
It’s always better to start out darker because you can add lighter colors later. It’s so much harder to go the other way around. If you have the paint too light too soon, trying to darken things can result in a very murky mess. Once white gets into your dark paint, it’s nearly impossible to get the value darker. It’s better to wipe things off or wait till everything dries and paint over it with a darker layer.
Step 4 – Rough In The Background Color
One of the huge challenges I faced with this painting was getting a green color in the background that wasn’t too overpowering and also was pleasing to look at. Green can be a very difficult color to get right. And in this painting, there are cool-toned shadow greens and warm-toned greens created by the dappled sunlight.
Roughing in the background quickly
As a rule of thumb in painting, cast shadows will have cool tones while areas receiving the light will be warm. Being aware of this throughout the painting helped me to keep the colors under control while I worked through the portrait.
I also was starting to formulate in the back of my mind how detailed I wanted to go with the grass. Painting in every single blade was not going to work for me, so sticking with a loose brushstroke looked like the way to go. I knew I didn’t need to go overboard with a great amount of detail as long as I got the values right. I also wanted the focus to be on Maiden’s face rather than the bright green behind her. Adding detail in the grass could have caused the viewer to focus on the wrong thing in the portrait.
Step 5 – Doing Color Studies On The iPad
I have to admit that I was not sure how to do Maiden’s face with such a strong light source casting shadow over her face. So instead of working out the colors on the canvas, I decided to use my iPad to help me work through some of the areas I thought would give me trouble.
You do NOT need an iPad Pro to do this. Simply doing a small color study on a spare canvas or canvas pad would do the trick just as well. I love this canvas pad from Amazon because it’s not paper resembling canvas, it’s the real thing.
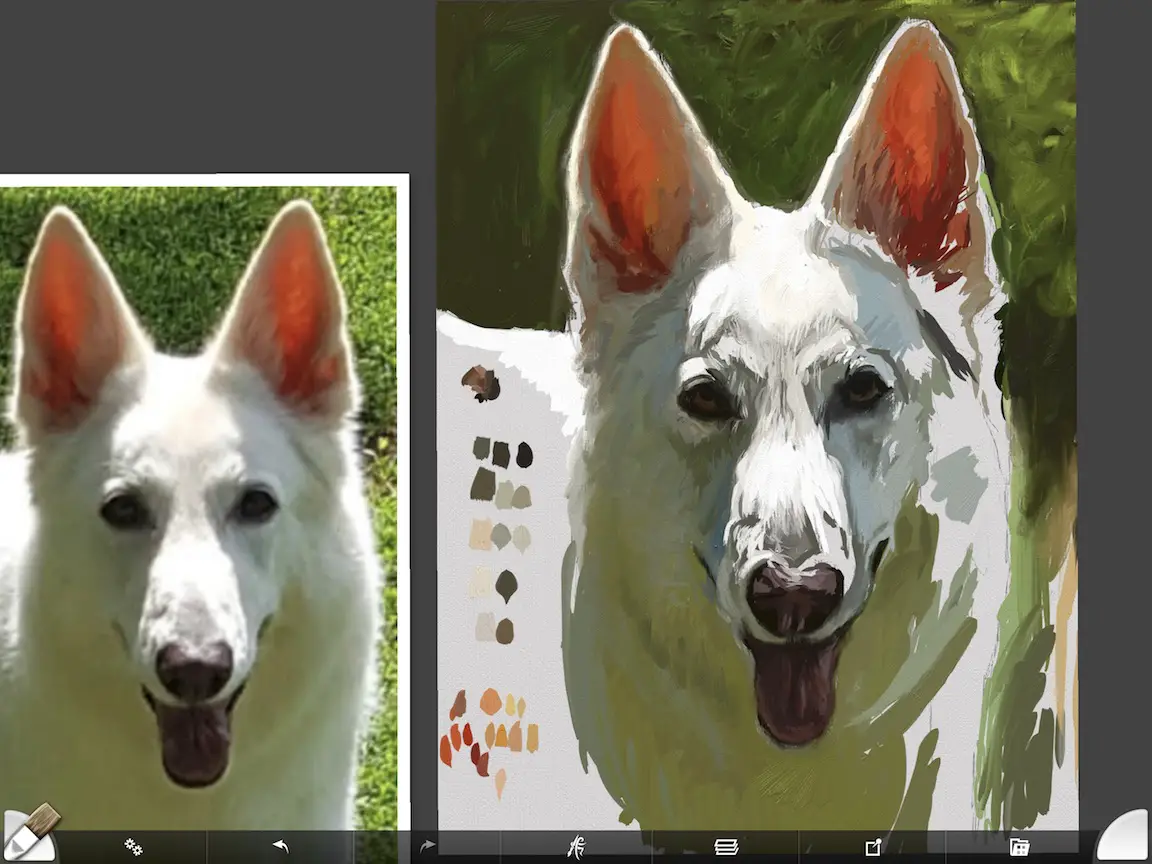
Color and value study using the iPad Pro
I’ve found that my iPad Pro is a great tool for working out parts of the painting I’m struggling with. I use ArtRage, which is as close to painting with real paint digitally as far as I’m concerned. I can do this while sitting on my couch at home or waiting for the oil to be changed in my car. It’s very convenient but doesn’t do the work for you. As you can see above, I was more concerned with values than brush strokes. I also painted four or five versions of her eyes to help me figure out how to handle them later on in the painting.
Step 6 – Adding Dark Tones When Painting White Fur
After I solved the problem of how I was going to paint Maiden’s face, it was time to continue moving forward with the white fur.
As you can see below, I started out with a very dark blue-grey color. I did this by mixing black with a touch of yellow ochre and a very small amount of warm white.

Painting in the darkest fur values to model the form
The darkest values were on the sides of her legs, under her rib cage and a couple of other places around her eyes and chest that weren’t receiving any light. By establishing these very dark values first, the form of Maiden’s body immediately started to take shape.
Beginners may make the mistake of thinking something that is white couldn’t have so many dark tones in it, and end up painting everything too light. I know I’ve done this before. You can’t get a white whiter than white, so starting darker will give you all of the range of values you need to create the form properly.
Squinting your eyes throughout the beginning stages is very important so you can see your values properly. If you squint your eyes on the photo above, you can see the form take shape.
Painting in the medium fur values including reflected colors from surroundings
Step 6 – Add Medium Tones To Continue Building Form
If you look closely at the photo above, you can see that I’ve added a variety of medium tones including blue-grey, a warm green-grey, a dark celery color, and a dark peach color.
The blue-grey colors are on the cool side of the shadows and the warm green-greys represent a reflected light from the environment around her. I always like to use golden blush or peach tones whenever I paint white fur as it adds warmth and is a nice complementary color to the blue-greens.
Complementary colors add a level of excitement and emotion to a painting. Think of why sunsets are so beautiful to look at. They are bursting with complementary colors with all those orange, yellow, purple and blue colors.
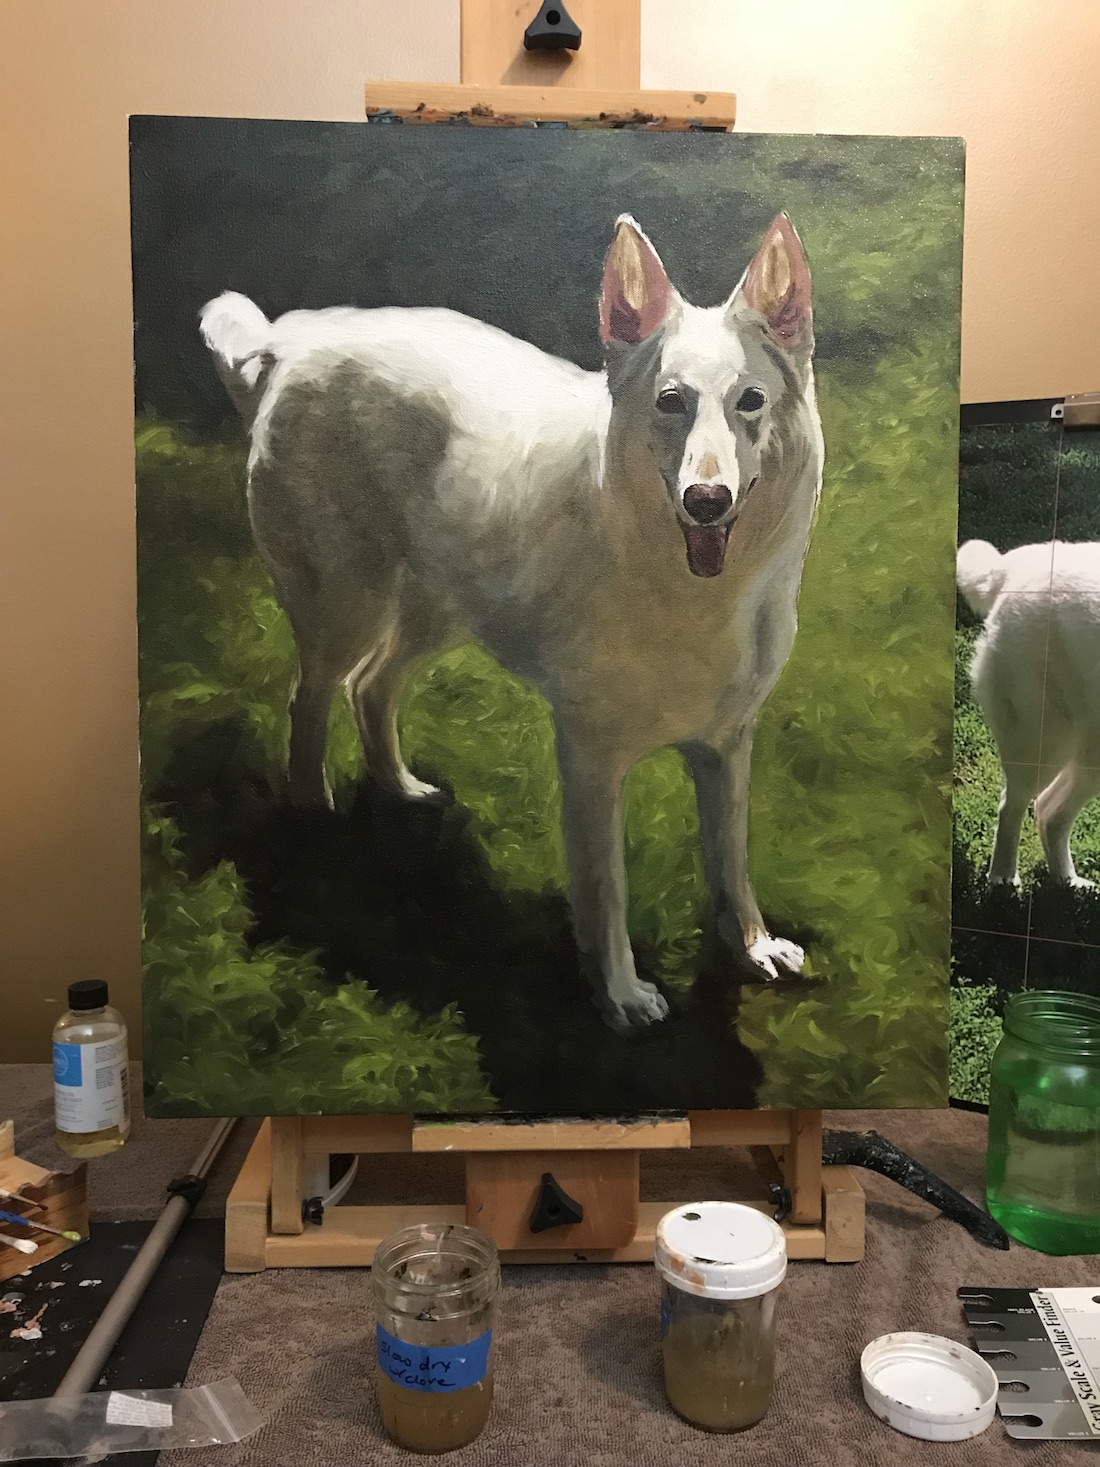
Step 7 – Adding In Facial Details
I usually like to get the eyes of a portrait in right away, but I saved it for later since I was unsure of how I was going to paint them.
Adding in the nose and tongue
I always feel like the eyes are the anchor and focal point of any portrait, but in Maiden’s portrait, her eyes were in shadow. This made them less prominent in the overall painting. Nonetheless, I still wanted her eyes to be special but waited towards the end of the painting to get in the detail.
Instead of fixating on her eyes, I started in on her nose and mouth. While the eyes can capture a personality immediately, it’s the totality of the entire face that makes a portrait memorable. You don’t need to get overly detailed with any of this if you concentrate on the right tones and values.
Filling out the fur without getting too light too soon
Step 8 – Fluffing Up And Modeling The Fur
In this step, I decided to go back to finishing the fur before it dried too much. I used a fairly big brush and worked quickly. I made sure my brush strokes went in the direction of her fur pattern and kept everything loose. Using more abstract brush strokes can create a sense of movement which brings the painting to life.
I also used a warm white at first when I started to lighten the values. This kept me from getting the whites too bright. I reserved titanium white for the highlights where the sun was hitting the fur.
Starting on those amazing ears
Step 9 – Getting The Sunlight To Shine Through Her Ears
While Maiden is a very striking dog overall, it’s her ears in this painting that really steal the show. As you can see above, I started to add in the brighter orange color in her ears. This was made by combining alizarin crimson, rose quinacridone, cad yellow and yellow ochre where needed.
First, I painted in the centers of her ears with the brightest yellow/red combination as you can see above. Then I stepped down the color by adding in more red tones and also worked in some burnt umber. The blood-red parts of the ears are created with alizarin crimson and burnt umber (see below).
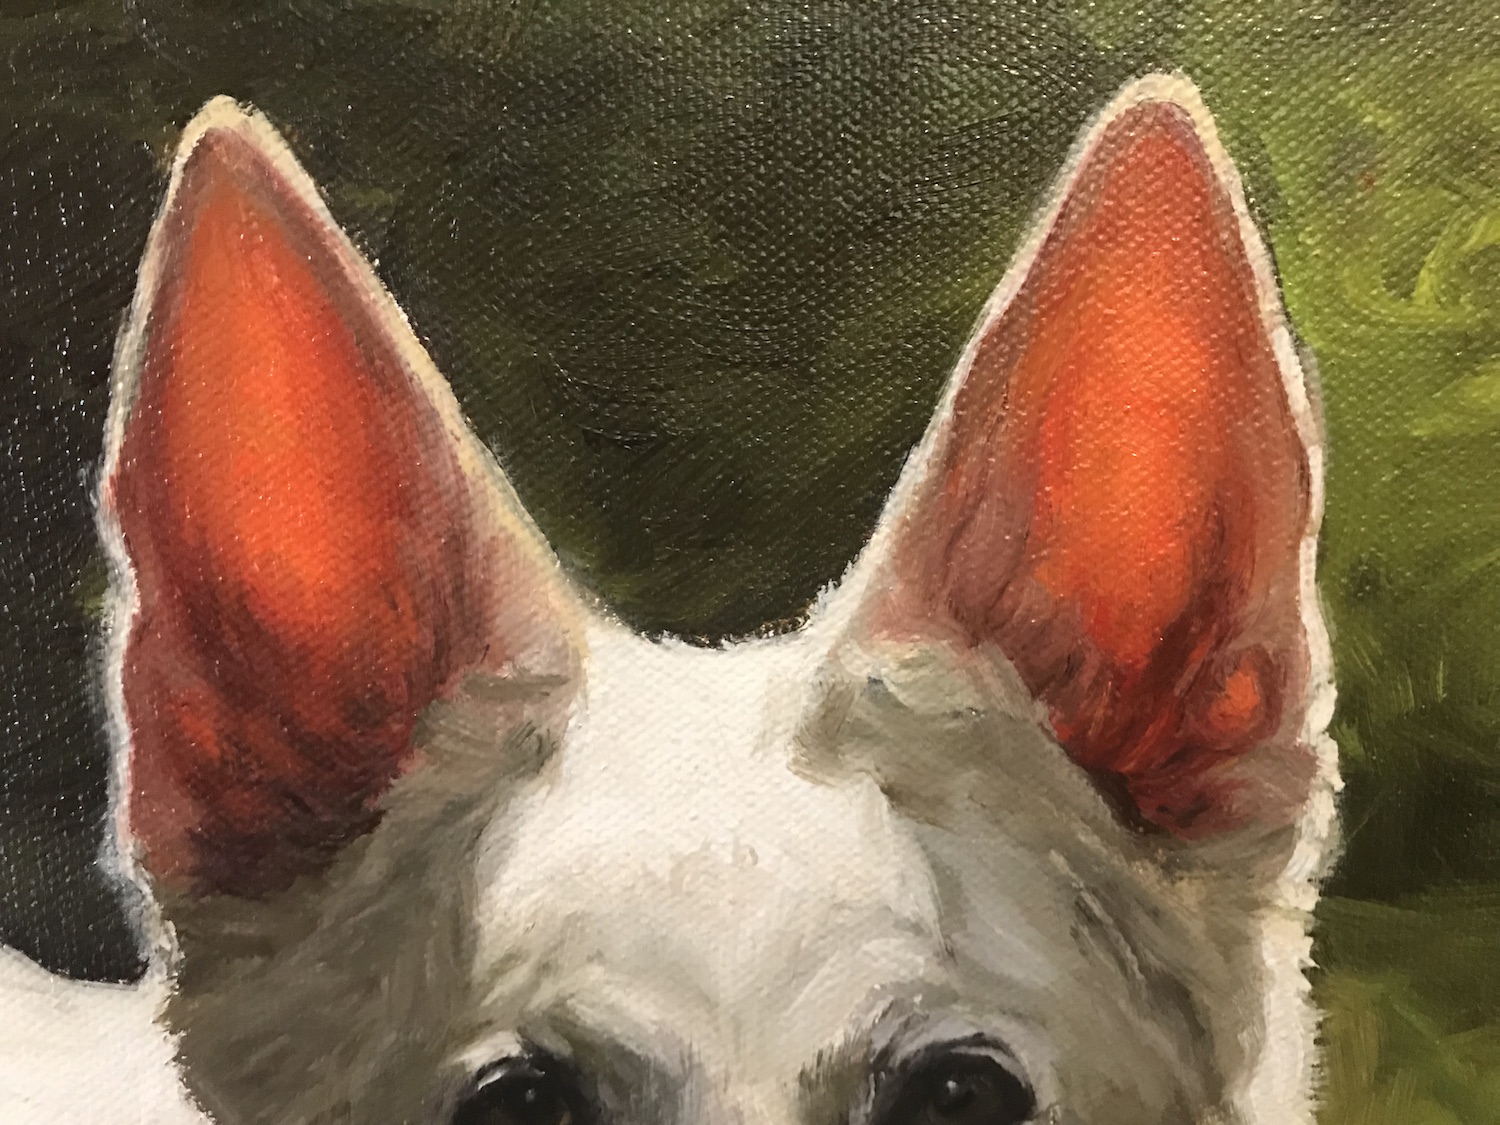
Close up of creating the illusion of light shining through the ears
As you can see in the ear detail photo above, I continued keeping my brushstrokes very loose. I’ve mentioned in past tutorials that I don’t always get to a high detail finish on my portraits. Many times I’m working from fairly grainy photos and it’s nearly impossible to see detail on them which is fine. I know I can go in and add detail in places I want people to focus on.
Sometimes I have to make this up by researching images of similar dog breeds online. I researched a lot of White German Shepherds on Google before I got started on this portrait.
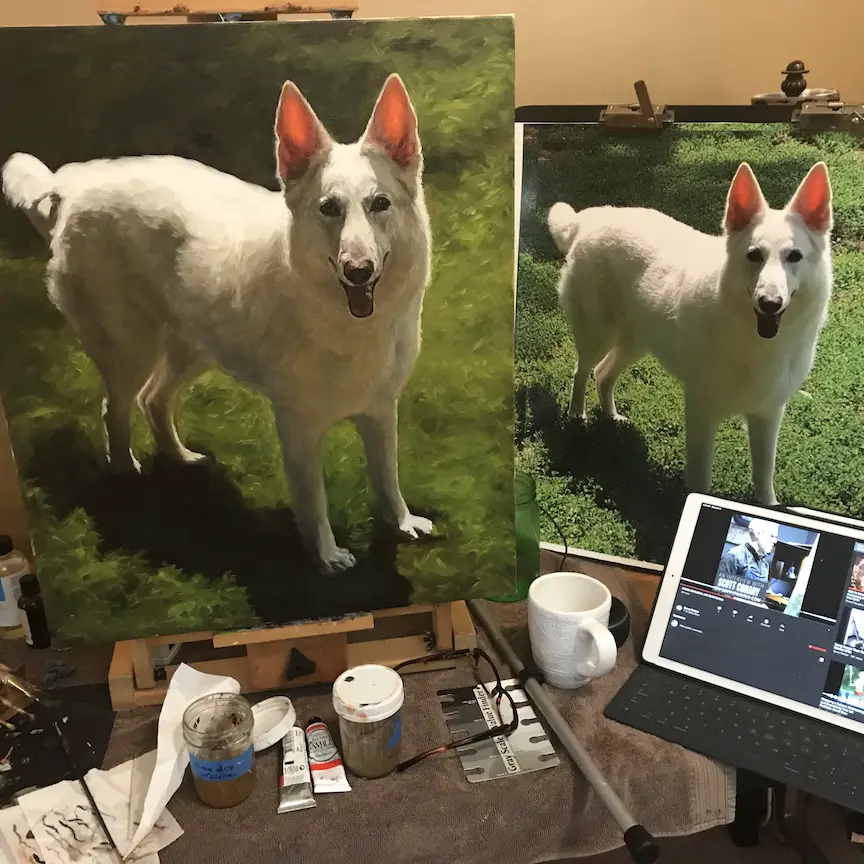
Step 10 – Making Comparisons To The Reference Photo
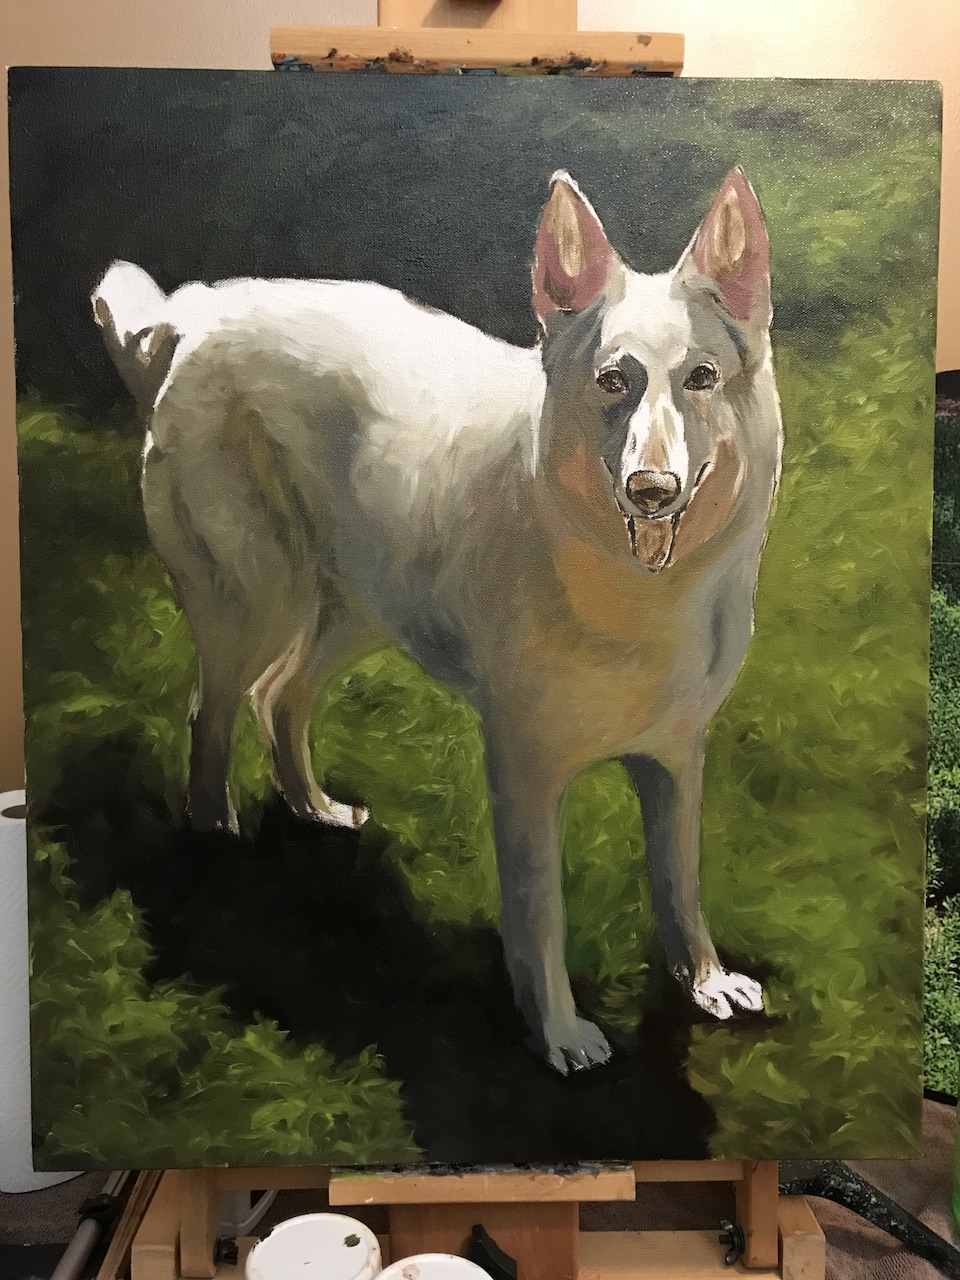
Below you can see me comparing my overall composition to the printout of the reference photo. The reference photo is a foot or two behind my easel, so it looks smaller, but I can assure you that they are the same size.
One of the reasons for printing out a reference photo to the same size as the painting is so you can use the sight-size method. Ideally, you would have your image of the same size right next to the canvas so you can move your eyes back and forth quickly between the original and the painting. By moving your eyes back and forth, it is easier to spot differences.
I talk more about this in a digital tutorial of a portrait I did and go into more detail. It is much easier to do using a real canvas than a digital canvas.
Checking against the reference photo
Another trick I like to use when comparing my reference to the painting is to take a photo of the painting as I make progress. That is where these photos came from. When you see the painting really tiny on screen, it helps you to spot areas you need to work on.
Step 11 – Finishing With Detail Work
Below is a close up of Maiden’s face. The image is slightly darker than the actual painting, but you can see where I’ve added detail. I went from a fairly large brush in the beginning of the painting and kept getting smaller as I got closer to finishing. By the time I got to the details on Maiden’s face, I was using a very tiny brush.
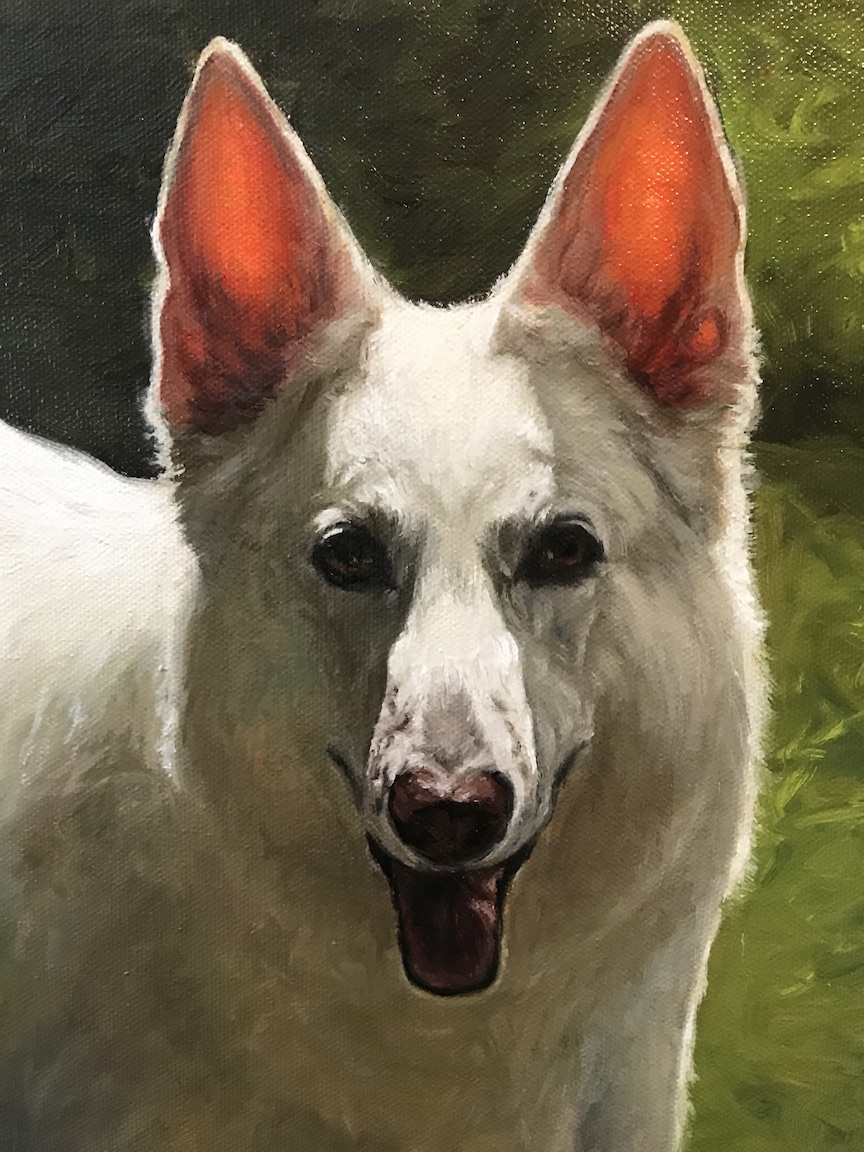
Close up of the details in the face. I added a little light to the eyes to make them sparkle just a bit.
Even though I was in tiny brush mode, I still kept most of the strokes pretty abstract. I know I keep beating the drum of matching values, but I don’t think I can emphasize enough how important values are – especially for beginning artists.
When the values are right, the human brain reads and understands the information correctly. The brain is very efficient and will fill in details for us. I didn’t need to paint every strand of hair on Maiden’s face, because when you look at the painting as a whole, it reads as white fur on a white dog.
By the way, look at how little white paint there is compared to dark paint. The brightest whites really pop off the canvas because of the darker values all around them.
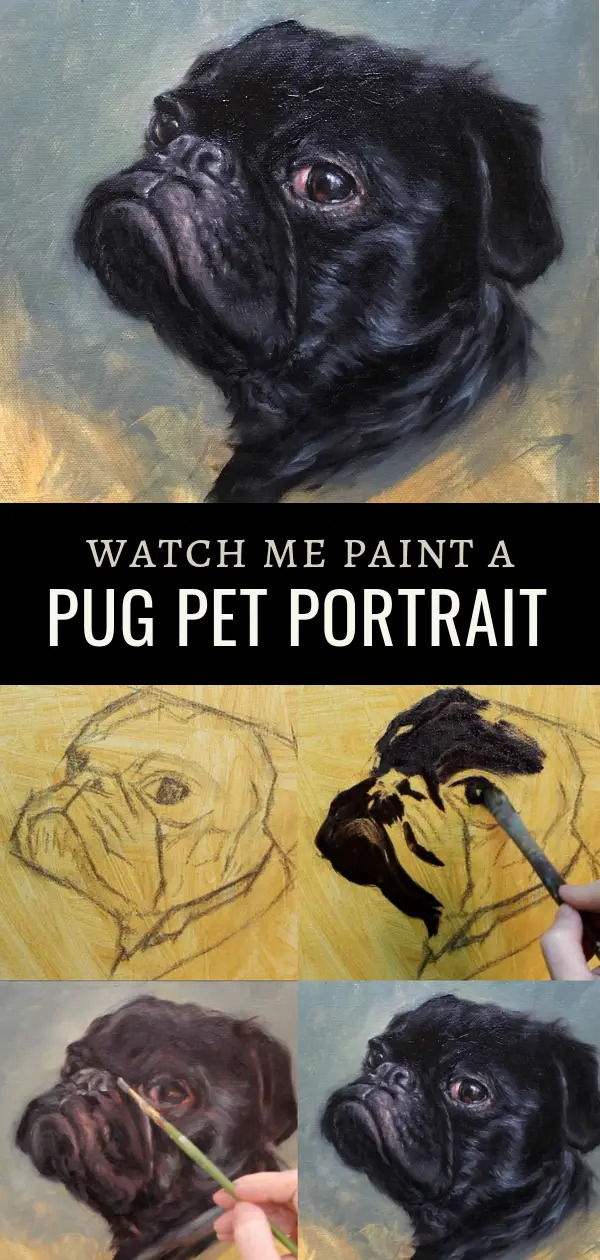
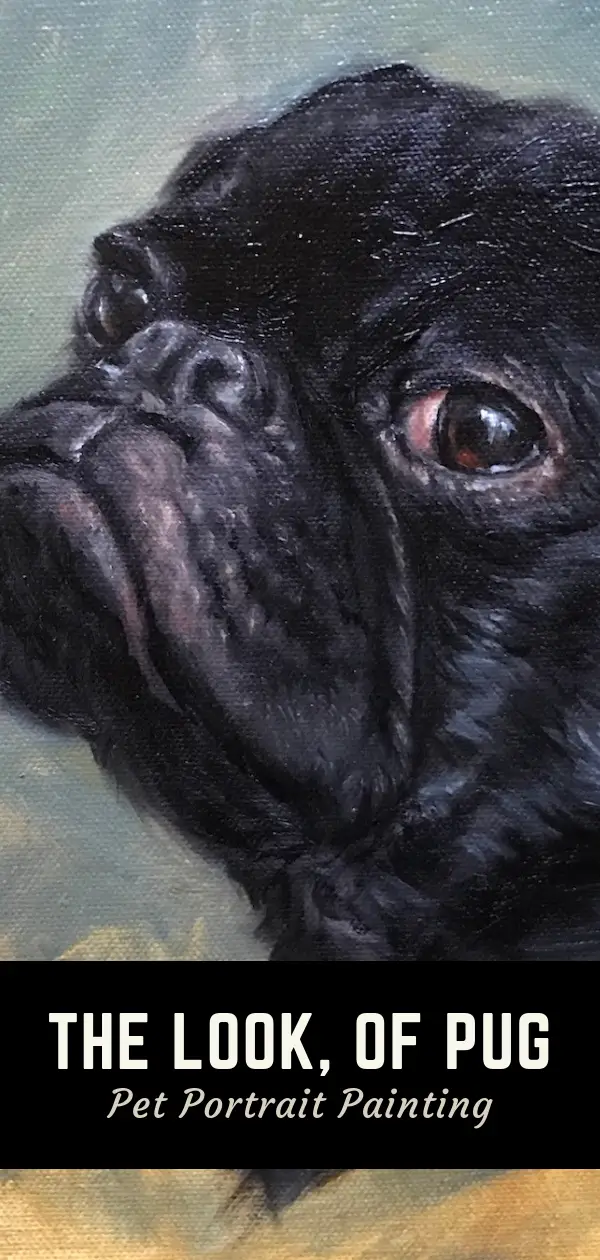
Using A Gray Scale And Value Finder
I don’t know which is harder, painting white fur or painting black fur, like the portrait of a pug below. Both are a challenge, but a simple and inexpensive Gray Scale And Value Finder can be a tremendous help along the way.
Mine is in pitiful shape because it soaked up some oil, but it still works and helps me to identify where my tones need to be lighter and darker. You can find your value on your reference photo and then move it over to your painting to see if your value is lighter or darker.
It may also help to take a photo of your painting and convert it to black and white. Sometimes that can help you to see where the values need to be darker and lighter.
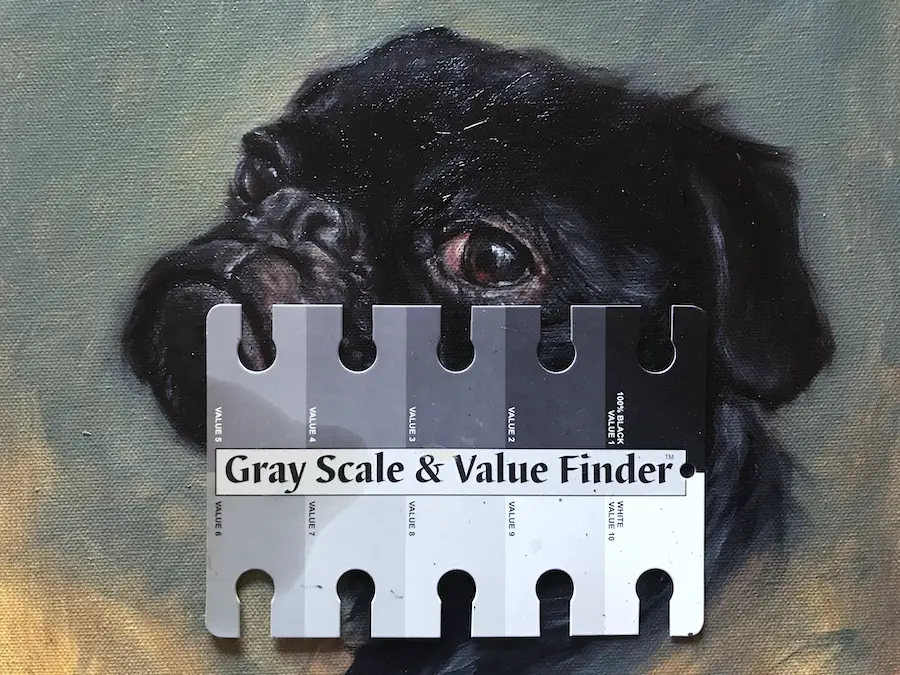
Using a Gray Scale & Value Finder can help you figure out how light or dark a color should be
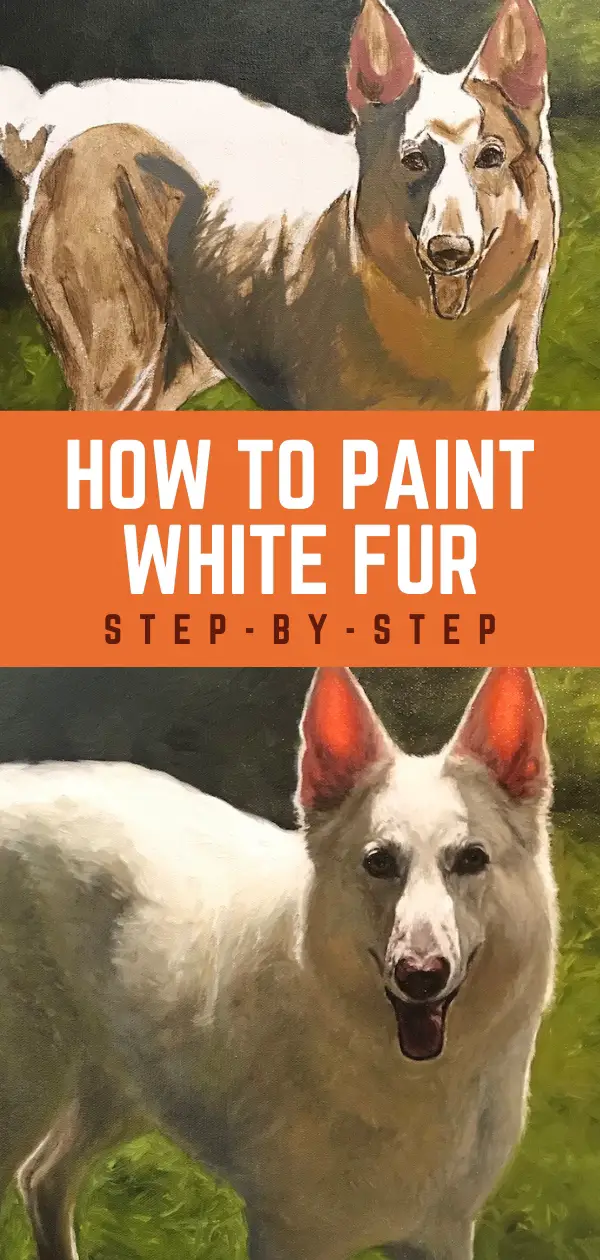
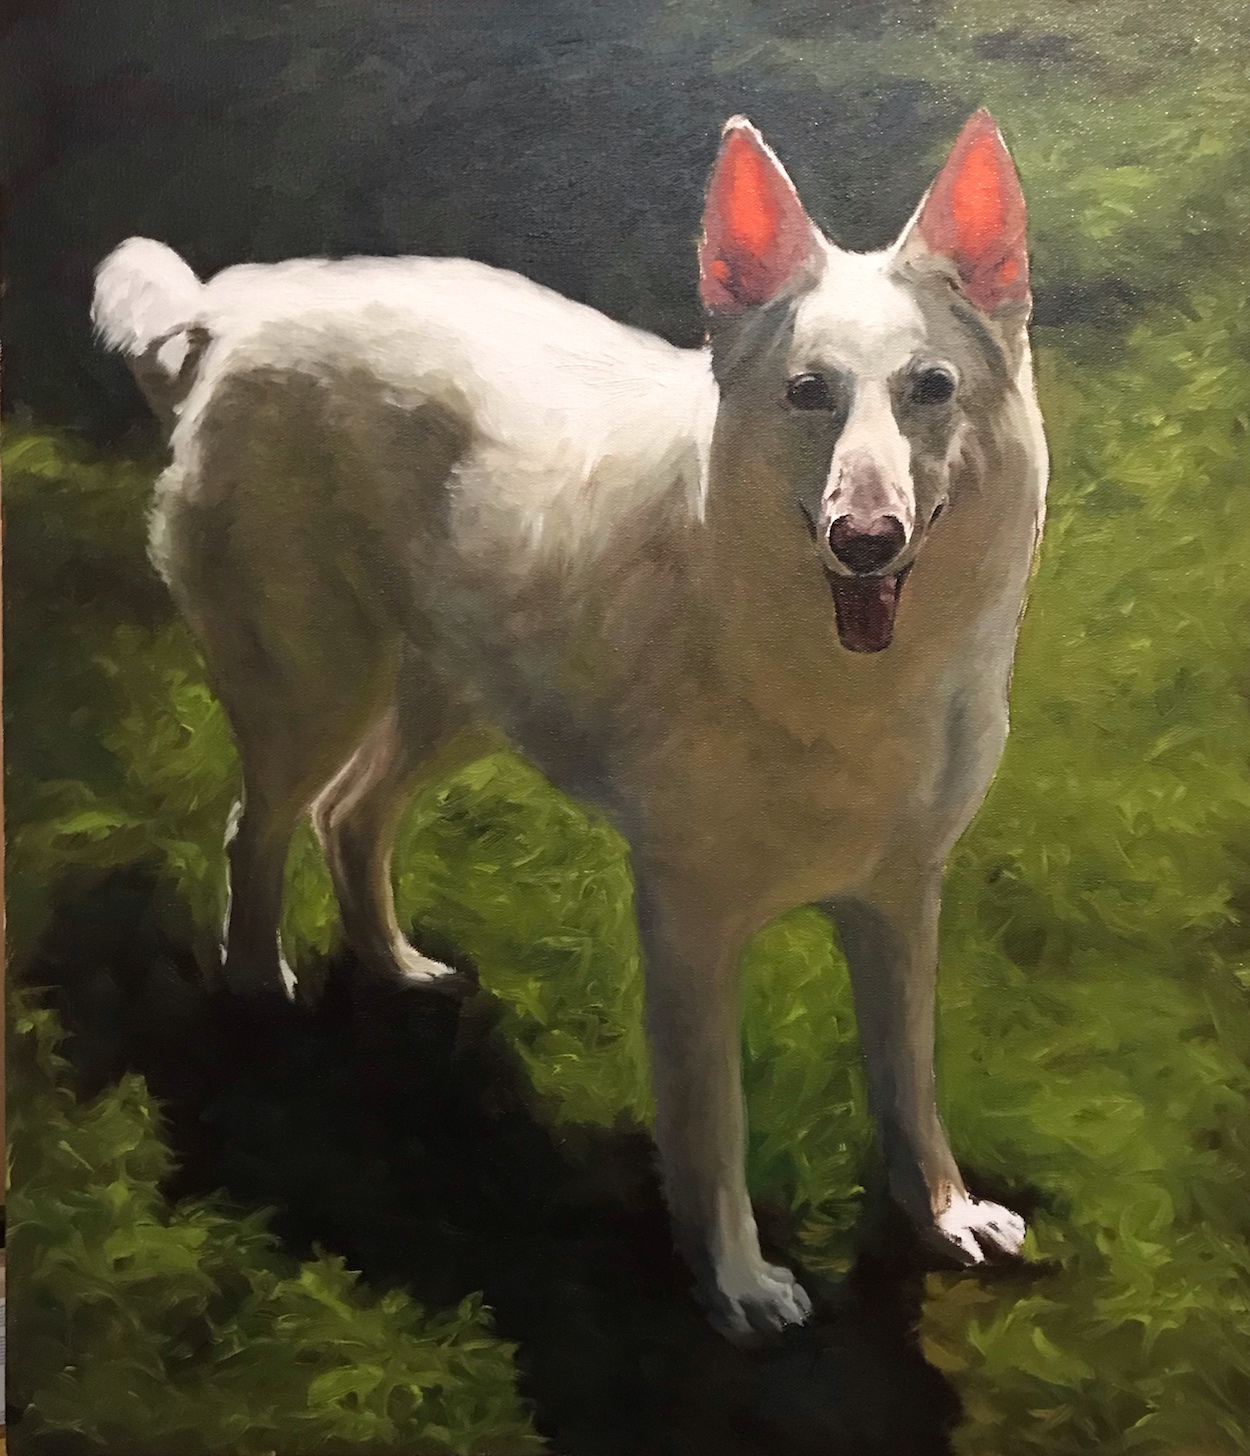
The Final Portrait
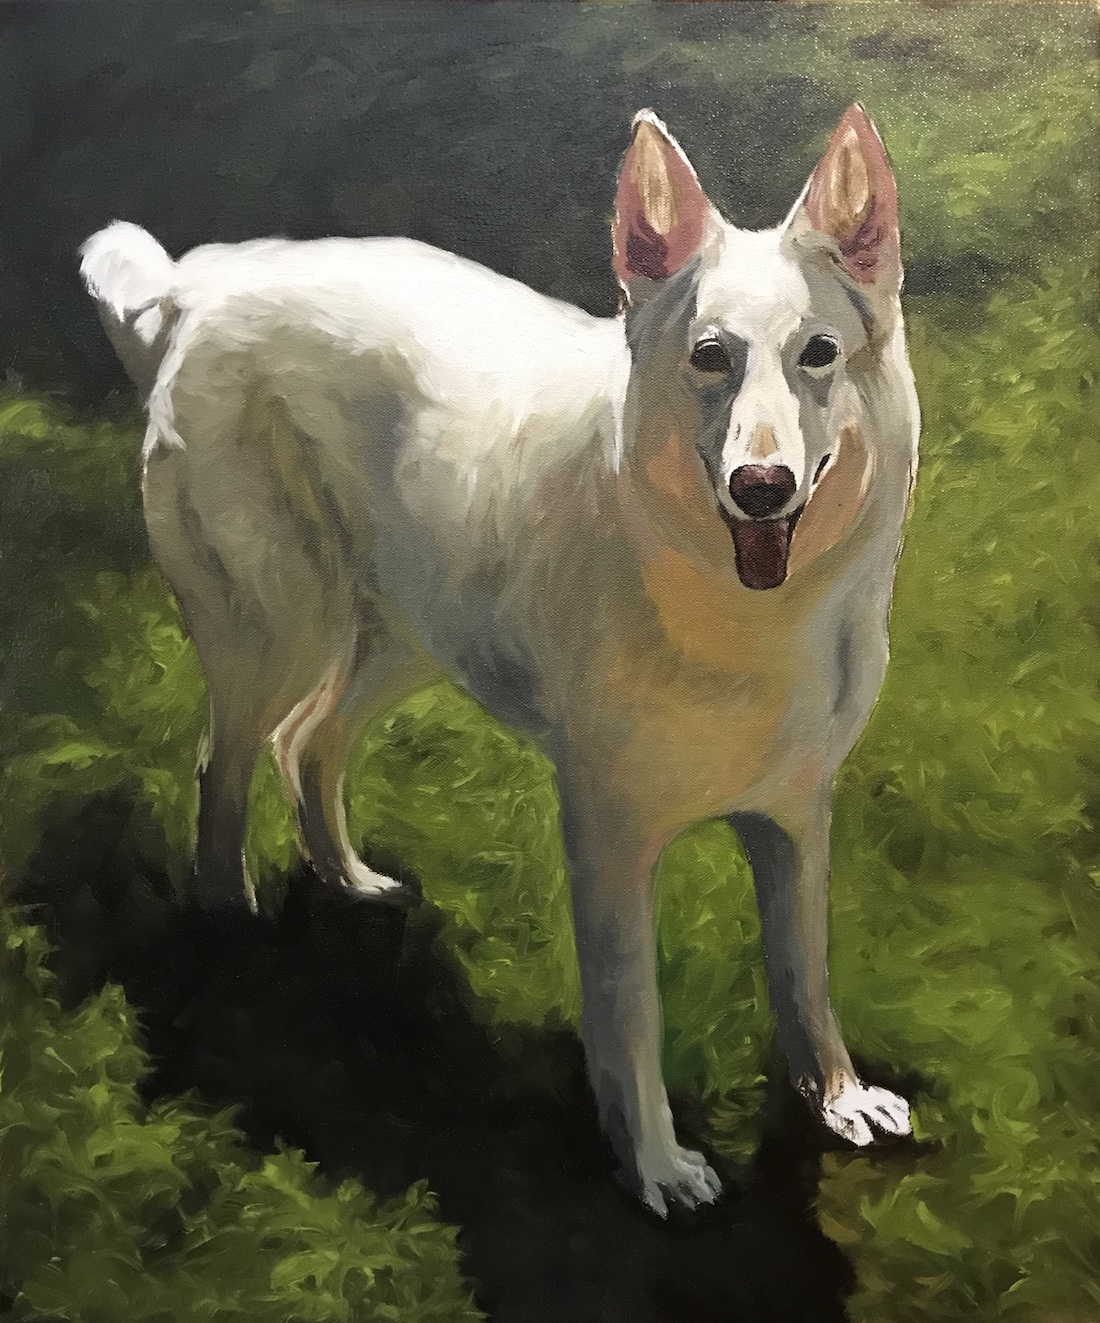
Below is the finished portrait. As you can see, when I paint white fur I use a lot of different colors. This is because white fur reflects colors in the environment around it. Maiden’s fur was reflecting not only the cools shadows in the grass, but the warm highlights as well.
I chose to push the overall tone of the painting to the warm side since she was basking in the sun. Also, keeping the brushstrokes a little more abstract gives her more of an ethereal quality. This painting was a memorial painting, so I wanted her to have almost an otherworldly presence.
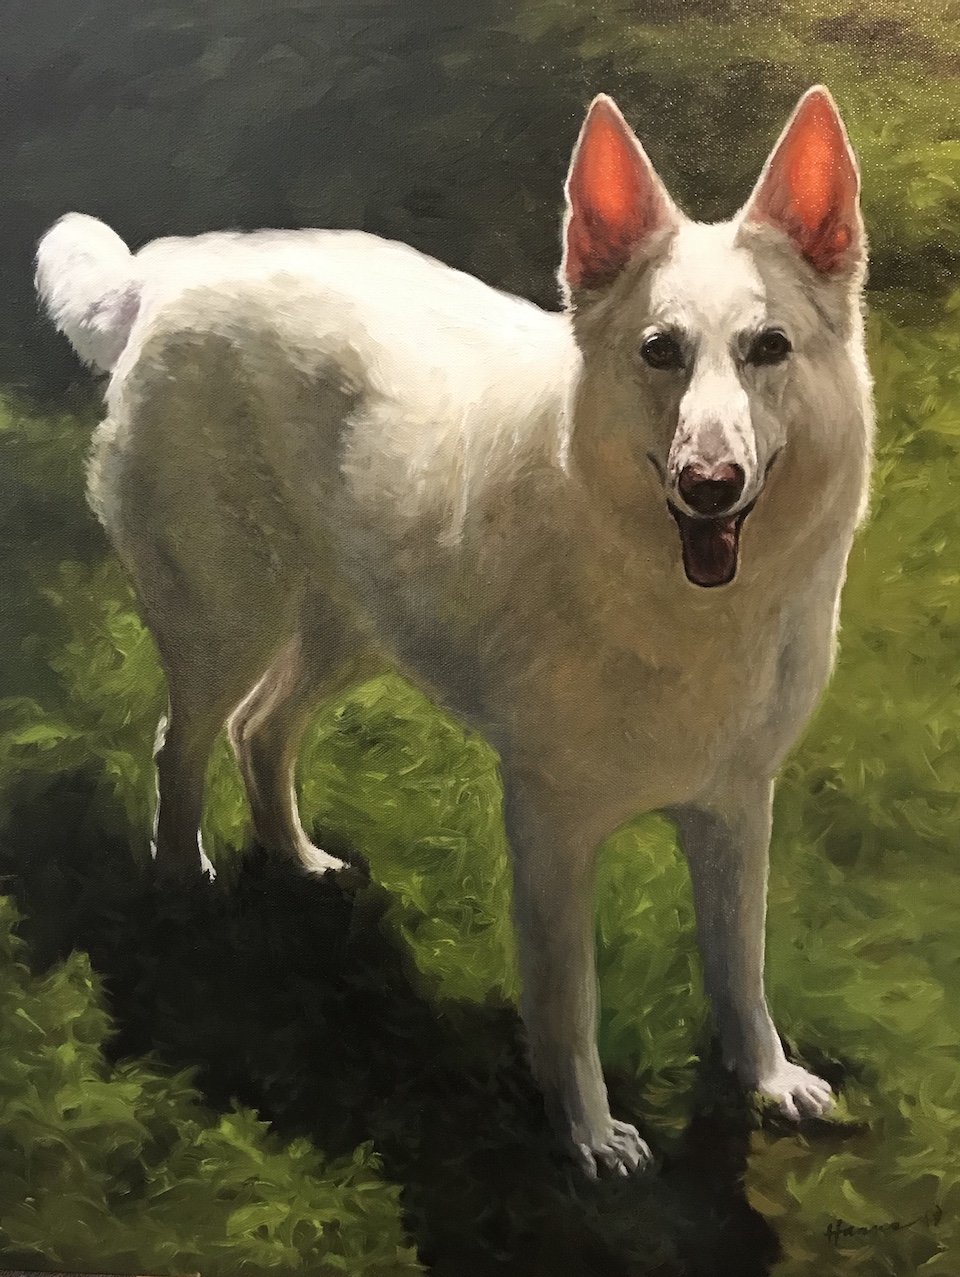
The final finished portrait of Maiden
It was truly a pleasure working with Maiden’s human to bring her portrait to life.
He had just lost his precious girl and wanted this portrait to be a special present for his wife. Below is a photo of Robert and Angie reunited with their beloved Maiden. I love working with dog lovers. They are my people. Cats are wonderful, but dogs totally steal my heart.
I want to extend a special thanks to Robert and Angie for allowing me to paint their sweet and beautiful Maiden. I always feel like I get to know a dog when I paint them, and I can tell she was a very special girl.
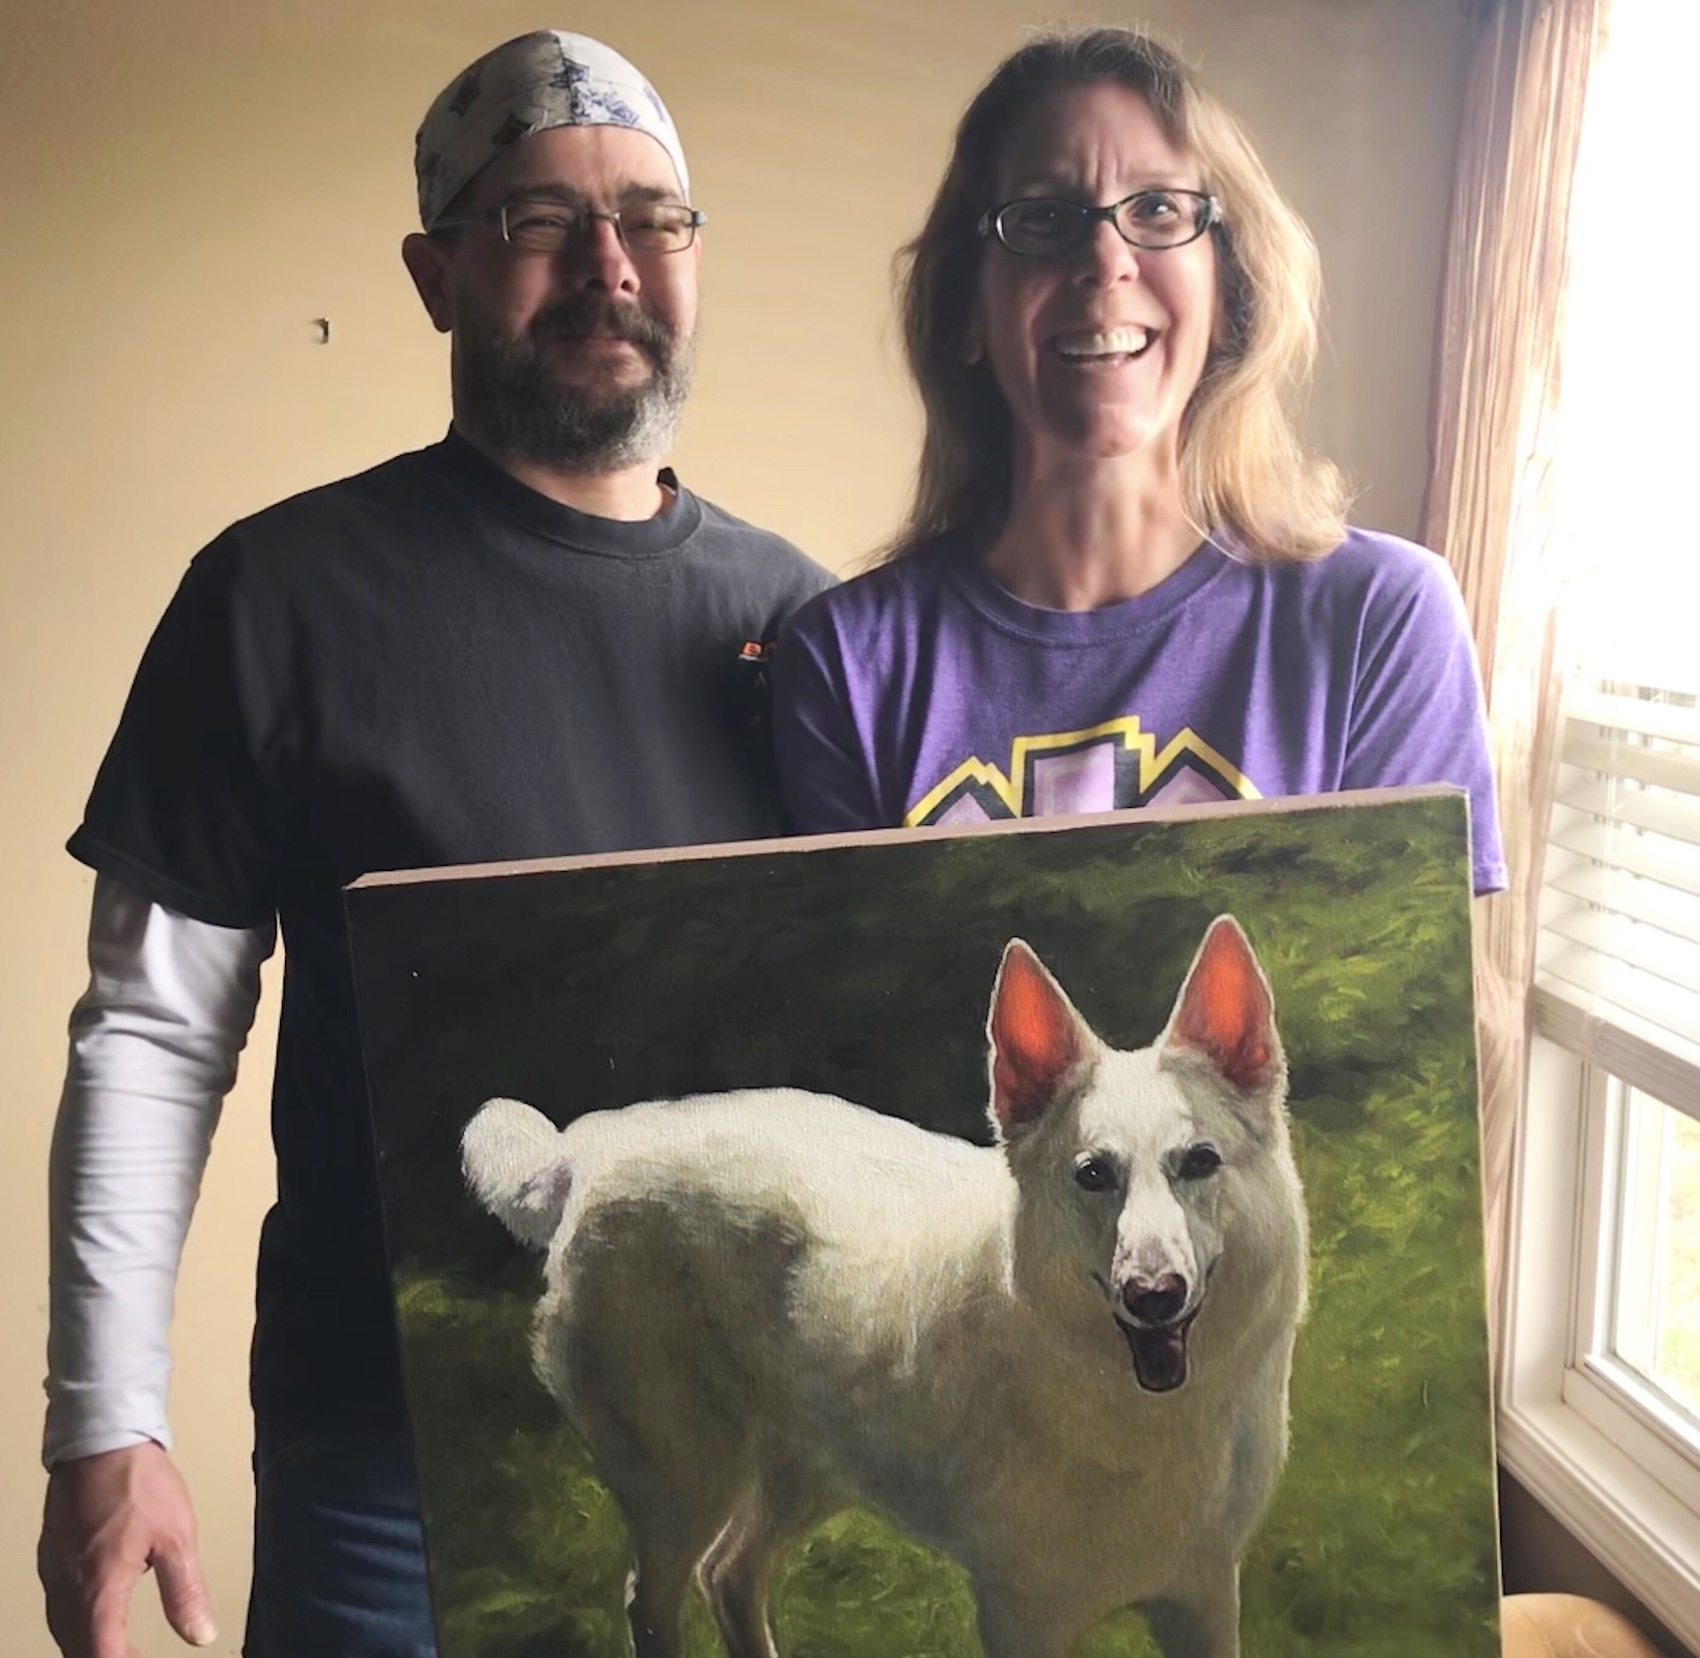
Robert and Angie reunited with their girl, Maiden
Pet portraits always make a great gift for people whether the pet is still living or has moved on. Art is emotion and a portrait can connect you instantly to a beloved family member. I have portraits done of all my dogs that have moved on and it makes me feel like they are still with me.
Summary Of Tips For Painting White Fur
Painting white fur can be tricky, but if you keep a few of these tips in mind, you can have great success:
- Do a value study and start by blocking in your darkest colors first.
- Use a Gray Scale And Value Finder to help you gauge your lightest lights and your darkest darks.
- Don’t get too light too fast when painting white fur. Keep it darker in the beginning.
- White fur reflects the environment around it, so there may be a variety of colors that you need to work into the fur.
- Start with bigger brushes first and map out the main color blocks.
- Switch to smaller brushes for details.
- Don’t feel like you need to paint every single hair (unless you really want to).
- Check against your reference photo often and squint to see major value differences.
- Take progress shots on your phone. Sometimes seeing the painting at a small size can help you spot trouble areas.
Supplies I Used In This Painting
I’ve listed a lot of the supplies I used throughout this article. Many of them are linked in red to Amazon so you can take a look at them and buy them if you think they’ll be useful. I do get a very small commission when you use my link.
Below are the paints I use for most of my work. I have an introductory set of artist oil paints from Gamblin. It is more cost-effective to buy the set rather than individual tubes, but do what works best for you.
I would highly recommend a mahl stick to help you steady your hand as you paint. You can see me use it in the video where I paint a pug. The stick I have isn’t fancy, but it does the trick. This is one like it on Amazon. You can use any lightweight stick that will help you to steady your hand though. A dowl or handle of some sort of broom may work just fine. If you want a fancier mahl stick, this one may be for you.
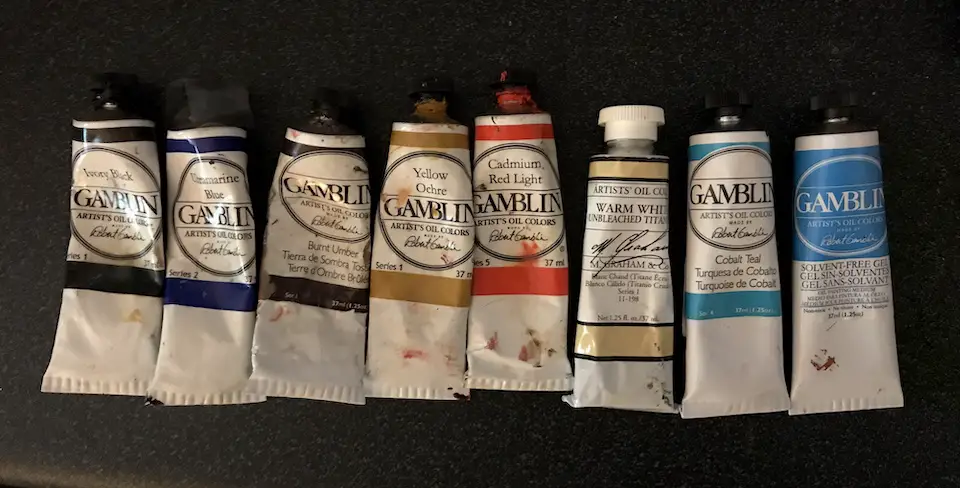
For individual tubes, here are links to ivory black, ultramarine blue, burnt umber, yellow ochre, and cad red light. Here is the warm white from M. Graham. The titanium white by Windsor Newton (not shown) was used for the brightest whites.
I also used Gamblin’s solvent-free gel to add body to the paint and Gamsol mineral spirits to thin it.
Thank you for stopping by!
I hope you enjoyed this article about how to paint white fur. If you are interested in more posts like this, below are my other popular painting tutorials and articles. Simply click on a title below to view the article:
The #1 Way To Improve Your Painting – Values in Art
7 Portrait Painting Tips For Traditional And Digital Painters
How To Paint A Dog Portrait Step-By-Step In Oil
Simple Step-By-Step Tomato Painting
Tips For Painting Silver Objects
How To Paint A Cat On The iPad Pro – Digital Painting Tutorial Featuring Tippy
How I Paint On The iPad – A Step-by-Step Portrait In ArtRage
8 Tips for Painting Black Fur
How To Paint A Cat In Oil Step-By-Step With Jorge & Nacho
10 Tips For Painting A Dog Portrait Featuring A Japanese Chin
30 Faces 30 Days Portrait Painting Challenge
Painting A Cat In ArtRage Featuring Rémy The Gargoyle
Painting A Cat In Oil Featuring Prescott, A Gorgeous Maine Coon Cat
How To Paint A Sphynx Cat In Oil Step-by-Step