

Painting realistic curly fur is definitely not for the faint of heart. Painting straight white fur is hard enough, but conquering the twists and turns of realistic curly fur is a challenge that can level up your skills as an artist. I’ll share everything I learned while painting this Bichon Frise portrait with all his luscious locks so you can approach your own curly portrait paintings with confidence.
In this painting tutorial, I’ll cover the following topics:
- Understanding the Anatomy of Realistic Curly Fur
- Choosing the Right Materials
- Preparing the Canvas
- Sketching the Subject
- Laying Down the Base Colors
- Building Texture with Layers
- Adding Highlights and Shadows
- Finishing Touches and Fine Details
- Tips on Drying Time
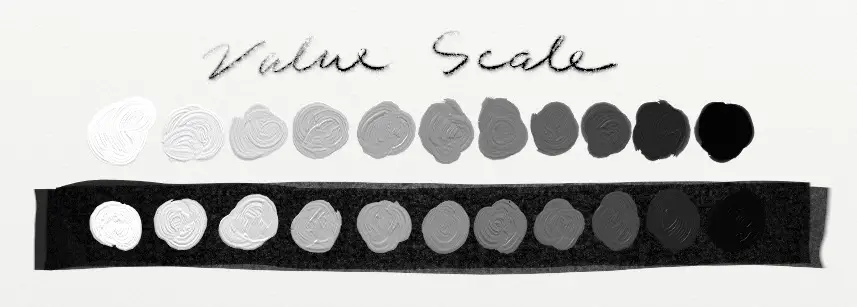
1: Understanding the Anatomy of Realistic Curly Fur
Understanding the anatomy of curly fur is an important part of painting it in oil. Realistic curly fur often has a lot of texture and volume, with small groupings of hair twisting and turning in different directions. Additionally, it can reflect light in unique ways, creating bright highlights and deep shadows.

1: Start the curls by adding a few random twists with a medium/dark color. 2: Add darker strokes to start building dimension. 3: Blend in subtle highlights on top of the lighter strokes to create form. 4: Subtly add complementary color to create visual interest. 5: Add small, bright highlights on top the lighter colors and blend.
To capture the texture of realistic curly fur, you need to pay attention to the general direction of the hair. Curly fur tends to have a lot of volume and movement in different directions. Carefully study of the subject and making notes by drawing directly on top of a copy of the reference photo is helpful in recreating this texture in paint.

In this reference photo, I added the dark blue background digitally along with a grid. I also got a feel for the direction of the fur by making marks on a copy of the photo.
Once you start to get the hang of it, you will feel a sort of rhythm when painting the strokes. Be careful to create variation in the size and angles of the fur groupings. You want there to be a random feeling to the placement of the curls. If everything is too evenly spaced in an identical way, it won’t look natural.
Note: Some of the links on the supply list are affiliate links to Amazon, which means if you use the link, I will get a small commission. This, of course, is at no additional cost to you. Using these links allows me to keep this website running. Thank you so much for supporting a fellow artist.
2: Choosing the Right Materials
To paint realistic curly fur, you will need a few key materials, including:
- Oil paints
- Burnt umber
- Yellow ochre
- Ultramarine blue
- Titanium white
- Lead white – optional, but recommended
- Alizarin crimson
- Brushes in a variety of sizes, including fine detail, small, medium, and large brushes
- Canvas or canvas panel
- Gesso
- Palette knife for mixing paint
- Linseed oil or another medium
- Gamsol for thinning paint and cleaning brushes
For a comprehensive list of materials, please visit my supply page. I’ve included links for your convenience.
3: Preparing the Canvas
Consider the Surface for Painting Curly Fur
To start, you’ll want to choose a canvas that is appropriate for oil painting. Canvas is available in a variety of textures and weights, so choose one that suits your painting style and preferences.
I prefer working on primed linen panels, but used stretched canvas for this painting. If using a stretched canvas, make sure that it is stretched tightly over a sturdy frame. This will prevent the canvas from warping or buckling as you paint.
Adding Gesso
Many stretched canvases are pre-primed with acrylic gesso. However, I find that these canvases have too much texture, so I modify them by adding a couple more layers of gesso.
Gesso is a type of primer made from chalk and binder. It creates a smooth, non-porous surface that helps the paint adhere properly and prevents it from soaking into the canvas fibers. Apply gesso to the canvas using a wide, flat brush, making sure to cover the entire surface evenly.

For this painting, I added two additional layers of gesso and sanded the layers down with fine sandpaper to get a smoother surface. It is much easier to achieve realistic results with portrait painting when you use a smoother surface. When adding gesso, make sure each layer has dried completely before sanding, and wipe off dust with a soft, lint-free cloth.
Toning the Canvas
After priming the canvas, I usually add a wash of color to get rid of the stark white. Most of the time, I use burnt umber or yellow ochre thinned down with Gamsol. I add the paint liberally with a brush and then wipe away the excess, leaving a stained canvas.
Workspace
Make sure that your workspace is properly set up for oil painting. Oil paints require solvents and mediums for thinning and blending, so make sure that you have plenty of ventilation and are aware of potential hazards when painting in oil. You’ll also want to have a variety of brushes and tools on hand, as well as a palette for mixing your paint.

The initial sketch on a toned canvas.
4: Sketching the Subject
I like to sketch my subject onto the canvas using vine charcoal. I do a very simple, basic outline. This is a rough sketch that captures the overall shape and size, as well as any major details such as the placement of the eyes and nose.
You can draw your subject freehand or use a grid to help you with measuring. I used a simple grid for landmarks. When using a grid, make sure the proportion of the grid on your reference photo is the same as the grid on the canvas.
Once the rough sketch is finished, I refined the drawing by adding more detail. The sketch was continued using a little burnt umber oil paint thinned down with Gamsol.

I started to sketch the curly fur using burnt umber thinned with Gamsol.
I paid close attention to the direction of the fur, and used light, feathery strokes to indicate the fluffy texture. Take the time to study your reference photos and observe the way that light and shadow play across the surface of the fur. This helps to create a more realistic and dynamic painting.
As I sketched my subject, I made sure to start indicating the value structure. Taking the time to sketch the subject carefully and thoughtfully, creates a strong foundation for a successful painting.
5: Laying Down Base Colors for Realistic Curly Fur
Laying down base colors is a crucial step in painting curly fur. This involves applying the initial layer of color to the canvas, which will provide the foundation for the rest of the painting.
When it comes to painting realistic curly white fur, the last thing you want to start with is white. White is reserved for the very end of the process since you can’t go brighter in value than white.
White is the lightest value, so when painting white curly fur, you need to start with darker values.
In this painting, I looked for some of the darkest colors in the white fur. I mixed some darker yellow, red, and blue tones and painted them with a little Gamsol to keep the paint thin and transparent. This also allowed me to remove paint easily with a clean brush, so I could start to get a sense of the curly fur.

Indicating direction using brushstrokes helps to create the beginnings of realistic curly fur.
It’s important to pay attention to the direction and movement of the fur. Using shorter, circular strokes helps create the look of little curls.
The Indirect Method
I decided to paint this portrait over a longer period of time, allowing the layers to dry in between sessions. This is known as the indirect method in oil painting. Painting glazes of transparent colors over dried, opaque colors creates an optical effect of luminosity.

Adding the first layer of color.
6: Building Texture with Layers
Once you’ve laid down your base colors, you can start adding additional layers to create more depth and dimension. Layering your colors is an important technique for creating a realistic-looking painting, as it allows you to add shading, highlights, and other details that help bring your subject to life.
Once the underpainting is dry, it’s time to begin building texture by adding layers. This creates more depth and dimension. I like to keep my shadow areas thin or less dimensional and use thicker, heavier strokes where the fur is most defined and textured. Not only will this have an optical effect of adding dimension, but it literally creates a 3D effect depending on how thick your paint is.

Starting to create texture.
Experiment to Create Realistic Curly Fur
Experimenting with different brushes and techniques creates different textures. For example, a stiff bristle brush can be used to create a rough, textured appearance, while a soft brush can be used to create a softer, more subtle effect. At the very beginning, I used a stiffer brush to wipe off paint in circular strokes to start creating a fur pattern. I used softer, synthetic brushes as I began to feather in the curly fur later on.
When layering, pay close attention to the way the colors and tones interact with each other. Use different colors and shades to make it look like there is more depth and volume. Don’t be afraid to mix colors together to create unique, customized shades.
Be Patient, Realistic Curly Fur Takes Time
Building texture with layers takes time and patience. Allow each layer to dry before applying the next. Using a medium like Liquin can help speed up the drying process if you are in a hurry. There are also mediums that slow down drying time. I go more into detail on mediums in this article.

Adding in a dark blue background color will create contrast with the white fur.
Painting the Background
Before I continued adding layers, I decided to paint the background. I used burnt umber, ultramarine blue, a touch of white, and a little yellow ochre to create the colors. Once again, I am subtly using warm and cool tones next to each other to create visual interest. Painting a very dark blue background created a dramatic contrast to the white fur. When I’m painting simple head and shoulder portraits, adding drama through contrasting colors helps the painting command attention.
7: Adding Highlights and Shadows
Steps 6 and 7 took the most time because there was a lot of back and forth between adding highlights and reestablishing shadows. I wanted the focus of the portrait to be on the face, so the center of the painting contains the most detail. Because of this, the curly fur on the body further away from the face was painted in a more abstract, less realistic way.
Secret Tip for Creating Realism
Painting areas surrounding the focal point doesn’t take away from the overall realism of the portrait, it actually increases it. Human eyes can only focus on the center of what it’s looking at. Everything around the focal point becomes more out of focus. If you have areas that are out of focus on your painting, they will encourage the onlookers eye to move back to the sharper details. Pretty cool, huh?
Be Aware of the Source of Light
I examined the reference photo closely to determine where the light source was coming from. In this portrait, the light was coming from the upper left side. The parts of the fur that the light directly hit had lighter shades added to them. Those areas included the tips of the fur and parts of the face where the fur was most prominent.

Creating the initial texture of the fur.
Adding highlights and shadows is a crucial step when painting realistic curly fur. I used smaller brushes to paint the highlights on top of the curls. However, I wasn’t using the brightest white yet.
Darker brown and blue shadows were added where curls overlapped or twisted away from the light.
The darker shades were created by combining different amounts of burnt umber, ultramarine blue, and yellow ochre. They were added to the areas of the fur that were in shadow, which included the right side of the face and body.
Lead White, Curly White Fur’s Best Friend
I used lead white for the first time when painting this portrait. It is quite expensive, which is why I had never used it before. I’m glad I made the investment because it is absolutely wonderful to work with. Lead white is a much more transparent white than titanium white.

Highlights and shadows bring out the curls. As the paint dries, it can become dull as you can see in the background here.
Because of the transparency, it took many layers to build up the white tones, which was perfect for painting realistic curly fur. I used a mixture of titanium white and lead white to build brighter areas. Use caution when working with lead white though, as it is toxic. Make sure to wear gloves to protect your skin.
Adding highlights and shadows is a subtle art, so take the time needed and practice to get the effect just right. By working slowly and thoughtfully, and observing your reference photo closely, you can capture the complexity of realistic curly fur.

Adding detail to this adorable, curly little face.
8: Finishing Touches & Fine Details of Realistic Curly Fur
Finishing touches and fine details can take painting curly fur to the next level by adding even more depth and nuance. Here are a few tips for adding final touches to a painting:
-
Check the Colors & Values:
Before adding any final touches, make sure the colors are consistent and accurate. Step back from the painting and look at it from a distance to make sure the colors blend well together. Squint your eyes to help you see values and make corrections. You can also take a photo of your painting and change it to black and white to see if the values look right.

I made sure to check my values frequently along the way.
-
Add Fine Details:
Use a fine brush and a steady hand to add individual strands of fur, highlights, and shadows. I like to use a mahl stick to keep my hand steady and also have a pair of reading glasses to help me see. I used transparent oil paints to glaze in hints of color, alternating warm and cool tones. Be patient and take your time toward the end of the process. Don’t worry about making everything in the painting perfectly detailed. I only brought detail to the face and then allowed everything else to go out of focus. If I tried to paint every single curl in sharp focus, I would never have finished the painting. It is easy to suggest curls in the areas away from the face with dabs of light and dark paint.
-
Sign Your Painting:
Once you’re satisfied with the final result, don’t forget to sign your painting. Choose a discreet spot in the corner of the canvas and sign your name using a fine brush and color of paint that works with the overall color scheme. If you mess up your signature, you can wipe it off and start over again, or you can paint over mistakes with some background color. My advice is to practice your signature on a scrap piece of canvas a few times and then add it to the painting.

For the final layer, I added the brightest highlights to the top of the curls and reinforced darker areas. The photo above was taken before the varnish was applied.
9: Tips on Drying Time
The drying time for an oil painting can take anywhere from a week to a year, depending on what pigments and mediums were used and how thick the paint was applied. I’ve found that burnt umber dries incredibly fast, so I use that pigment in thin layers quite often when starting my paintings.
Use Mediums to Speed Up or Slow Down the Drying Time
For quicker drying times, an alkyd medium such as Liquin can be mixed into the paint. Usually, a layer can dry within a day when using this medium. It is important to mix the proper ratio of medium to paint for the best results. I didn’t use Liquin with this painting, so I allowed each layer to dry before painting another layer.
Walnut, safflower, and poppyseed oils take the longest time to dry. For this painting, I used linseed oil, which, when used sparingly and in thin layers, can take only a few days to dry.
Temperature Influences the Drying Time
Oil paint dries faster in warmer temperatures. I have put my paintings in a dust-free area of the garage during the summer to speed up the drying process. I also make sure to not expose paintings to direct sunlight. The sun can bleach pigments that are not lightfast (also known as fugitive colors).
Varnishing Protects the Paint Film
Before adding a varnish, make sure your painting is completely dry and free of dust. Gently wiping the surface with a lint-free cloth can help remove debris. Varnishing the painting will bring back the richness of the color if the paint has dulled during the drying time. This is always an exciting step when finishing a painting. In addition to restoring the color, the varnish protects the paint film, which is important for preserving the work over time.
Are You Ready To Conquer Curly White Fur?
To wrap things up, painting curly white fur in oil requires a combination of technical skill, creative vision, and a whole lot of patience. By understanding the anatomy of the fur, choosing the right materials, using the right techniques, and taking a lot of time, anyone can learn to paint curly white fur successfully. The real question is, are you up for the challenge?
Thanks For Stopping By The Online Studio
I hope you found this tutorial on drawing a realistic bird helpful. If you want to stay updated on future tutorials, make sure to join the mailing list at the top of the page. If you want to see other tutorials, check out the links below.
FREE Painting Tutorials:
Click any of the images below to see the corresponding tutorial, or click here for a page previewing all of my tutorials.

Click the image to learn how to paint a sunflower.
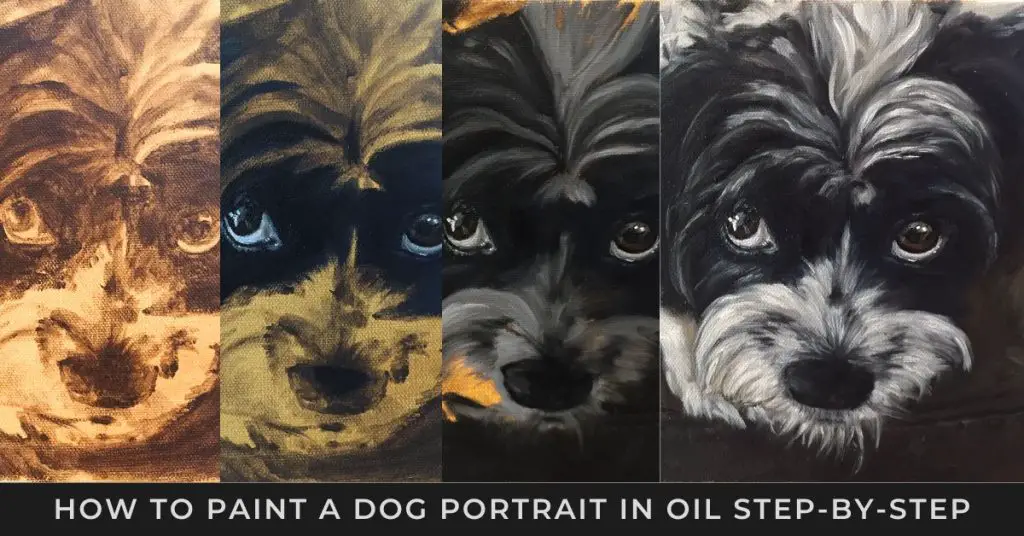
If you’d like to learn more about how to paint a dog portrait, click the image above.

Learn how to paint a colorful landscape. Click the image above.
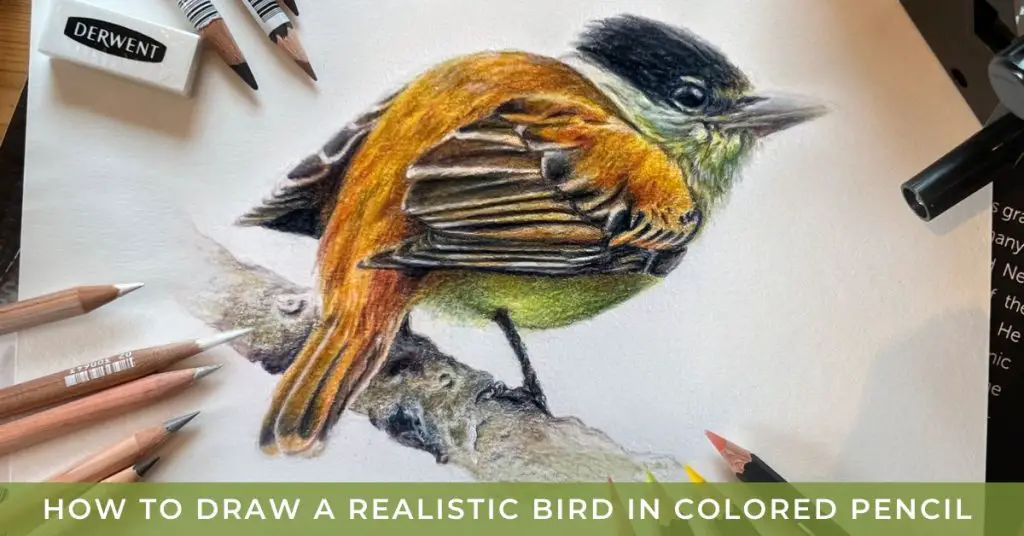
For the full tutorial, click the bird drawing.

See how I paint on the iPad in this tutorial using traditional techniques.

Whether you paint in oil, acrylic or digitally, you will learn my secrets to painting silver by clicking the image above.
Learn how to paint a colorful landscape in this tutorial. Click the image above.

Black fur can be tricky to paint. Click the image above to see the step-by-step article.