

Pet portraits can be a big challenge for artists. In this article, I’ll take you through my step-by-step process for painting a realistic pet portrait using only four colors. Using a limited palette helps to eliminate some of the headaches while painting. This pet portrait is in oil, but I’ve used the same approach in acrylics and even while painting digitally.
I’ll begin with a quick overview highlighting the main steps. I’ve expanded the section on detail (step 10), giving extra tips.
How To Paint A Pet Portrait Overview
- Prepare The Canvas And Sketch Pet Portrait With Charcoal
- Reinforce Charcoal Drawing Using Thinned Paint
- Use Darker Values For First Layer On Pet’s Face
- Layer In Lighter Colors To Build Form Using A Larger Brush
- Reinforce Darker Tones To Establish Value Range Of Pet Portrait
- Add In Warm Tones To Muzzle And Mouth
- Continue To Block In Medium Tones To Define Shapes
- Start Using Smaller Brushes For Detail Work After Block In Is Complete
- Save Your Brightest Tones For Final Stage Of The Pet Portrait
- Take Your Time Adding Details For A Realistic Result
- Paint In The Pet’s Whiskers To Finish The Painting
- Sign The Pet Portrait
Note: Some of the links in this article are affiliate links. I may receive a small commission if you use them to purchase items. By doing so, you are supporting a fellow artist. I’m so grateful for your support.
1. Prepare The Canvas And Sketch The Pet Portrait With Charcoal
After you have selected a pet to paint, the first thing you need to do is prepare the canvas. I’ve chosen to use an 8×10 primed linen panel. I prefer working on panels because of their stability and linen for the smoother texture.

I sketched in the pet portrait with vine charcoal on a canvas toned with yellow ochre.
If you have a stretched cotton canvas, I would add a couple layers of gesso, sanding lightly between layers, to create a smoother surface. Smoother surfaces are easier to work with when painting portraits of pets or people.
I toned my canvas with yellow ochre thinned down with Gamsol and allowed that to dry for a bit. Then I measured out a grid and drew it on with vine charcoal. Make sure to have the grid on the canvas measure the same proportions on the reference photo. You can use a grid app to apply grids to your image if you don’t have access to a program like Photoshop.
After all of that prep, the fun begins with drawing in the pet with vine charcoal. This type of charcoal is great to work with and can be erased easily while drawing the portrait.
2. Reinforce Charcoal Drawing Using Thinned Paint
After I’m happy with the drawing, I paint over the charcoal with burnt umber thinned with Gamsol. If you don’t have burnt umber, no worries. You only need four paint colors to paint this pet portrait. This limited palette is known as the Zorn palette and is surprisingly versatile.

After making sure the sketch was accurate, I painted over the charcoal with burnt umber.
The Zorn palette is made up of ivory black, cadmium red, yellow ochre and white. To make burnt umber from these colors, simply mix a little of the ivory black with the cad red.
As you can see below, my tubes have been used and abused. My Gamblin paints came from the Gamblin Artist Oil Color Introductory set. Whenever I see this set on sale, I get one. The set also includes titanium white, which is not pictured below. It is, however, considered part of the Zorn palette.

A limited palette was used for this portrait.
I started off the pet portrait using a warm white instead of the titanium white. Titanium white is a very bright and opaque white. Since this dog is mostly white, I needed to hold back on my values in the white areas and the warm white helped me stay away from adding brighter whites too early on.
You can easily mix up some warm white using titanium white and a small amount of yellow ochre. Even though purchasing warm white is not necessary, it is kind of fun to work with other colors of white paints.
Lately I’ve been playing around with lead white and I absolutely love it. Lead white is more transparent and works great for layering. It is expensive, so it is something you will need to budget for.
3. Use Darker Values For First Layer On Pet’s Face
Painting a white dog isn’t really about painting with white, but painting subtle warm and cool tones of grey. Below you can see I’ve established some of the darker undertone colors on the pet portrait and began blocking them in.

For the first layer, don’t paint a white pet white. Paint darker values to build on.
It’s very important to be aware of the value range in order to make the portrait feel realistic. I dig into values a little more in this article about the number one way to improve a painting.
To see values easily, convert your reference image to black and white so you can see the tonal range. Using a greyscale and value finder is a great way to help you establish values. A color wheel is also helpful and you can get a combo pack here. I love using these tools.
4. Layer In Lighter Colors On The Pet Portrait To Build Form Using A Larger Brush
At this stage of the painting, I like to use larger brushes to build forms and keep shapes simple. In the image below, I’m adding in some lighter values and am using a little painting medium to help the paint flow.
There are a number of painting mediums to choose from, but if you are just starting out, keep it simple and stick with linseed oil. I still have a small bottle of linseed oil I got several years ago. A little goes a long way.

Using a larger brush keeps me from getting too detailed too fast on the pet portrait.
I’ve painted using both direct and indirect painting methods. The direct method is wet-in-wet painting and is sometimes referred to as alla prima painting. Colors can get muddy if you aren’t careful using this process. It’s a lot of fun though and using a limited palette can help to keep the colors clean.
If you are painting over several days like I did with this painting, the layers of paint will most likely dry between sessions. This is considered an indirect way of painting. I’ve been wanting to do more glazing in my work and the indirect method is perfect for that purpose. This method allows for achieving subtle variation in tone, which adds to a more realistic result.
If you need your layers of paint to dry sooner, you can use a medium called Liquin, which will result in thin layers that are dry to the touch the next day.
5. Reinforce Darker Tones To Establish Value Range Of The Pet Portrait
Below I am adding some darker tones to reestablish some of my darkest darks. For this pet portrait, the darkest darks appear in the eyes, nose and mouth. These areas will have high contrast between darks and lights which results in capturing the viewers attention.

Beginning to reinforce dark values on the pet’s face.
All of the other areas of the painting will be in softer focus and will have much less contrast. One of the tricks to painting great realistic paintings is to keep things a little unresolved in the areas that aren’t as important.
Our eyes don’t see everything in focus all at once. So keeping the most important things in sharper focus with higher contrast will direct attention to those things.
6. Add In Warm Tones To Muzzle And Mouth
To add warmer tones to the muzzle and mouth area, I blended some cad red with yellow ochre to get a warm pinky/peach color. This color can be tinted lighter in tone with white or tinted darker with ivory black.
The mouth, nose, ears and eyes will have a little of the pink/peach showing as these are areas where blood vessels are closer to the skin. This isn’t seen as much in black dogs, but is often seen in white dogs with short fur.

Starting to use cad red to warm up the muzzle and mouth area of the pet portrait.
Ivory black in the Zorn palette serves as a very dark blue and it shows a lot of blue when mixed with white. With ivory black really being the blue in the palette, the cad red and yellow ochre round out the three primary colors.
Of course, the black also is used to tint the paint darker and white is used to tint mixtures lighter, resulting in a wide range of values. There are some really great Zorn palette color charts on the internet. The best one I’ve found is by artist Michael Lynn Adams. He does great job showing the entire range of colors in his “how to” chart by simply using only four colors.
7. Continue To Block In Medium Tones To Define Shapes
In the background I mixed some ivory black, and yellow ochre with maybe a tiny touch of white. Only add white if really necessary. The yellow ochre could be enough to lighten the mixture. I keep this color darker on the edges and allow it to get slightly lighter towards the center. This vignette effect keep attention towards the middle of the painting.

Finish blocking in the pet portrait before moving on to detail work.
I use the same colors for painting the tennis ball. This ball was quite dirty and slimy, so I decided to make the ball a little prettier. The darkest area of the ball right under the upper jaw is mostly yellow ochre with a little bit of black. I then added some white to the mix to start creating the sphere of the ball.
Then did a little dabbing of some lighter and darker tones to create the texture on the tennis ball, keeping it relatively abstract.
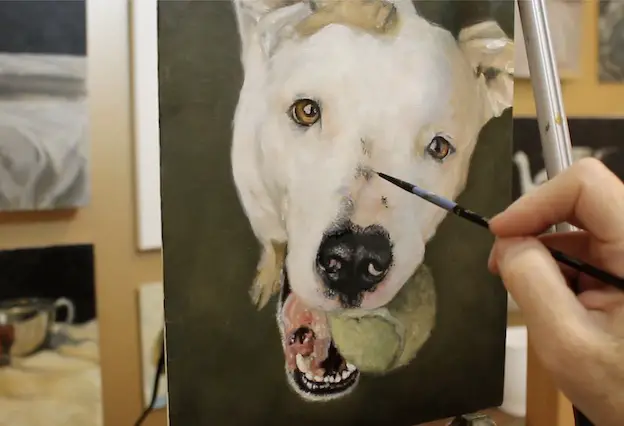
8. Start Using Smaller Brushes For Detail Work After Block In Is Complete
All of the canvas is covered at this stage, but is still pretty rough. There are details and highlights that need to be added throughout the pet portrait to make everything come together.

Painting a pet’s mouth may seem impossible if you don’t have the right mindset.
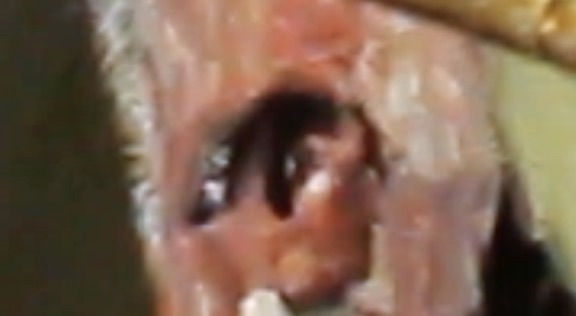 One of the areas that I knew would be a challenge was the mouth and tongue. I wasn’t really sure how I was going to paint it, and then I decided to not paint a mouth and tongue, but to paint a tiny abstract painting, because that is what it looked like.
The small photo is the mouth and tongue isolated away from the rest of the portrait. As you can see, it doesn’t really look like anything close up, but when put into context, the brain reads it as part of the mouth. How crazy is that? This is one of the reasons why I love to paint. I’m always surprised by how something so complex can be resolved in a simple way.
9. Save Your Brightest Tones For Final Stage Of The Pet Portrait
Those little teeth were some of the brightest whites in the painting, but I painted them with a slightly warmer tone so that the cool whites in the face would pop forward in the portrait.

Here I’m continuing to build the form of the pet through lighter values.
The cool whites are made with titanium white and a very small amount of black. Some of the tones also include a little yellow ochre in some places and a little cad red as well to create warmer whites. This creates a dance back and forth between the warm and cool tones which is very satisfying to look at.
In the photo above, you can see this dance between warm and cool whites taking place. All of these are layered little by little on top of each other to create the form. It’s almost like creating a sculpture with the most opaque bright whites building up to the top areas. Think of it like a mountain peak. The top areas catch most of the light. All of the other areas are in some form of shadow.
10. Take Your Time Adding Details For A Realistic Result
During this phase of the pet portrait, I’m pretty anxious to finish the painting. However, this is when I try to slow down a bit and think very carefully about each mark I’m going to make moving forward.
I don’t want to over-paint the pet portrait, but I also want to achieve a certain level of realism.
Detail work on a pet’s fur can take time. Relax and enjoy the painting process.
Because I do slow down during this part of the painting, I thought I would break this section down a bit to detail what I’m doing.
Paint In Reflections On The Pet’s Eyes
The eyes are my favorite part of any portrait painting. They bring so much emotion and life when painted correctly. Most of the time I will start a painting and get the eyes finished quickly as they are so enjoyable to look at.
For this pet portrait, I tried to refrain from getting the eyes done immediately. It was really hard, but I waited until almost the end to finish them.

The eyes are the emotional focus and get special attention through details.
For the iris of the eyes, I used yellow ochre with some cad red to make the yellow/orange color. I lightened the area right below the pupil where the light catches. This was done by adding more yellow ochre and a touch of white. Toward the top of the iris, I added a bit of ivory black with a little more cad red. That combination creates a dark brown.
The outer edge of the iris is ivory black that is blended slightly into the iris. In dogs, the whites of the eyes take up little room and are generally a darker grey color. You definitely don’t want the whites of the eyes to be brighter than the highlighted reflections on the eyes.
The highlights are added in layers. First, titanium white greyed down with ivory black is added. This makes a bluish white which is perfect. Think of adding a small rectangular white piece of paper to a ball. This is the general shape you will want to achieve. After that is added, I go back in with pure titanium white to add a few sparkles for the highlights. I also will add a couple of dots of white on the waterline.
Keeping Some Areas Less Detailed Adds Interest And Guides Focus
With the eyes, nose and mouth being sharper in focus, I made sure that everything else was painted with a looser brushstroke. The intentional blurred effect with the ears, body and ball keeps the viewer’s eyes moving back to the higher contrast–more in focus areas.

I’m intentionally keeping the pet’s ears loosely painted to drive focus to the eyes.
For the ears, the fur is painted with yellow ochre and a touch of cad red to create warmer areas. These mixtures are tinted up and down with titanium white and ivory black.
The skin on the ears is mostly cad red tinted with white, a little yellow ochre and greyed down in some places with ivory black. You can see the warm and cool tones playing back and forth in the ear.
Make Corrections To Values By Squinting Your Eyes
Throughout the painting, I’m squinting my eyes while looking at my reference photo to see how my values are matching up on my canvas. Your eyes are one of the best tools you have to help you discern what is important and what isn’t.

Making sure the values are correct adds to a realistic result.
When you squint, your eyelids reduce the amount of information transmitting to your brain. This simplifies the shapes and helps you to see values more clearly.
Beginner painters either paint everything too light or too dark. Sometimes it’s a combination of too light and too dark, which can make a painting look chaotic. The more chaos in a painting, the less focus and harmony it has.
Don’t Paint A Pet’s Foot – Paint Shapes Instead
Just like painting the mouth, if I think about the foot too much as a foot while painting it, it won’t look like a foot. Let’s face it, feet are weird on animals and humans alike. They are hard to paint because they are in the periphery for most of us (unless we are a podiatrist).

Like the ears, I’m painting this pet’s foot loosely focusing on shapes and values.
We think we know what these shapes look like, because we “see” them all the time. But the truth is that we see them through our peripheral vision, which means we only have a concept of what they should look like.
The feet need to be painted loosely anyway, so I’m just going for main shapes with a few strokes of paint. If it can “read” as a foot while your looking at the dog’s eyes, then it’s done. If it is getting too much attention when you are looking at the eyes, then there most likely is a value and contrast problem.
11. Paint In The Pet’s Whiskers To Finish The Painting
When the overall painting is looking like it’s reflecting the right values and is in proportion, it’s time to add the whiskers. I always reserve the whiskers for the end of the process because you never know what will need to be moved or what value may need to be shifted until the end.

The whiskers are painted with a small brush at the end of the painting process.
Whiskers can cause a bit of worry as you need to have a confident stroke when creating them. If you were painting alla prima, then your paint would be wet enough to simply use the end of your brush handle and scrape off the paint. But since my layers of paint are dry, I can’t use that technique.
This is where my mahl stick really comes in handy. As you’ve seen in the previous pictures, I have a metal stick I’m resting my hand on throughout the painting process. Mahl sticks don’t need to be fancy, they just need to be practical. You can use a dowel from the hardware store and make one or buy one online.
What I do is get a small brush, mix some titanium white with a little bit of ivory black and add some medium. I usually use linseed oil as my medium. This keeps the paint thin and easy to apply to the canvas. I rest my hand on the dowel and practice a few motions above the canvas and then give it a go with the paint. If I mess up and get a blob, it’s usually easy to wipe off due to the layers underneath being dry. I get the whisker mostly laid out and then go back in and add a couple of brighter highlights.
12. Don’t Forget To Sign The Pet Portrait
Here is Avie’s pet portrait completed. A painting isn’t really finished until you sign the painting. It’s important to sign your work so your art can be easily identified. Also, people who buy your work like to see the signature. This is a sign of a art made by hand. That has meaning for people.

The signed finished portrait of “Avie”, 8×10 oil on linen panel.
I try to not have big, bright signature visually fight with the subject in the painting. Instead, I like to have it added subtly into a corner. Some artist’s sign on the bottom and some sign on the top. It’s up to you. I used a little yellow ochre with some linseed oil to sign my last name. I also sign the painting on the back with my full name, the date, the name of the painting and also my current location.
Supply Lists For Painting A Pet Portrait
While I do have supplies linked in the text above, I thought I would make a list of essential supplies and optional supplies for your convenience.
Essential Supply List:
- Vine charcoal https://amzn.to/3CLEyIl
- Yellow ochre https://amzn.to/3iDjaya
- Ivory black https://amzn.to/3CLEyIl
- Cadmium red https://amzn.to/3IM6ijI
- Titanium white https://amzn.to/3WcpL0f
- Gamsol odorless mineral spirits https://amzn.to/3QC5Vua
- Linseed oil (not 100% essential, but is extremely helpful) https://amzn.to/3vZRp5Q
Optional Supply List:
- Linen panel (optional if you already have a canvas) https://amzn.to/3khAKIr
- Liquin https://amzn.to/3ZyJKZR
- Gesso if using regular cotton canvas https://amzn.to/3INfWm7
- Greyscale and value finder https://amzn.to/3X6N1Om
- Greyscale finder with color wheel https://amzn.to/3COXp5f
- Mahl stick (not exactly like mine, but similar) https://amzn.to/3ZyJKZR
- Warm white https://amzn.to/3WcpL0f
- Gamblin Artist Oil Set https://amzn.to/3Wb2884
- Lead white https://amzn.to/3X6N1Om
Thanks For Stopping By
If you enjoyed this article on painting pet portraits, be sure to check out some of my other tutorials listed below.
How To Paint White Fur – Painting A White German Shepherd Step-By-Step
How To Paint A Realistic Portrait – Avoid These 11 Mistakes!