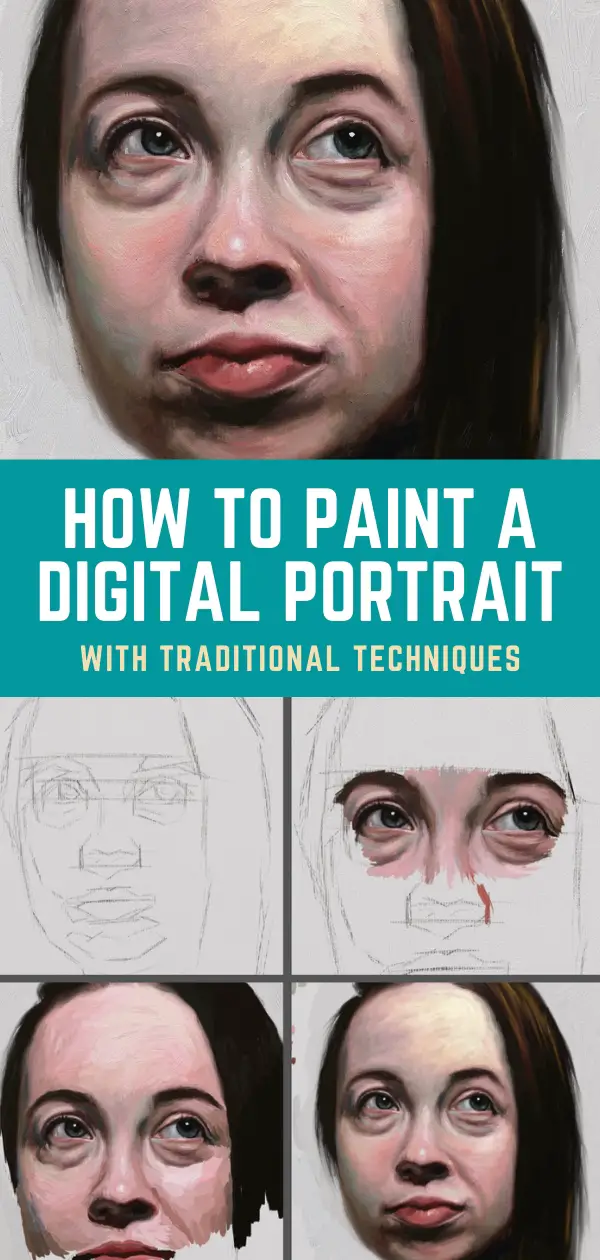
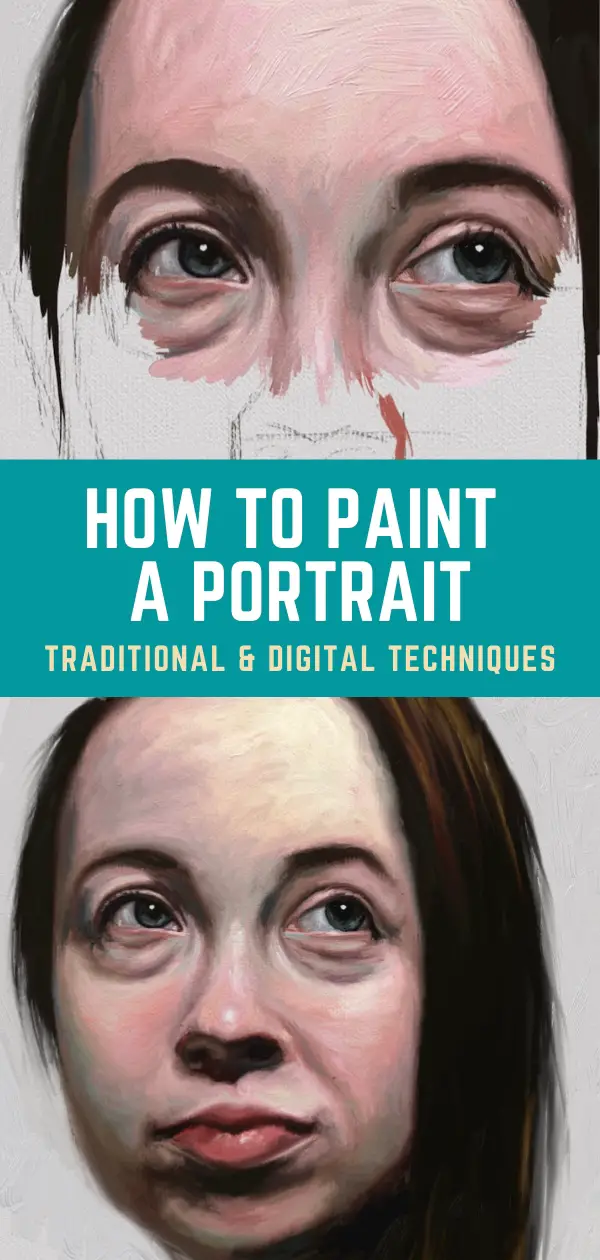
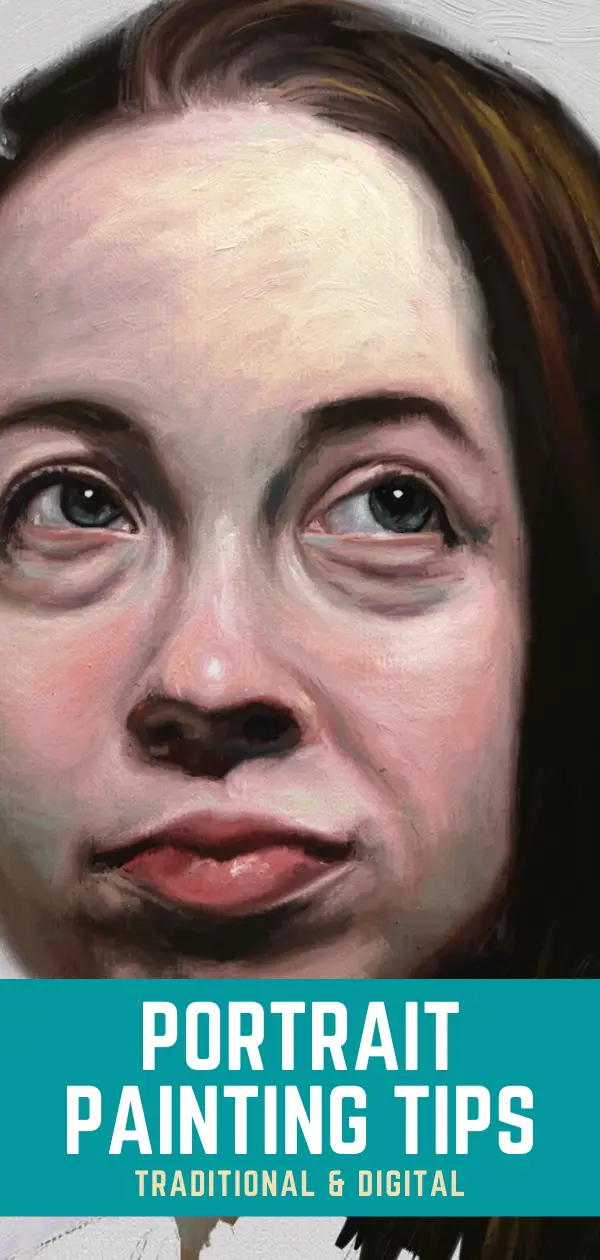
When I got my iPad, painting a realistic digital portrait was the first thing I wanted to try. As a traditional oil painter, I don’t want my digital portraits to look like digital paintings. I wanted them to look like real oil paintings. In this article, I’ll show you how I do it.
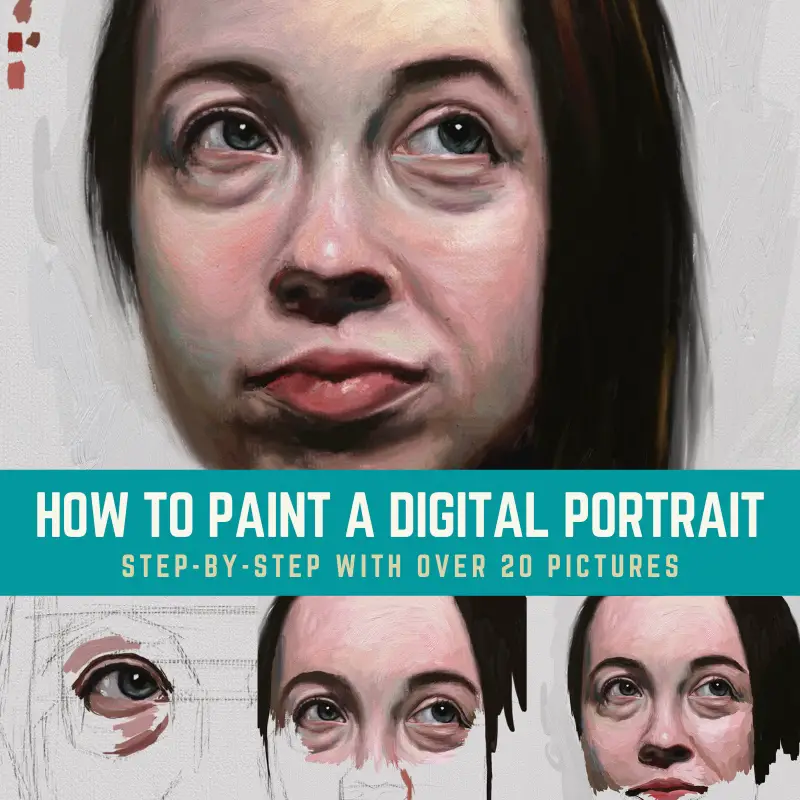
Procreate was the first program I tried, but I didn’t get the results I wanted. After giving ArtRage a try, I found that painting a realistic digital portrait was much easier for me to achieve. It’s a program that just seemed to work for me. I know many artists that use Procreate and other painting programs with great success.
NOTE: If you don’t have a digital program to paint in, you can still follow along using whatever types of paint you have. The basics are still the same.
A Different Portrait Painting Approach
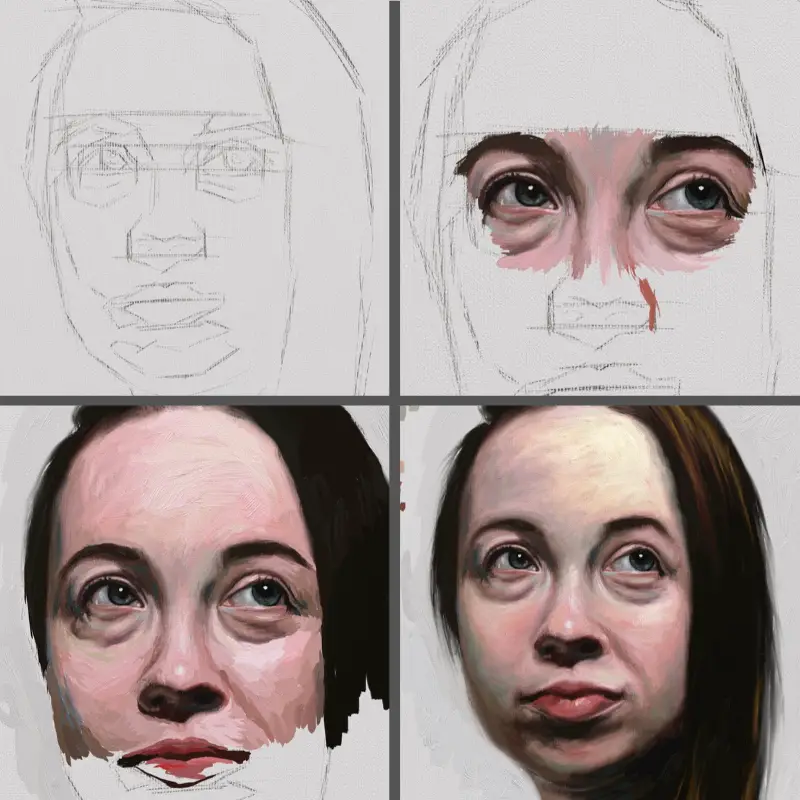
Normally, I approach my paintings exactly the same way I approach my traditional paintings. I block in all of my darks first, then medium tones and then add in highlights. When I started this portrait, I thought I was only going to paint one eye. I proceeded to paint the eye with my traditional painting approach, dark to light, but then after I finished the eye I decided to paint the other eye. And then her face looked weird with just the two eyes done so I connected them together. The next thing I knew I was painting in the whole face, but just piece by piece.
There are a lot of artists that paint this way so it is not uncommon. If you are an experienced artist and stick with a limited color palette, you shouldn’t have a problem with proportions and values. If you are a beginning artist, you may find that if you approach painting this way, some parts of the face may seem disconnected from other parts.
Usually, this is because the values are inconsistent or the drawing is off. That is OK as we are just practicing here. This tutorial can be great for learning how to just do eyes or only a mouth. I’m planning on painting this portrait in oil using my normal approach, so look for that in the future.
Getting Started On A Digital Portrait
As I’ve said in previous tutorials, there are many ways to get started with digital portrait painting. You can practice your drawing skills by drawing the portrait using the sight-size method as I’ve done in this lesson, or you can trace in your portrait. Either way is fine to get started.
If you think it’s cheating to trace, watch Tim’s Vermeer and get back to me. Artists have used technology throughout the centuries to create masterworks. I am in the no-judgment zone here. For some beginning artists, it helps to trace to understand form.
When I first started drawing and painting, I did everything freehand and got very good results, but that doesn’t happen for everyone. So do what works for you. Lately, I’ve been blocking in my drawings using a grid to help me get proportions correct quicker. I’m an impatient painter and want to use my paints as fast as possible.
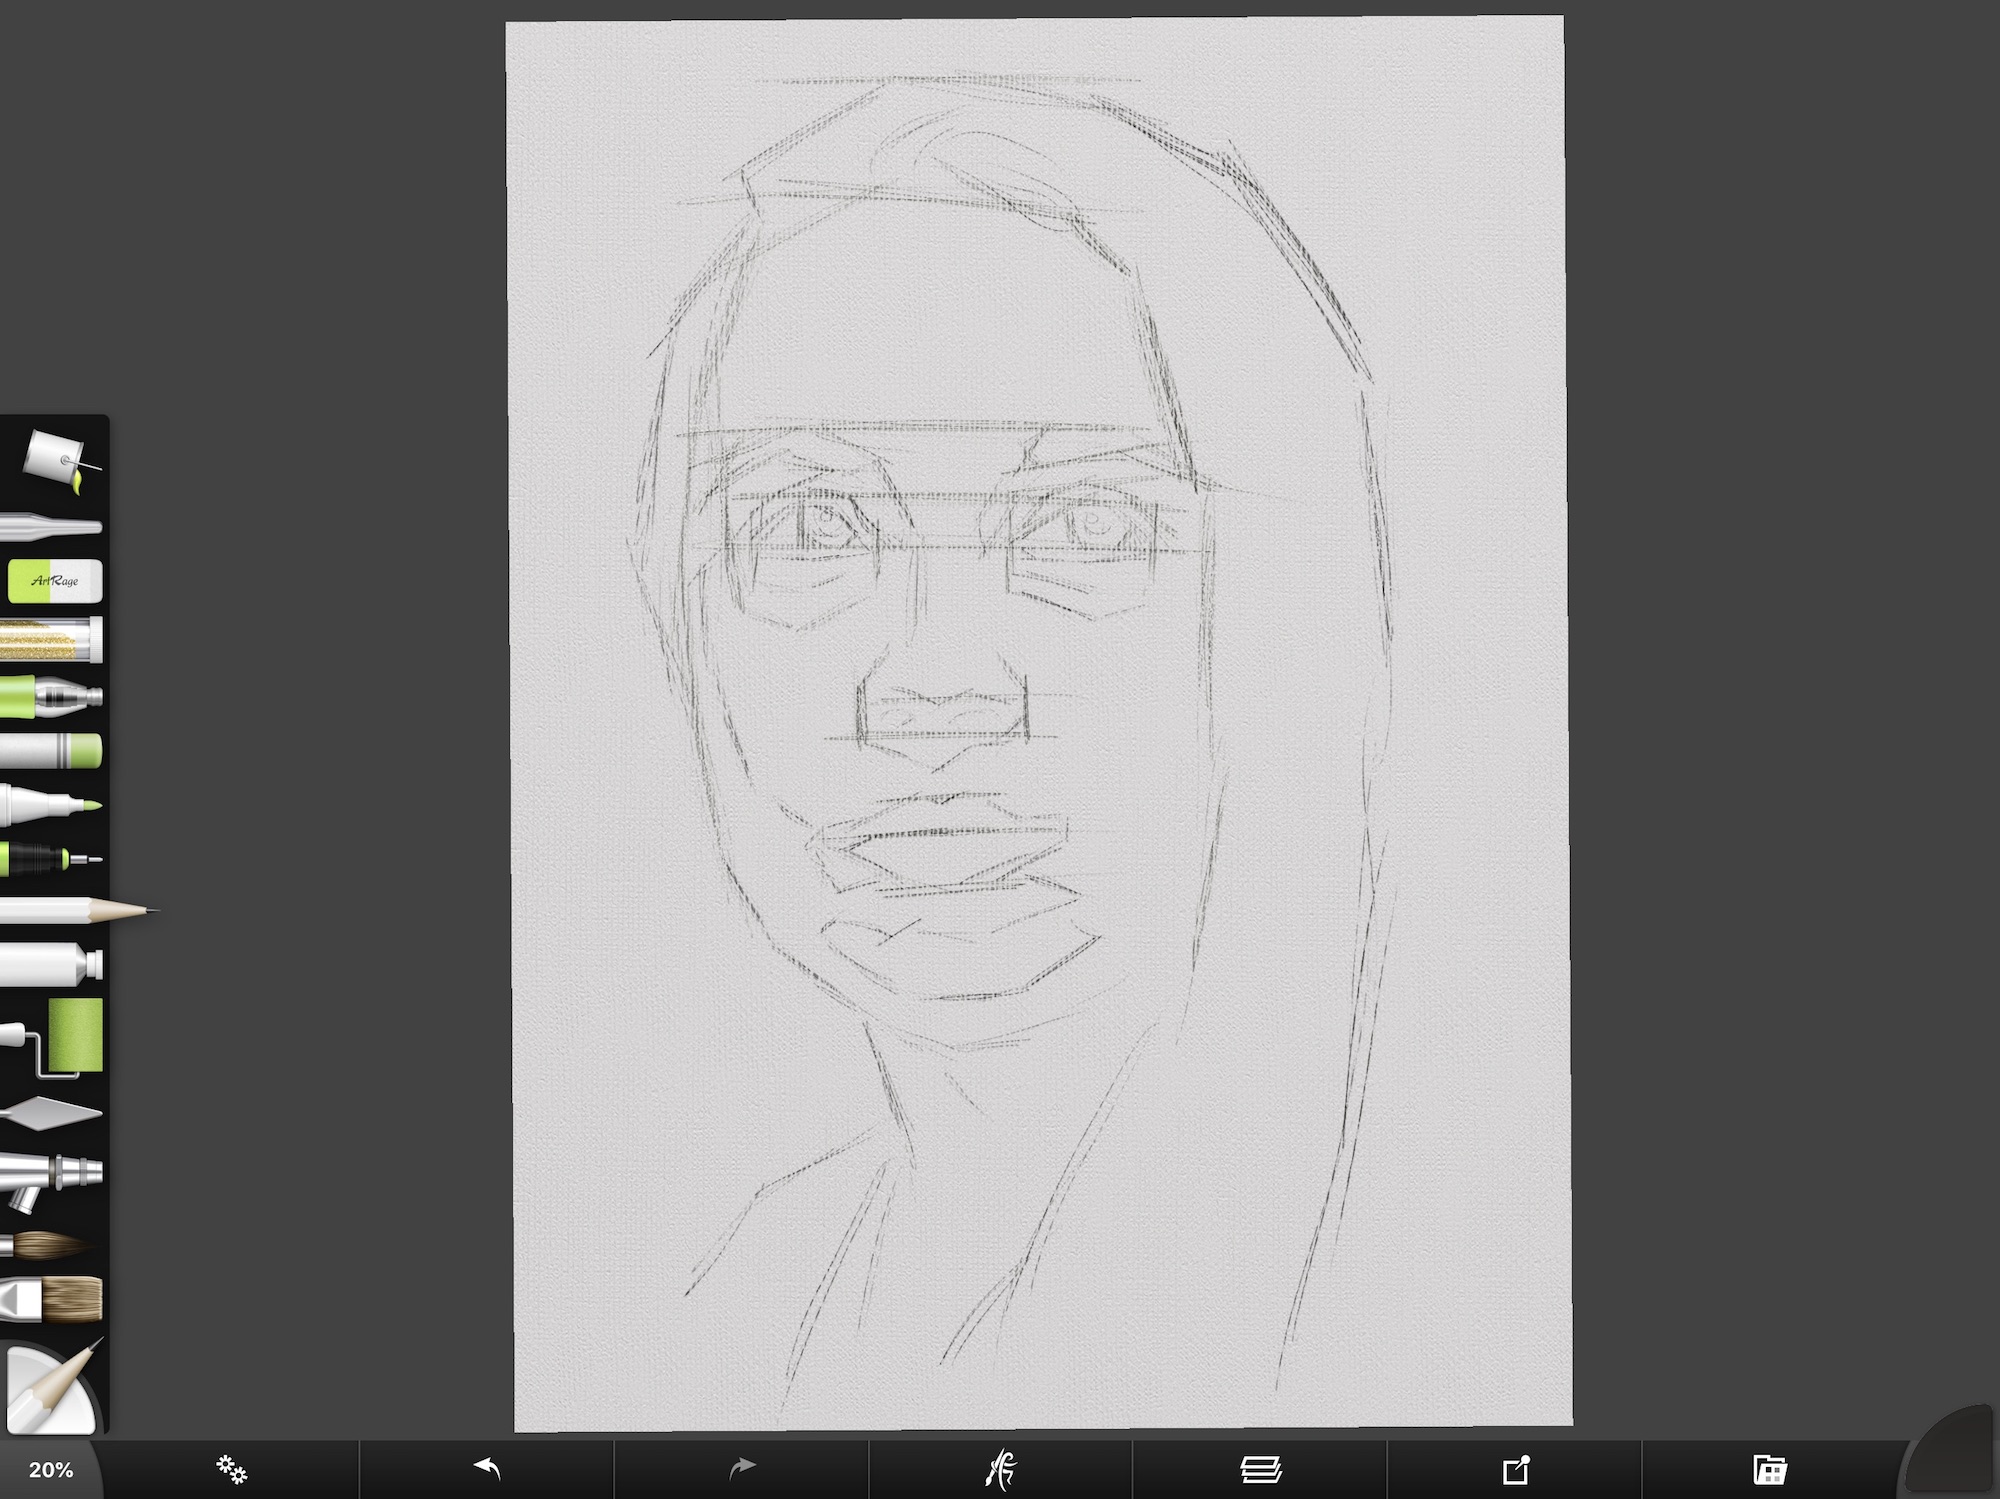
Sketch In The Portrait
Above you can see that I’ve sketched in the portrait with a digital pencil. I always like to mark in the top and bottom of the eyes, the base of the nose, the middle of the mouth, the chin and hairline with horizontal lines. If you are working from a live model, you can extend your arm out fully, close one eye and measure the distance between two points with your thumb on the pencil or charcoal and transfer the measurement.
I had my image to the left of my canvas at the same size and quickly sketched in the drawing, double-checking my measurements as I went along. I got the image of this woman off of the Sktchy app, which I highly recommend for beginning artists. It’s a great community and you can get a lot of resource images there to work from.
Tips For Keeping It Real While Painting A Digital Portrait
When you paint digitally, you have the option to paint in layers. When I paint in oil, I either paint alla prima (all in one sitting) or wet-in-wet, meaning I finish the painting in a couple of days while the paint is still wet. In order to create the same look and feel as my traditional oil paintings, I paint all in one layer in ArtRage. It keeps it really simple.
I use the oil brush tool in various sizes with the pressure set to 75-85%. The thinners are set to zero and the loading is around 75 – 85%. I also keep the insta-dry feature off and auto clean on. I like to let my paint colors blend together as much as possible while I paint, but I’ve found that I still need to go in with the knife tool with it set to “just blend paint” and use a light touch.
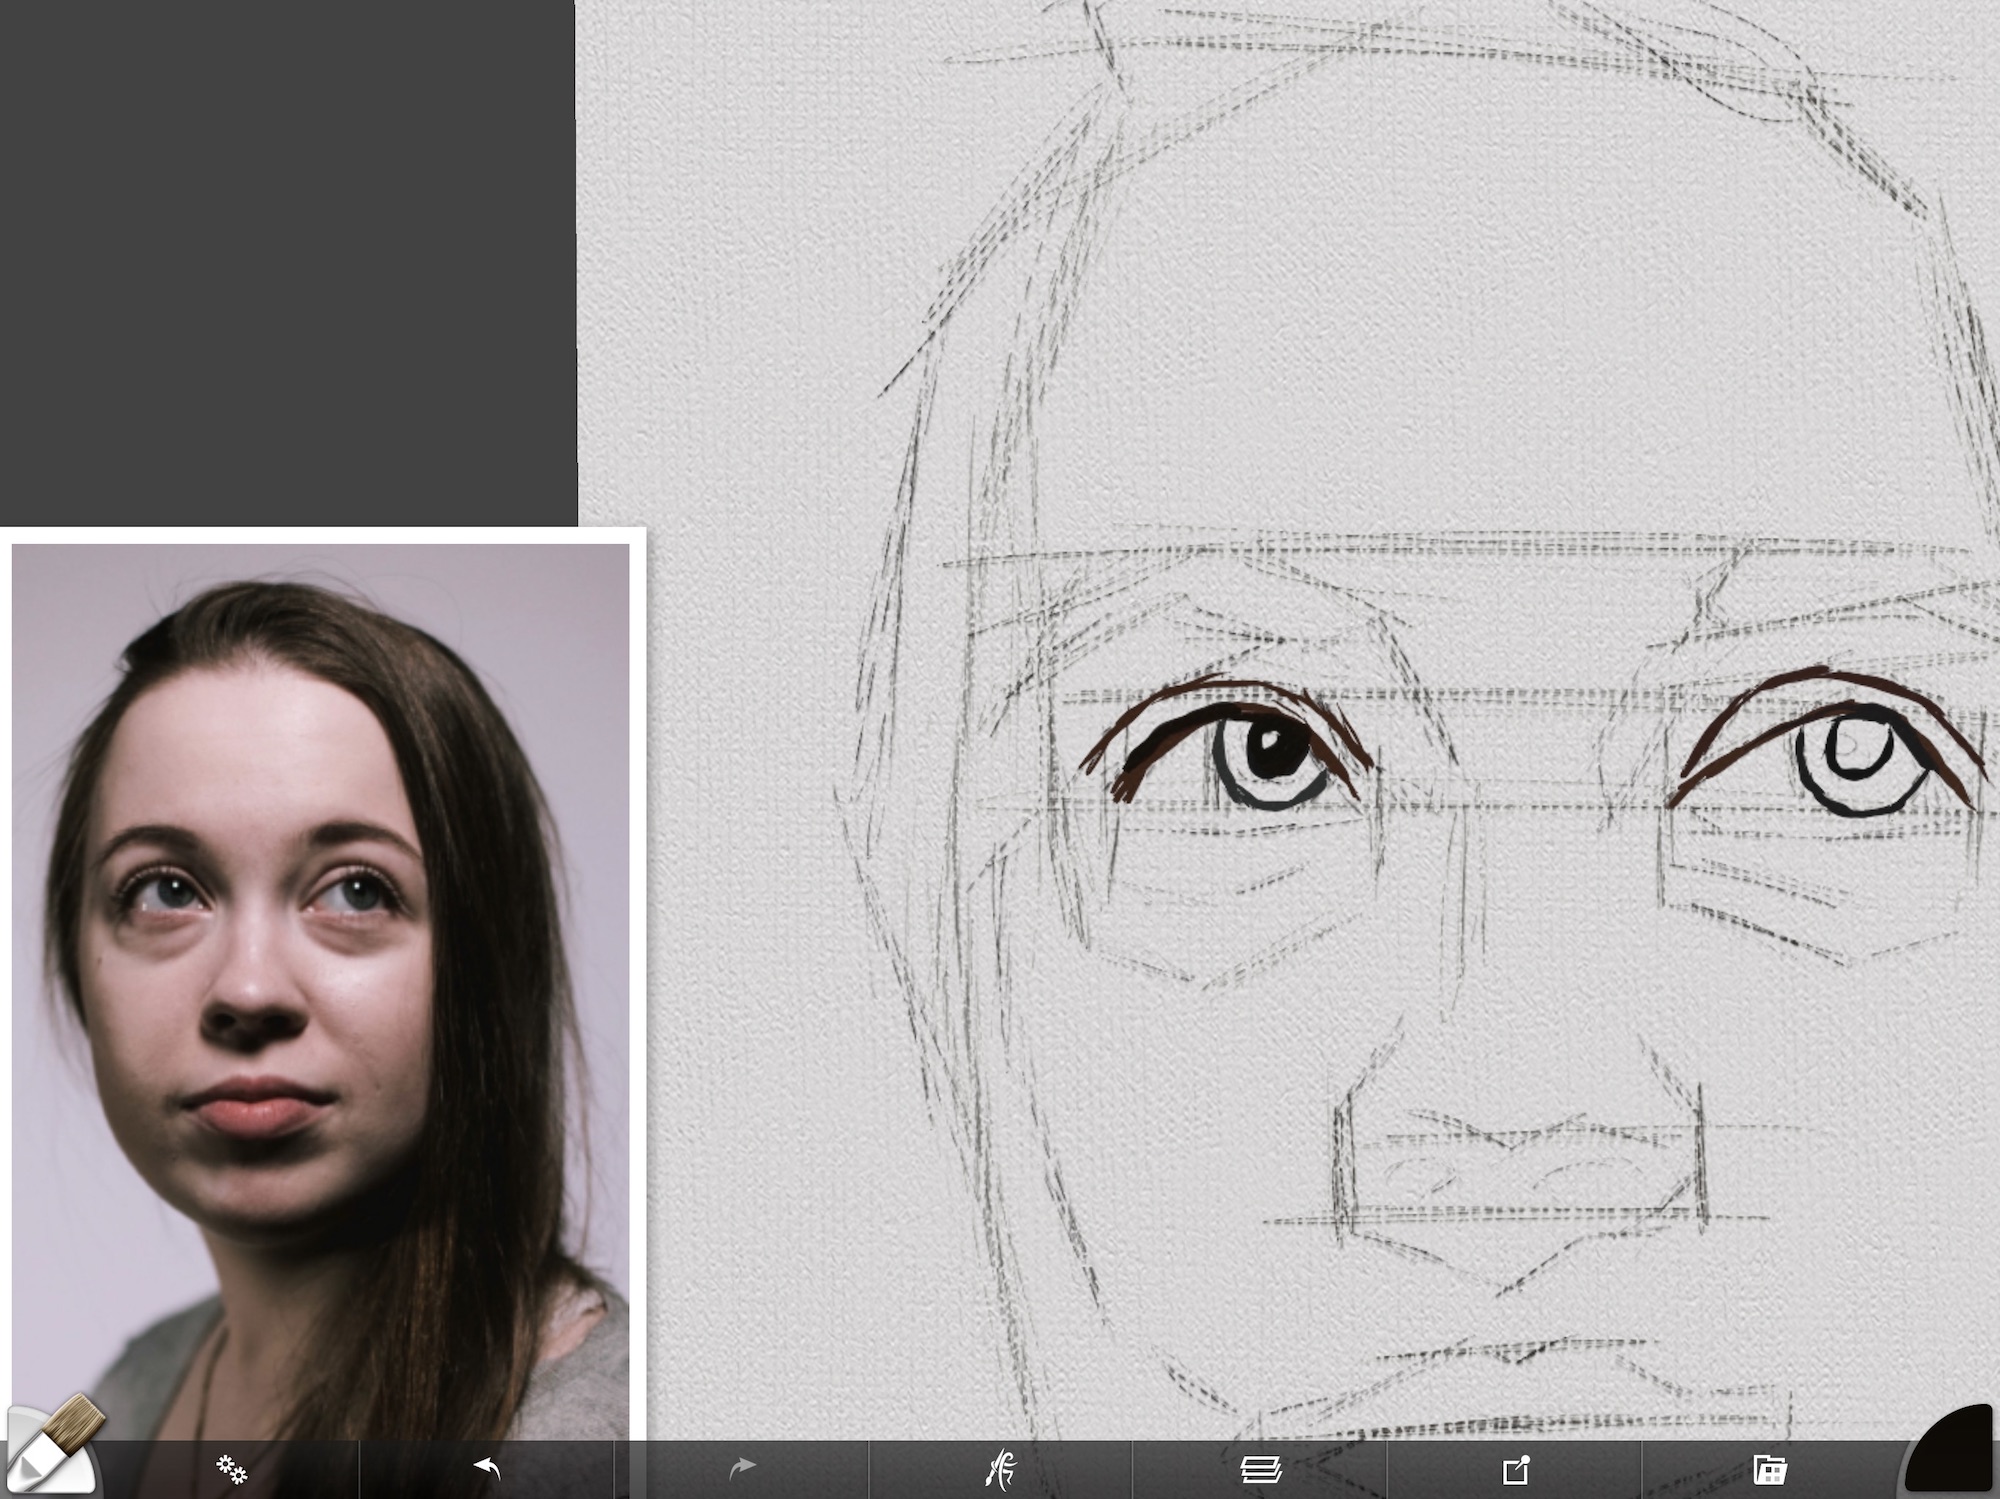
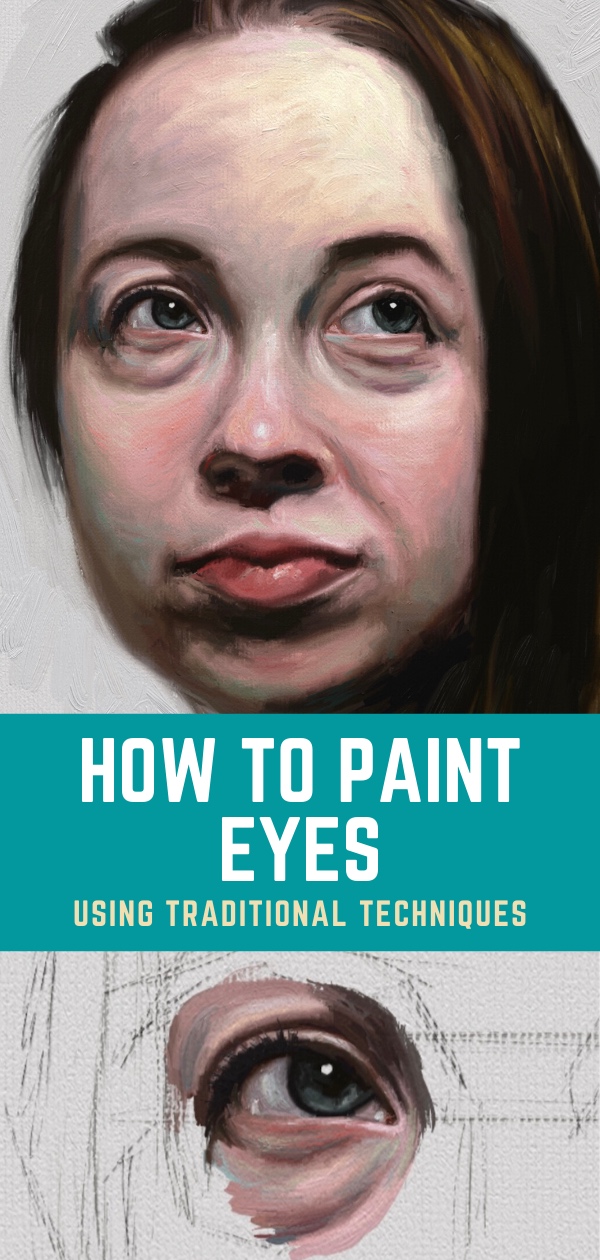
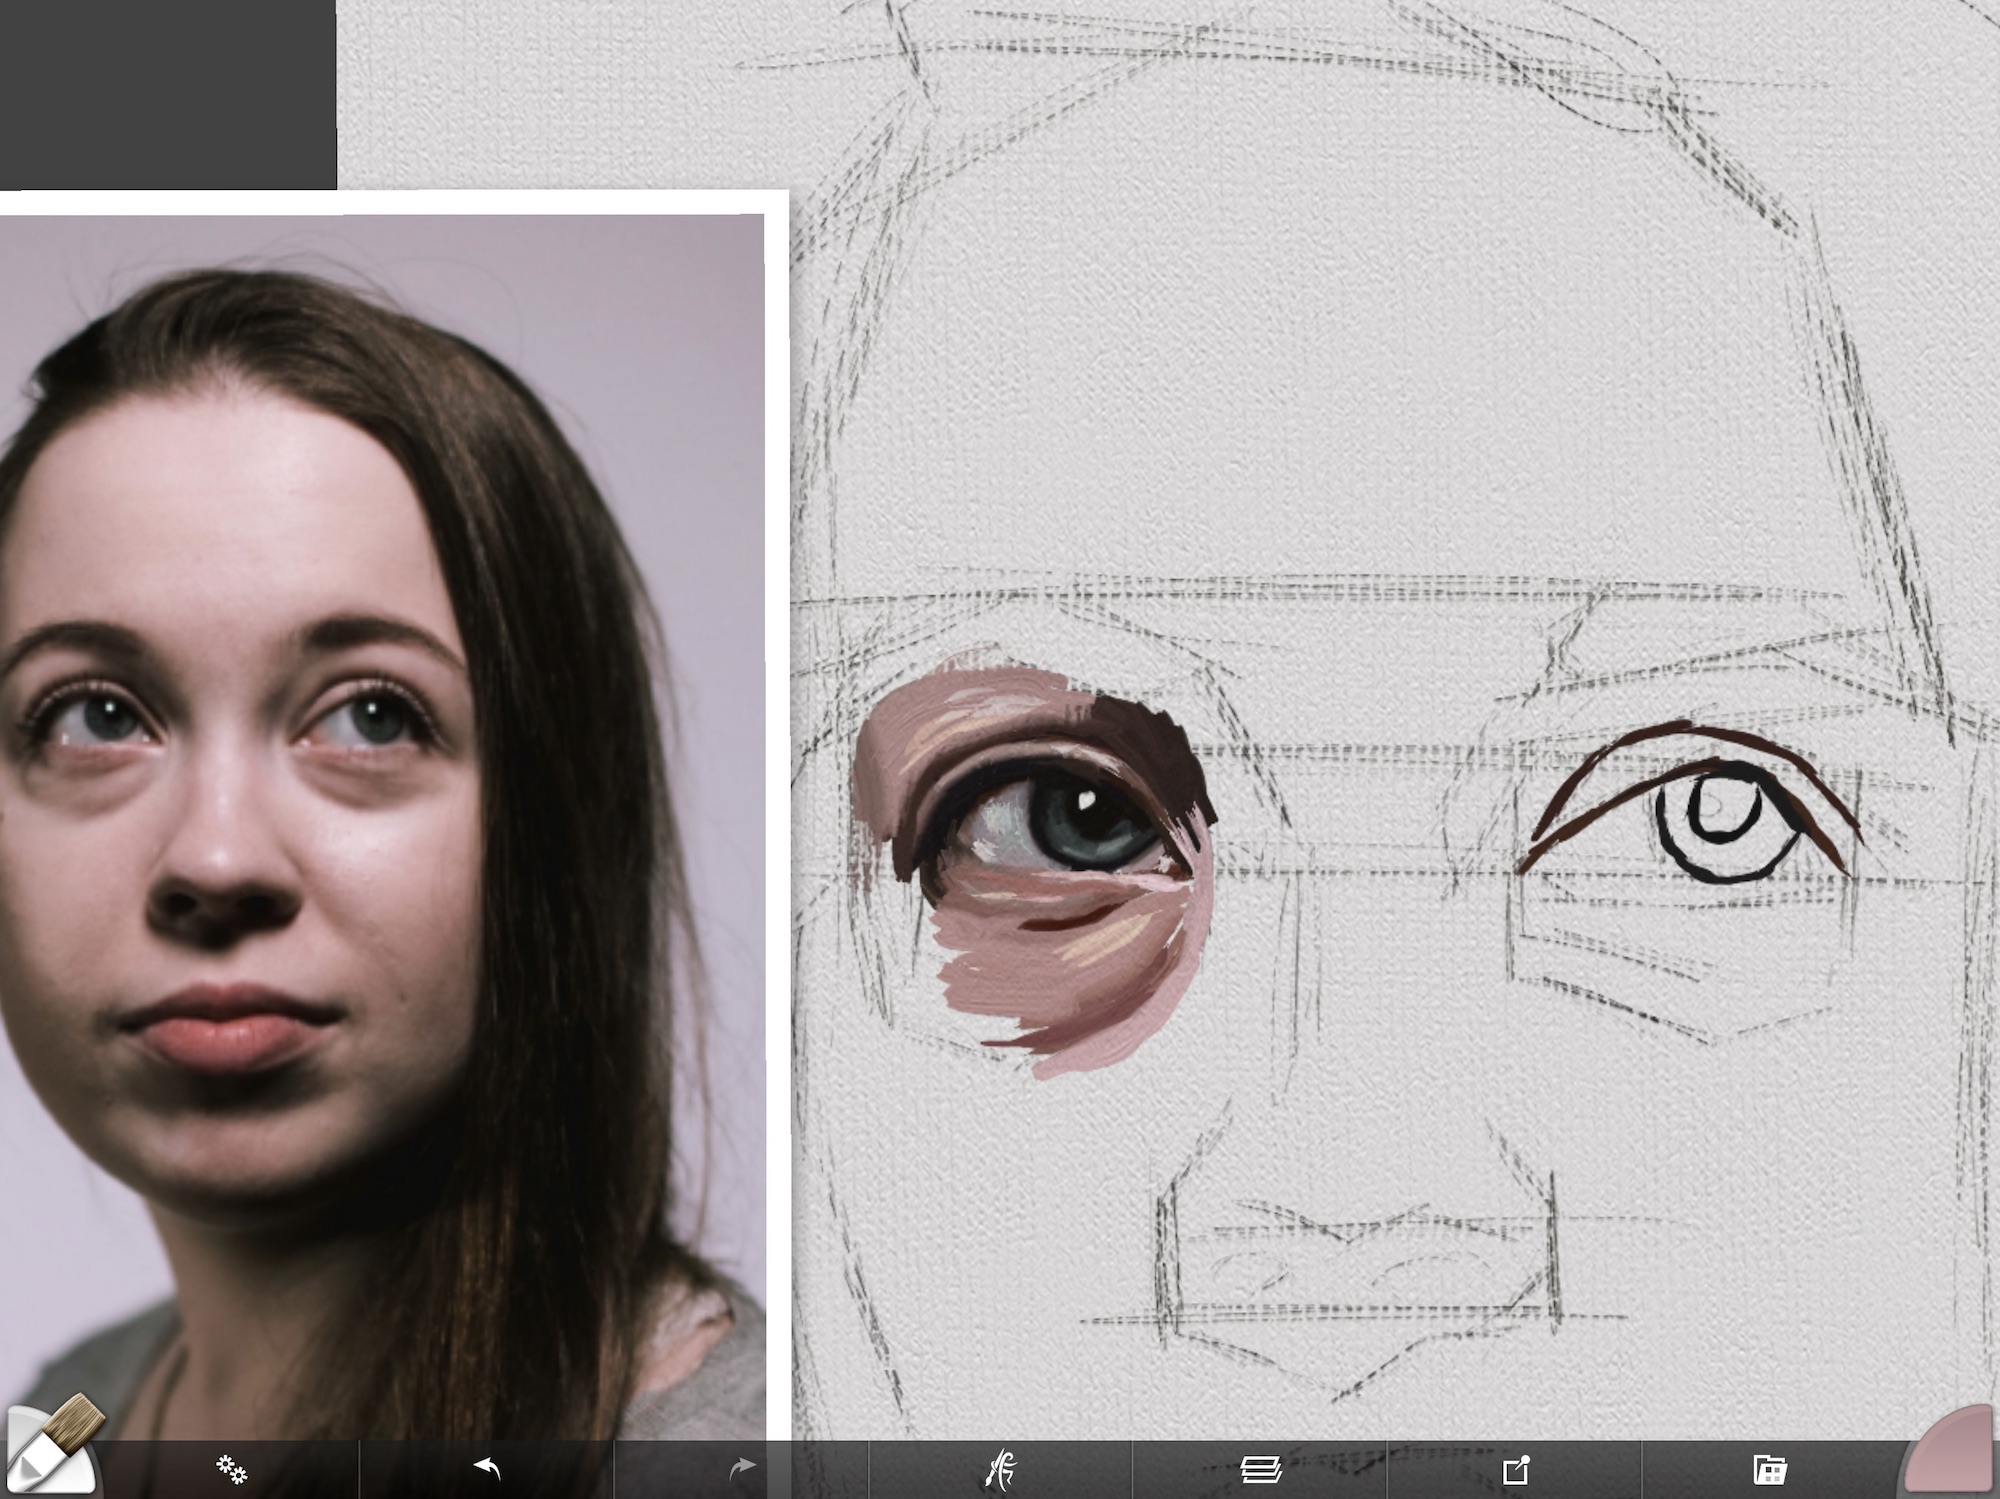
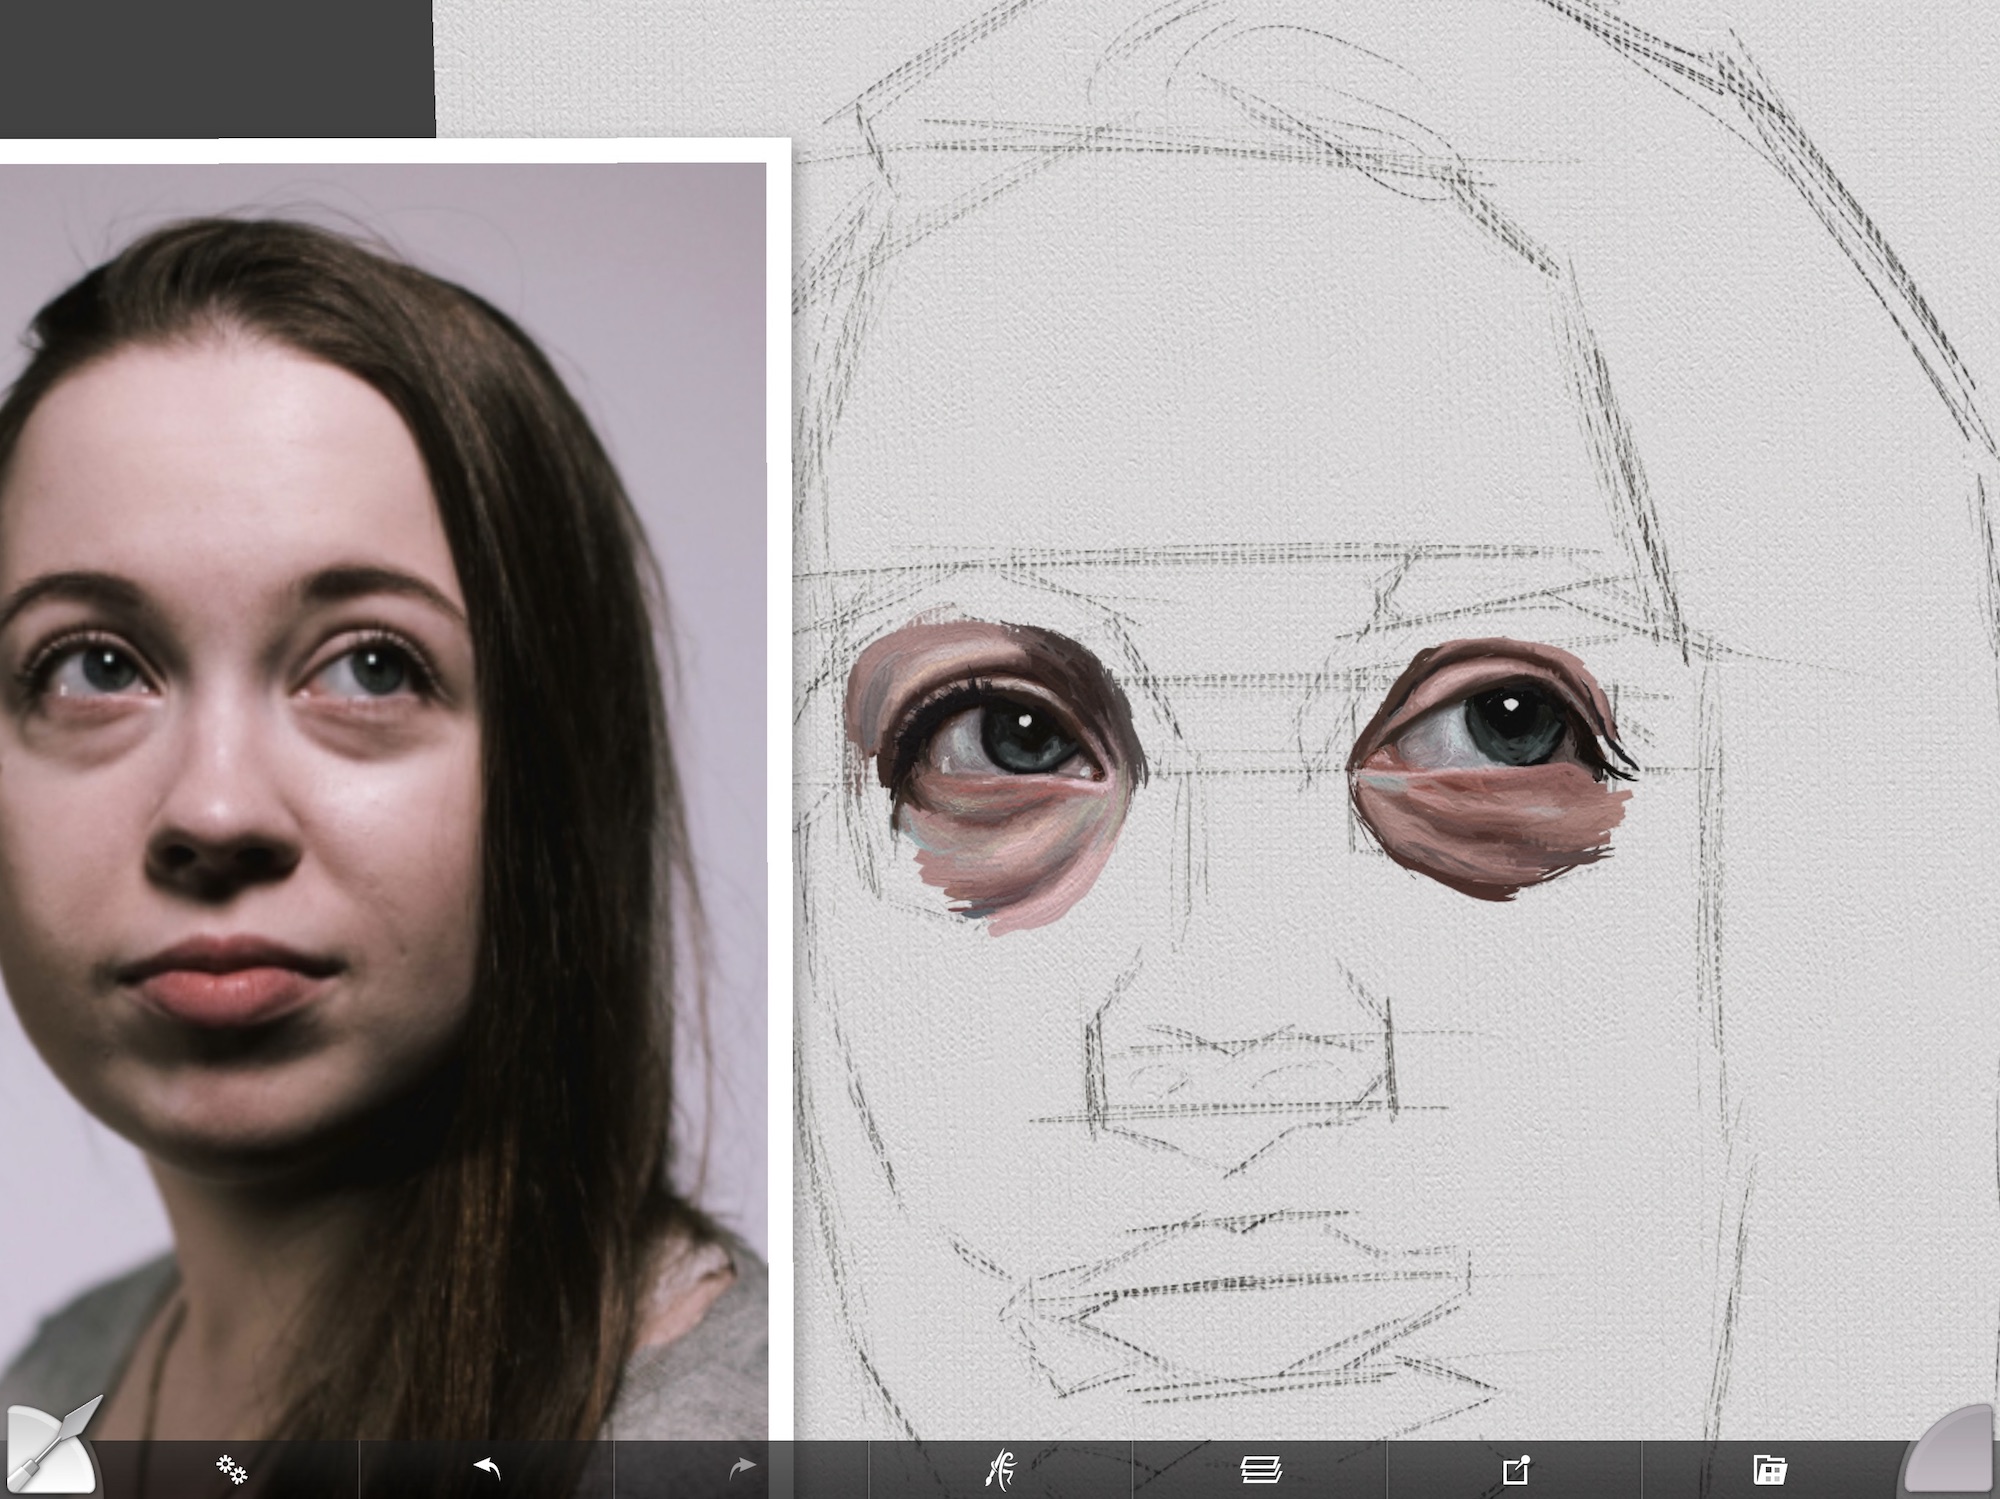
Painting Eyes: Rough-In The Dark Areas First
Even though I didn’t approach the overall portrait the way I normally paint, I still did follow the basics with each area that I tackled. As always, I start with my darkest areas first.
I love to paint eyes and think they are pretty easy once you learn how to do them. I outline the upper lid, as there is usually a shadow created there, then outline the iris and fill in the pupil. This doesn’t have to be done perfectly as you will be blending paint later on. I think I started with a very dark brown here.
Paint In The Iris In A Digital Portrait
Next, I quickly painted in the Iris using a dark blue/grey color. If you are painting digitally, you can sample colors from the photo, but I don’t ever think they are really accurate. They are close, but as an artist, you may want to choose a better color. If I do sample a color, I will adjust it to a color that fits with the palette I want to work with.
Speaking of palettes, you can create a color palette ahead of time and put samples on the side of your canvas. This keeps you within a color family and creates consistency.

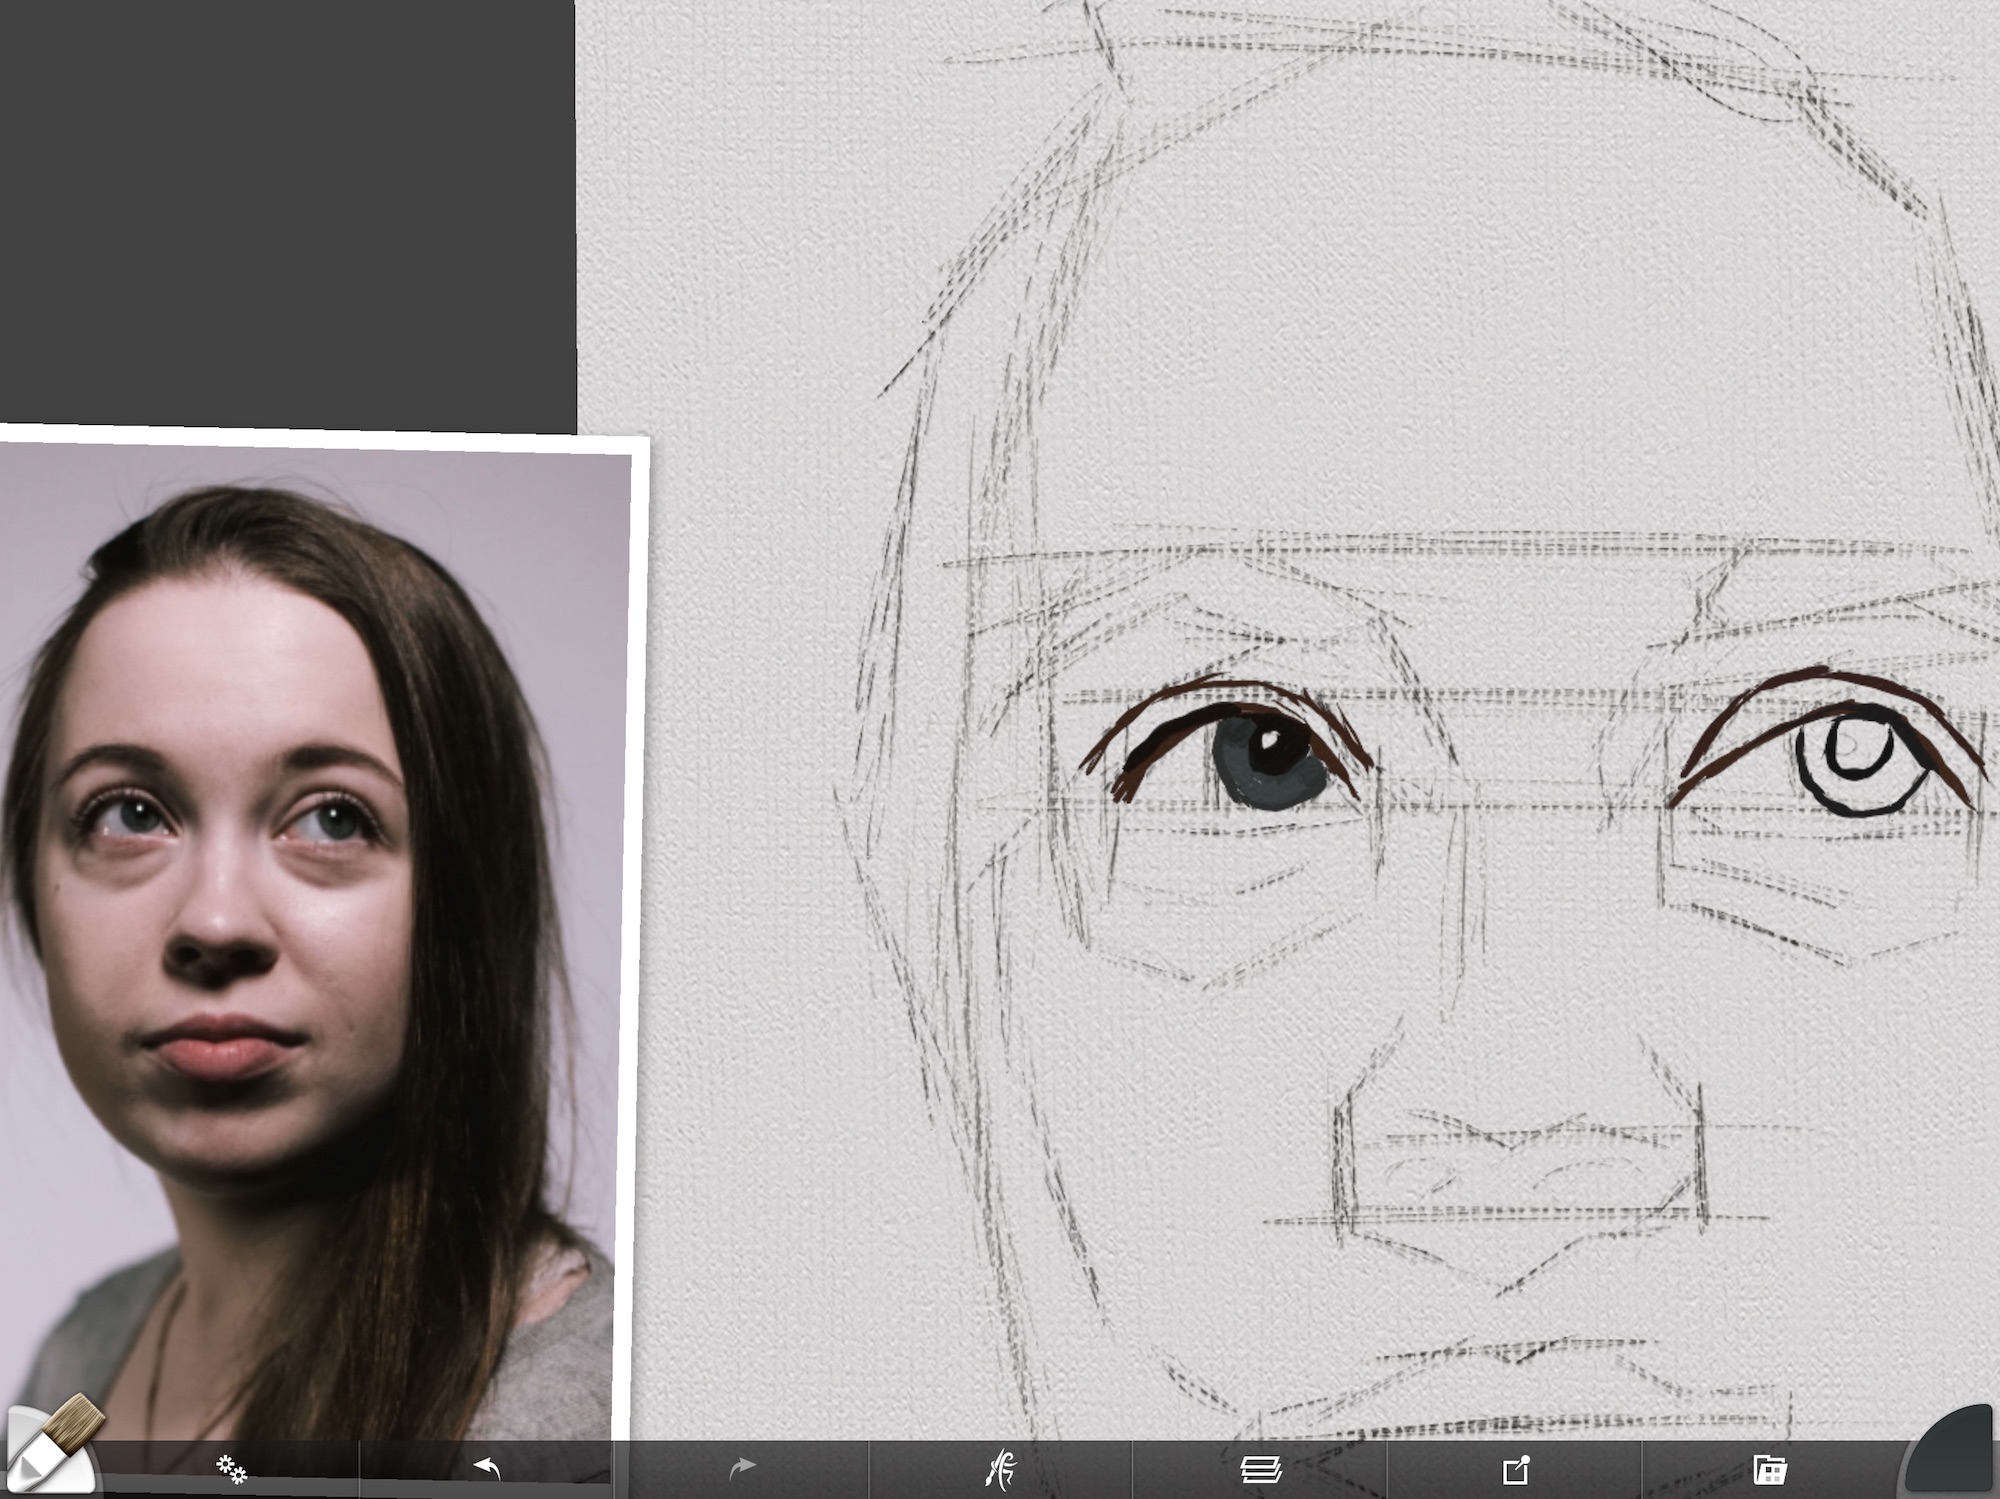
If you look closely in the image above, you can see that I darkened the iris just below the eyelid a little bit. This is due to the shadow that is created by the lid. Many beginning artists will keep the iris the same color all the way around which doesn’t look natural.
I also started to add in medium-toned reflections in the iris toward the bottom.
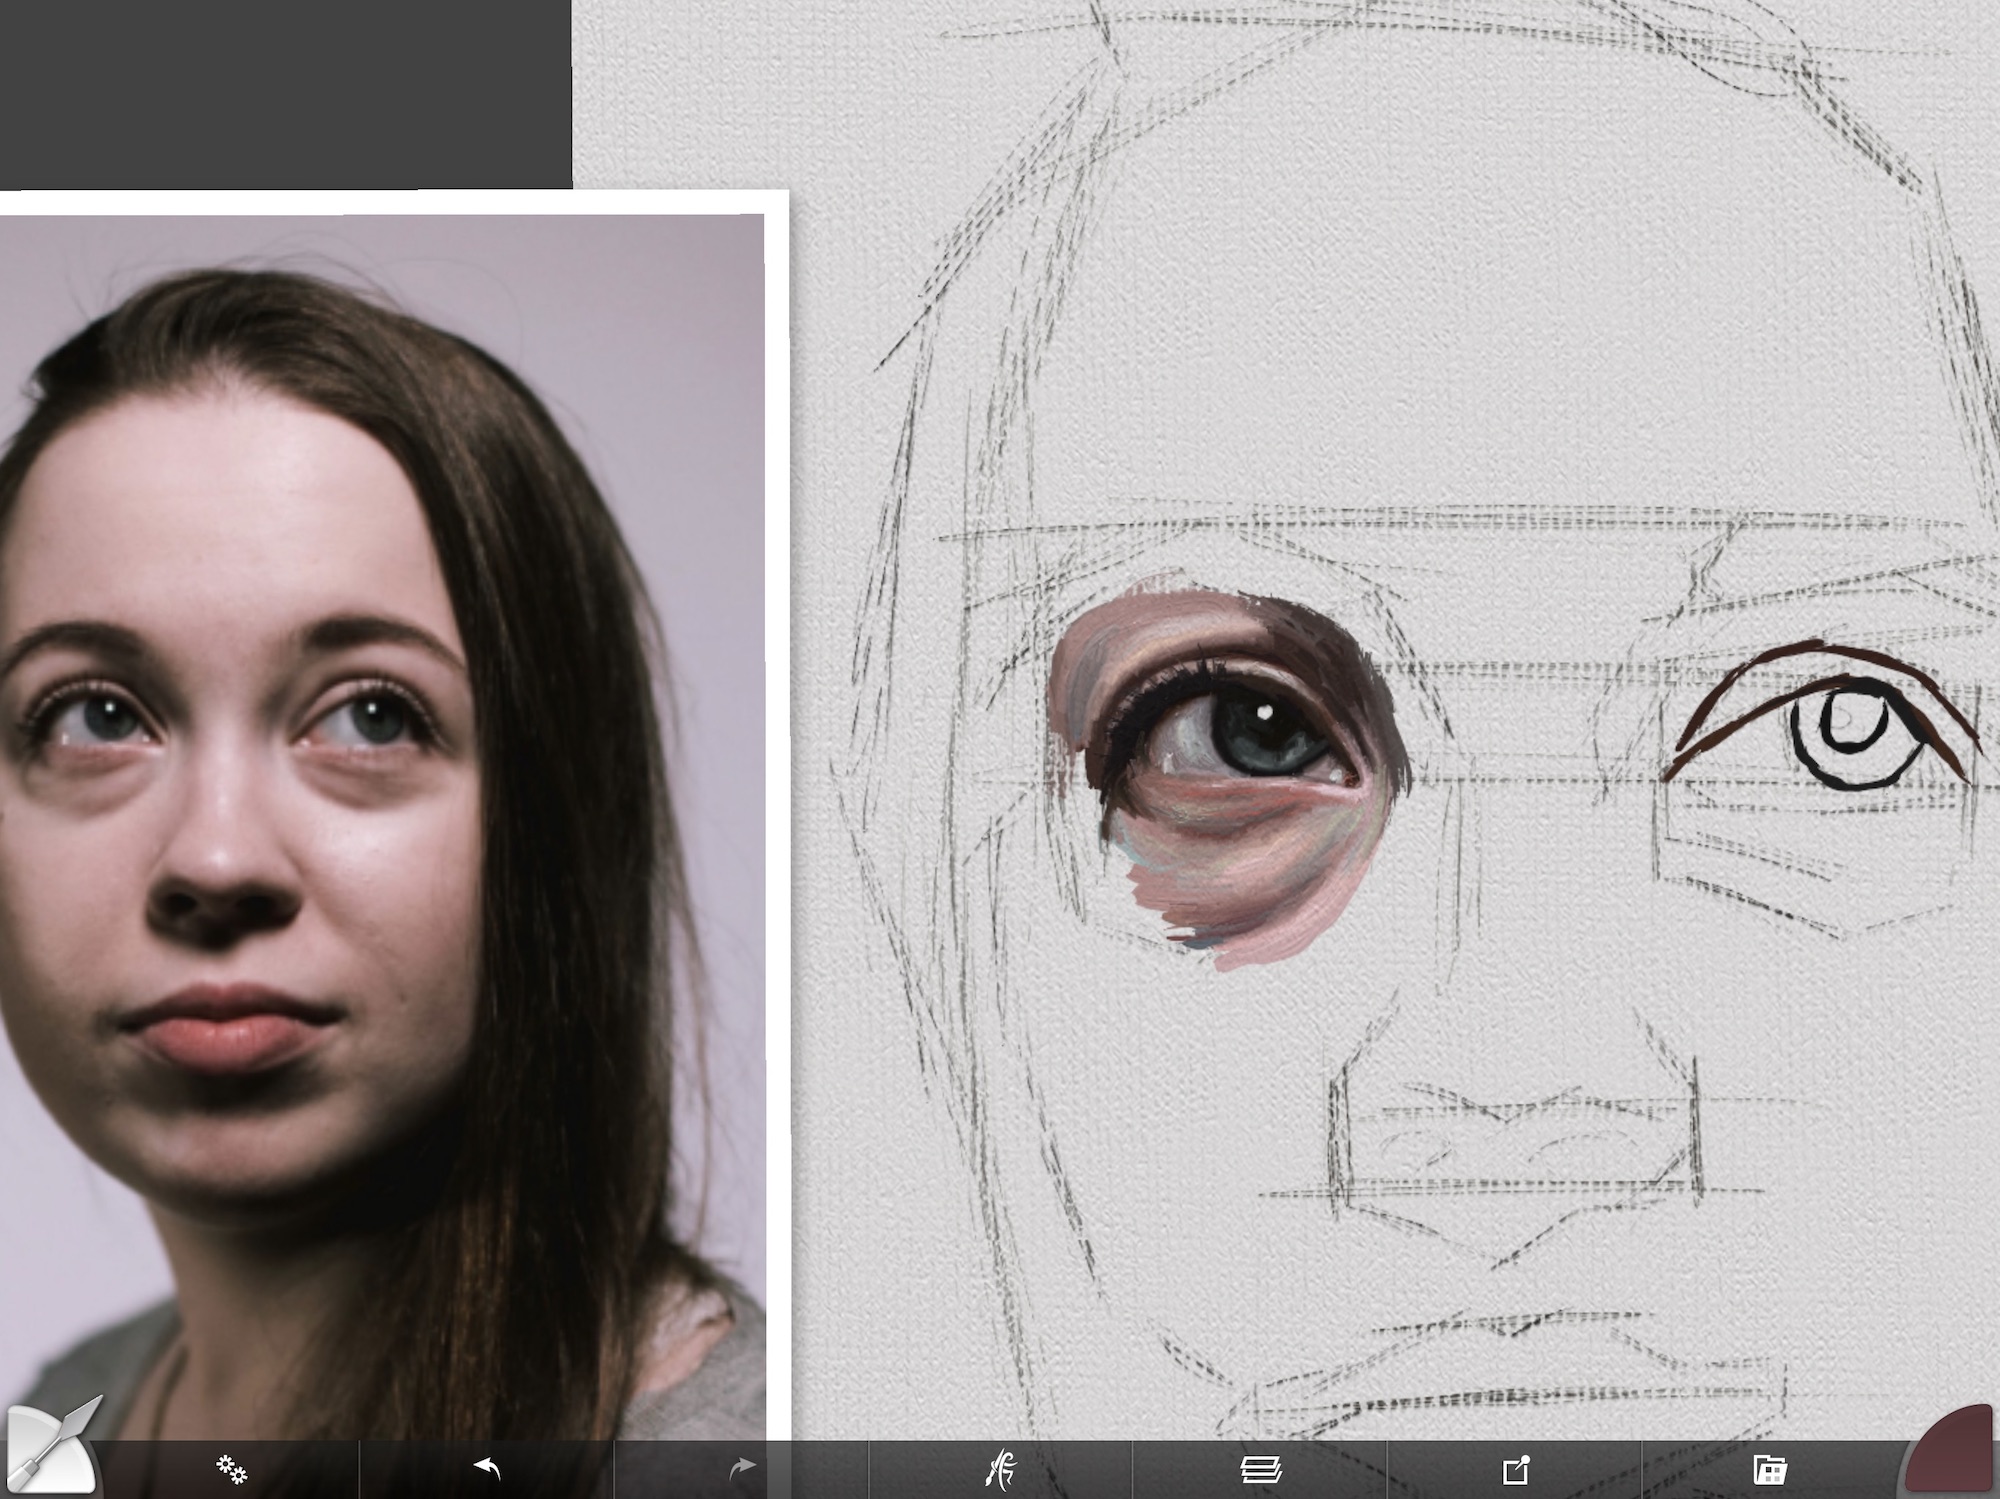
Painting The “Whites” Of The Eye
When doing a digital portrait, keep in mind that all the rules for painting a realistic portrait apply here. It is very rare that the white of the eye is ever white. There may be a white reflection in the eye, but for the most part, the whites of the eye are shades of grey.
Below you can see that I started out with a pretty dark grey to rough in the area. This grey has some reddish-purple tones in it.
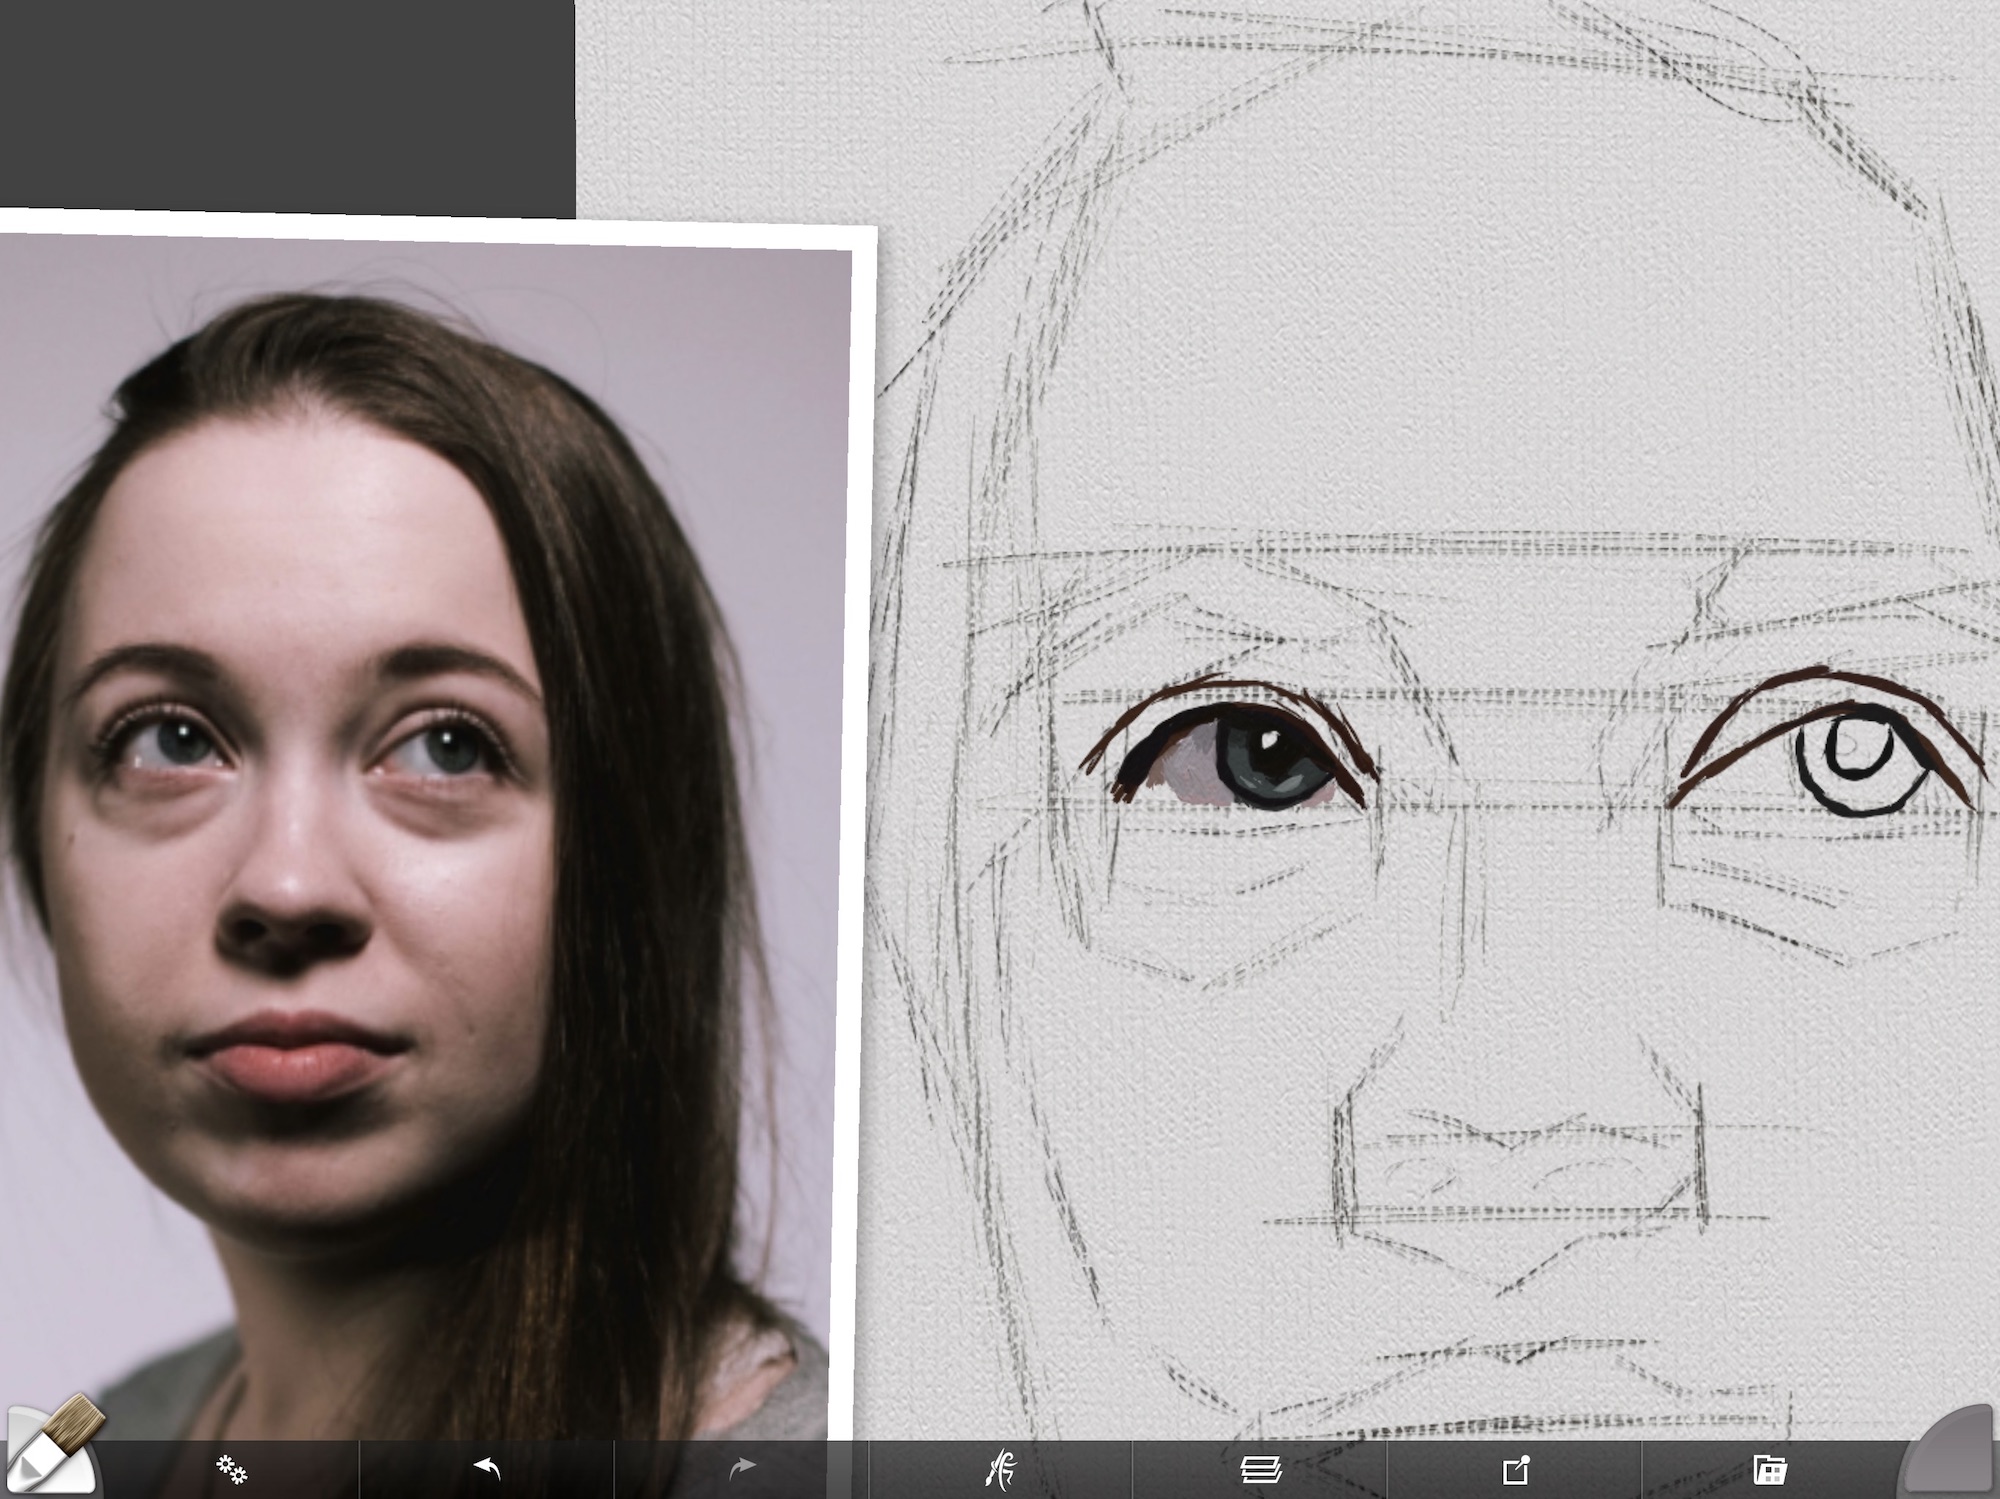
In the screenshot below, notice how I’ve subtly blended where the top eyelid meets the white of the eye. The eye is a sphere and in order for it to appear round, you need to create the shape through values. The values will be darker where there is a shadow being cast. And the upper eyelid most always casts a bit of a shadow.
I also added a couple of small lighter grey reflections that start to make the eye appear wet and round.

Adding Flesh Tones In A Digital Portrait
In the images above and below, I started to add in the flesh tones around the eye starting with the darker colors. Even though she has a pale complexion, notice how dark the colors are that I’m painting.
Beginning painters make the mistake of painting things much lighter than they actually are. I always start darker since I know I can always add lighter colors later. It’s much harder to make lighter colors darker. Everything starts to get milky when you try to do that. It’s best to erase the paint in a digital portrait or wipe the paint off with a rag or knife in a traditional portrait and start over.
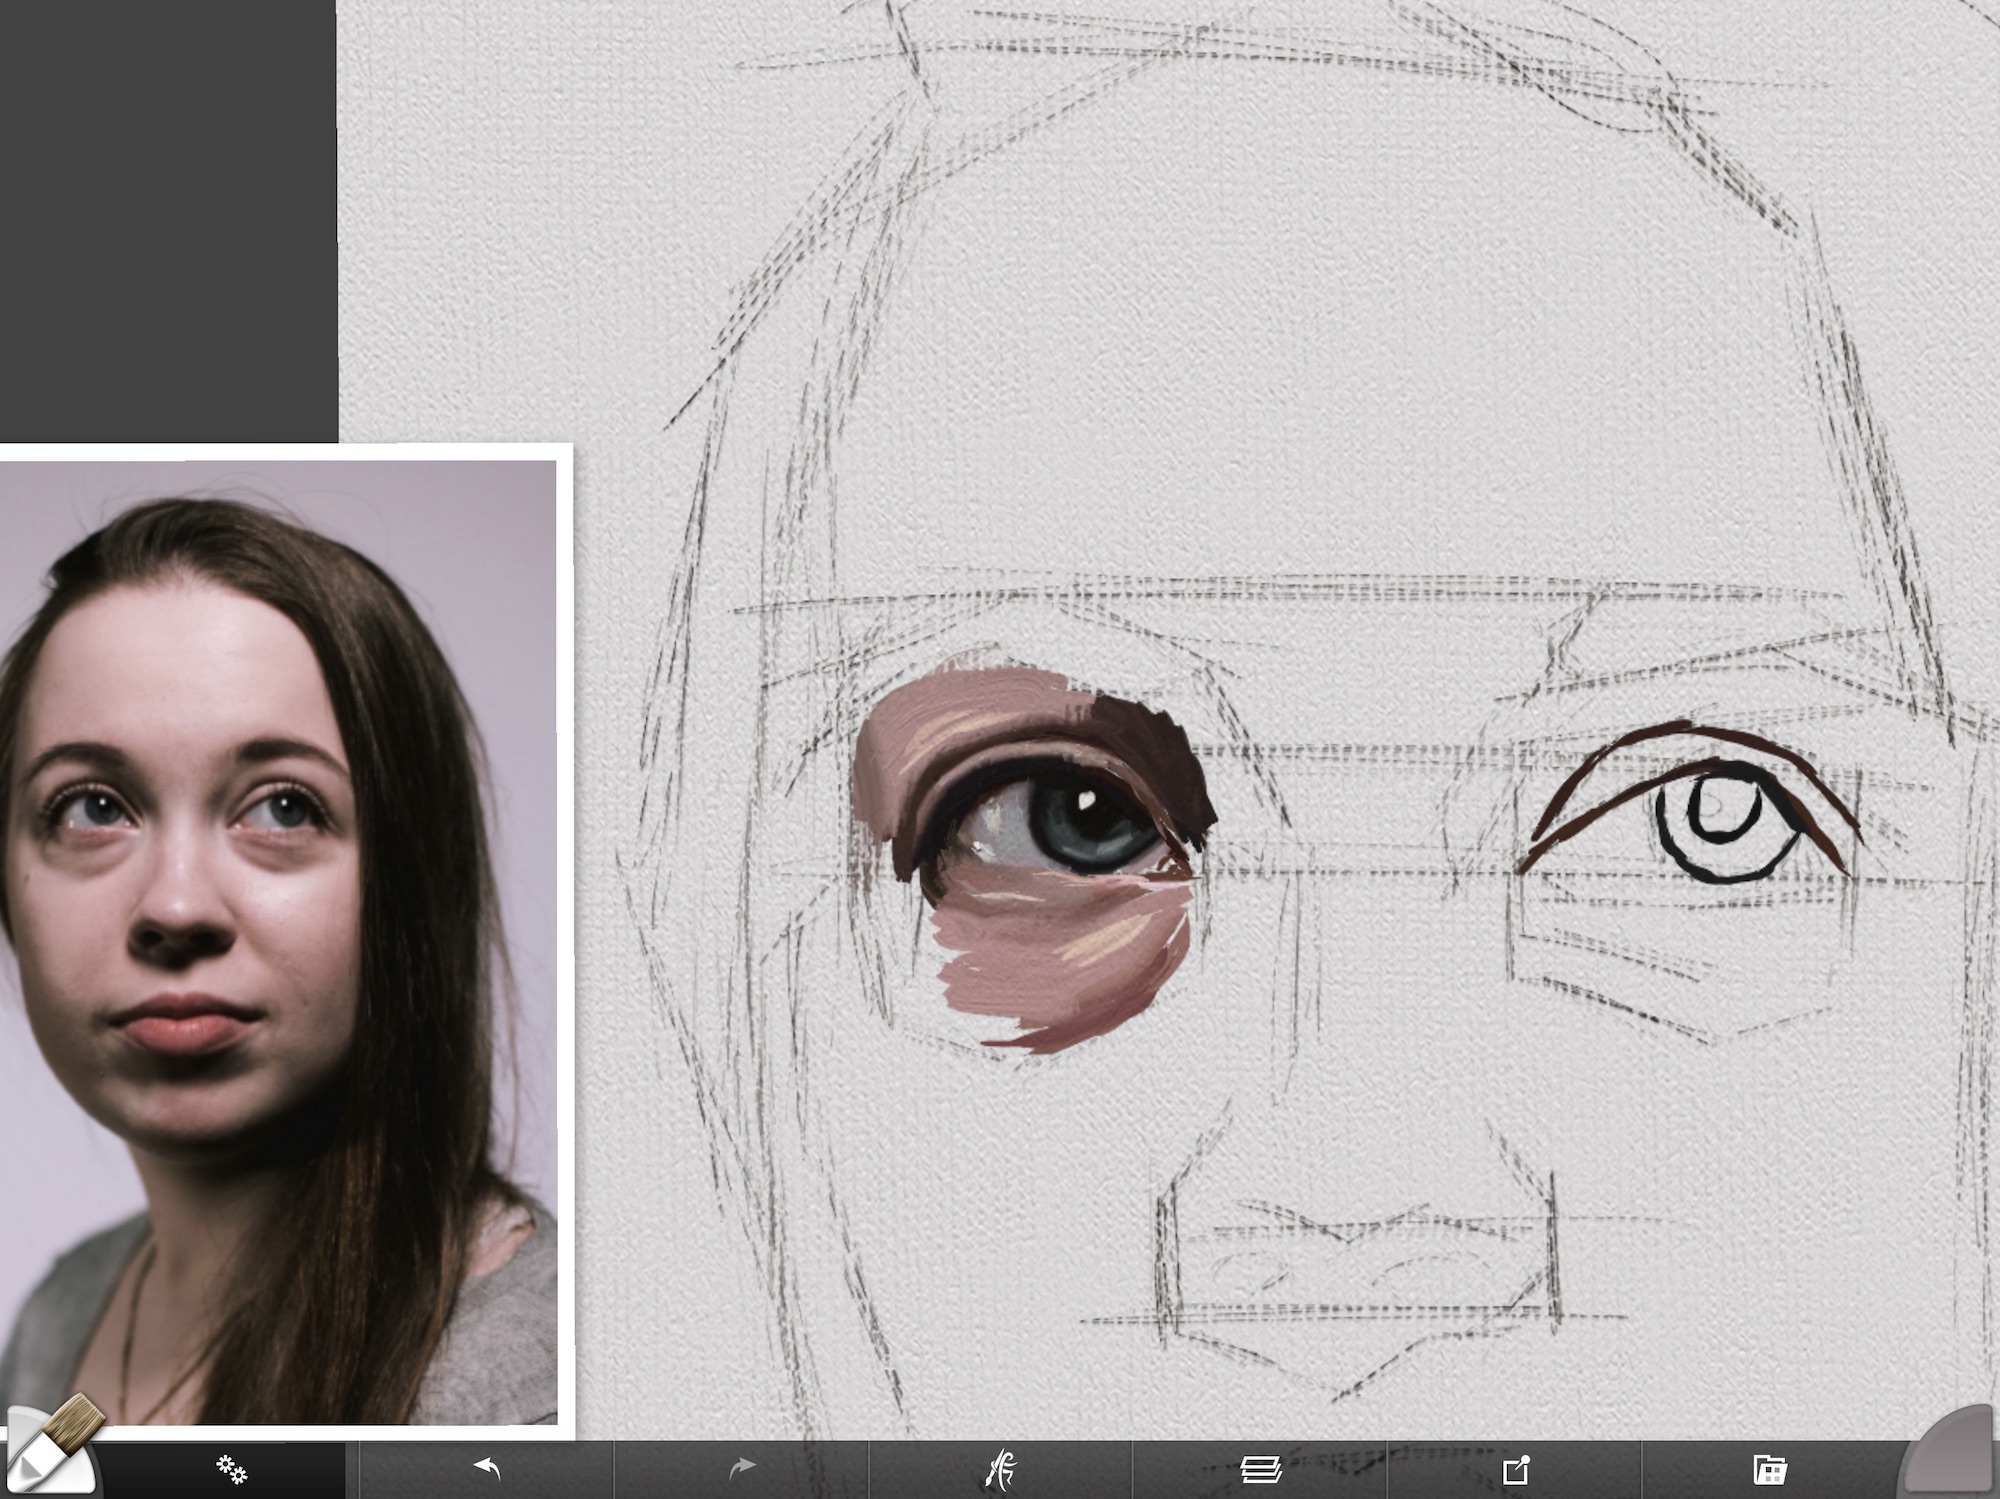
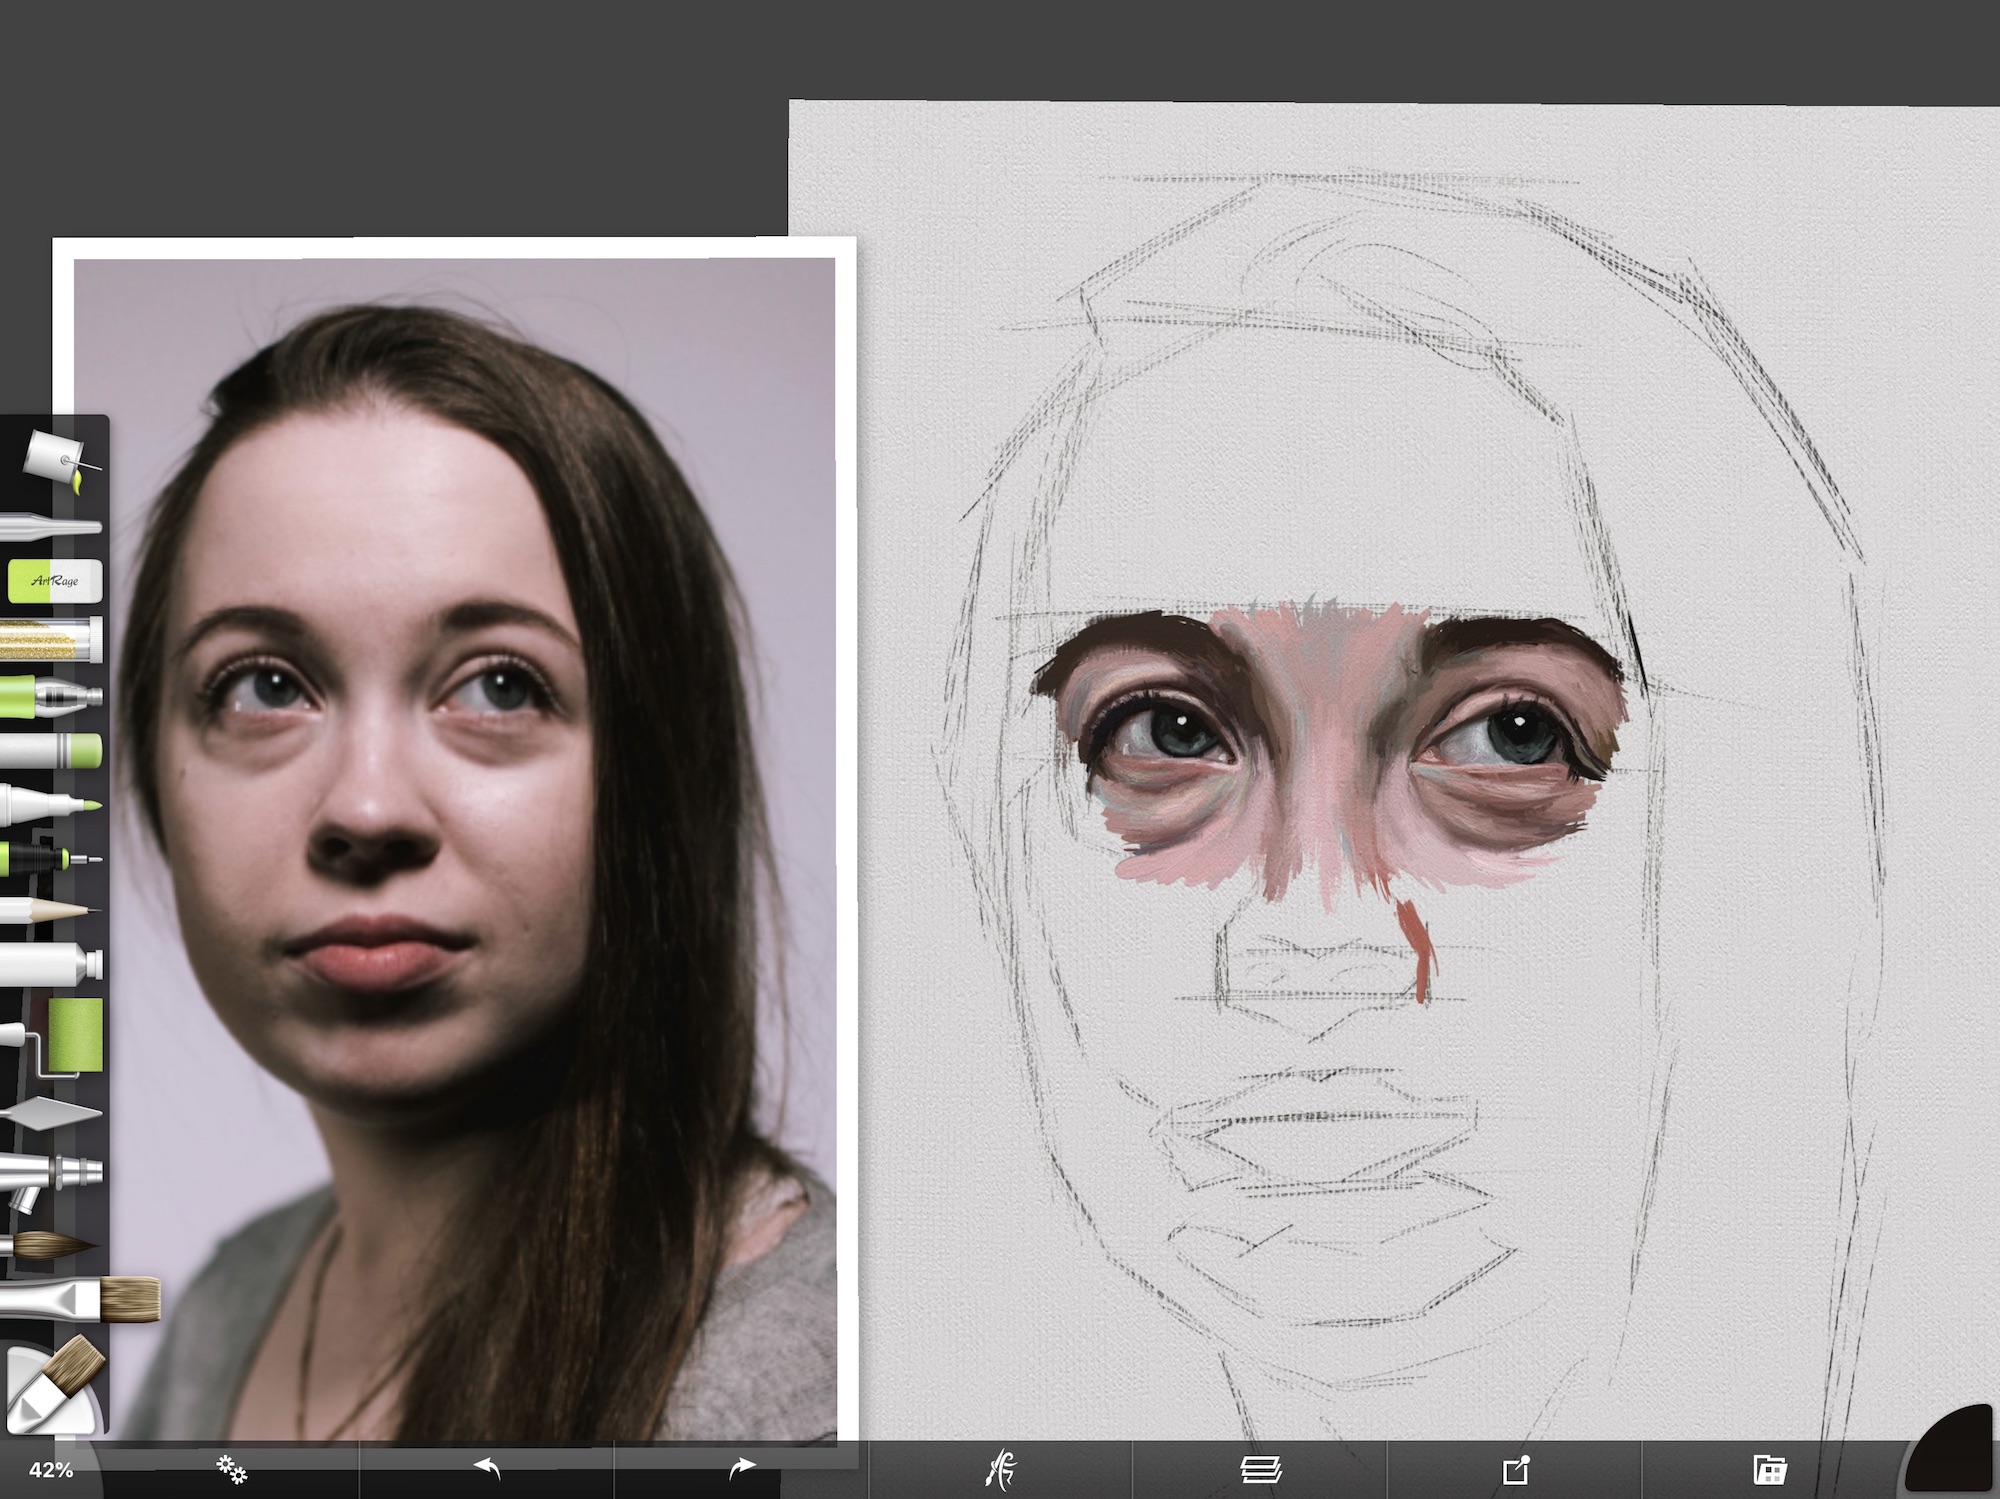
Creating Depth In The Eye Socket
Even when I paint a digital portrait, I still squint my eyes frequently to see the values. In the screenshot above, I’ve added a very dark brown color to the upper right of the eye.
I’ve also painted in the crease of the upper eyelid with the same color. After adding the medium flesh tone above and below the eye, I started to indicate a few highlight areas. All of this will get blended together lightly with the knife tool. When painting with oil paints and a brush, this blending can occur naturally.
I like to leave brush marks with the paint and don’t go too crazy blending. But that is up to your personal preference for what look you want to achieve. Some artists are very meticulous about blending and like to blur out their brushstrokes. It’s your painting and you can do what you want, but try to not blend everything. You may be surprised by the effects you get.
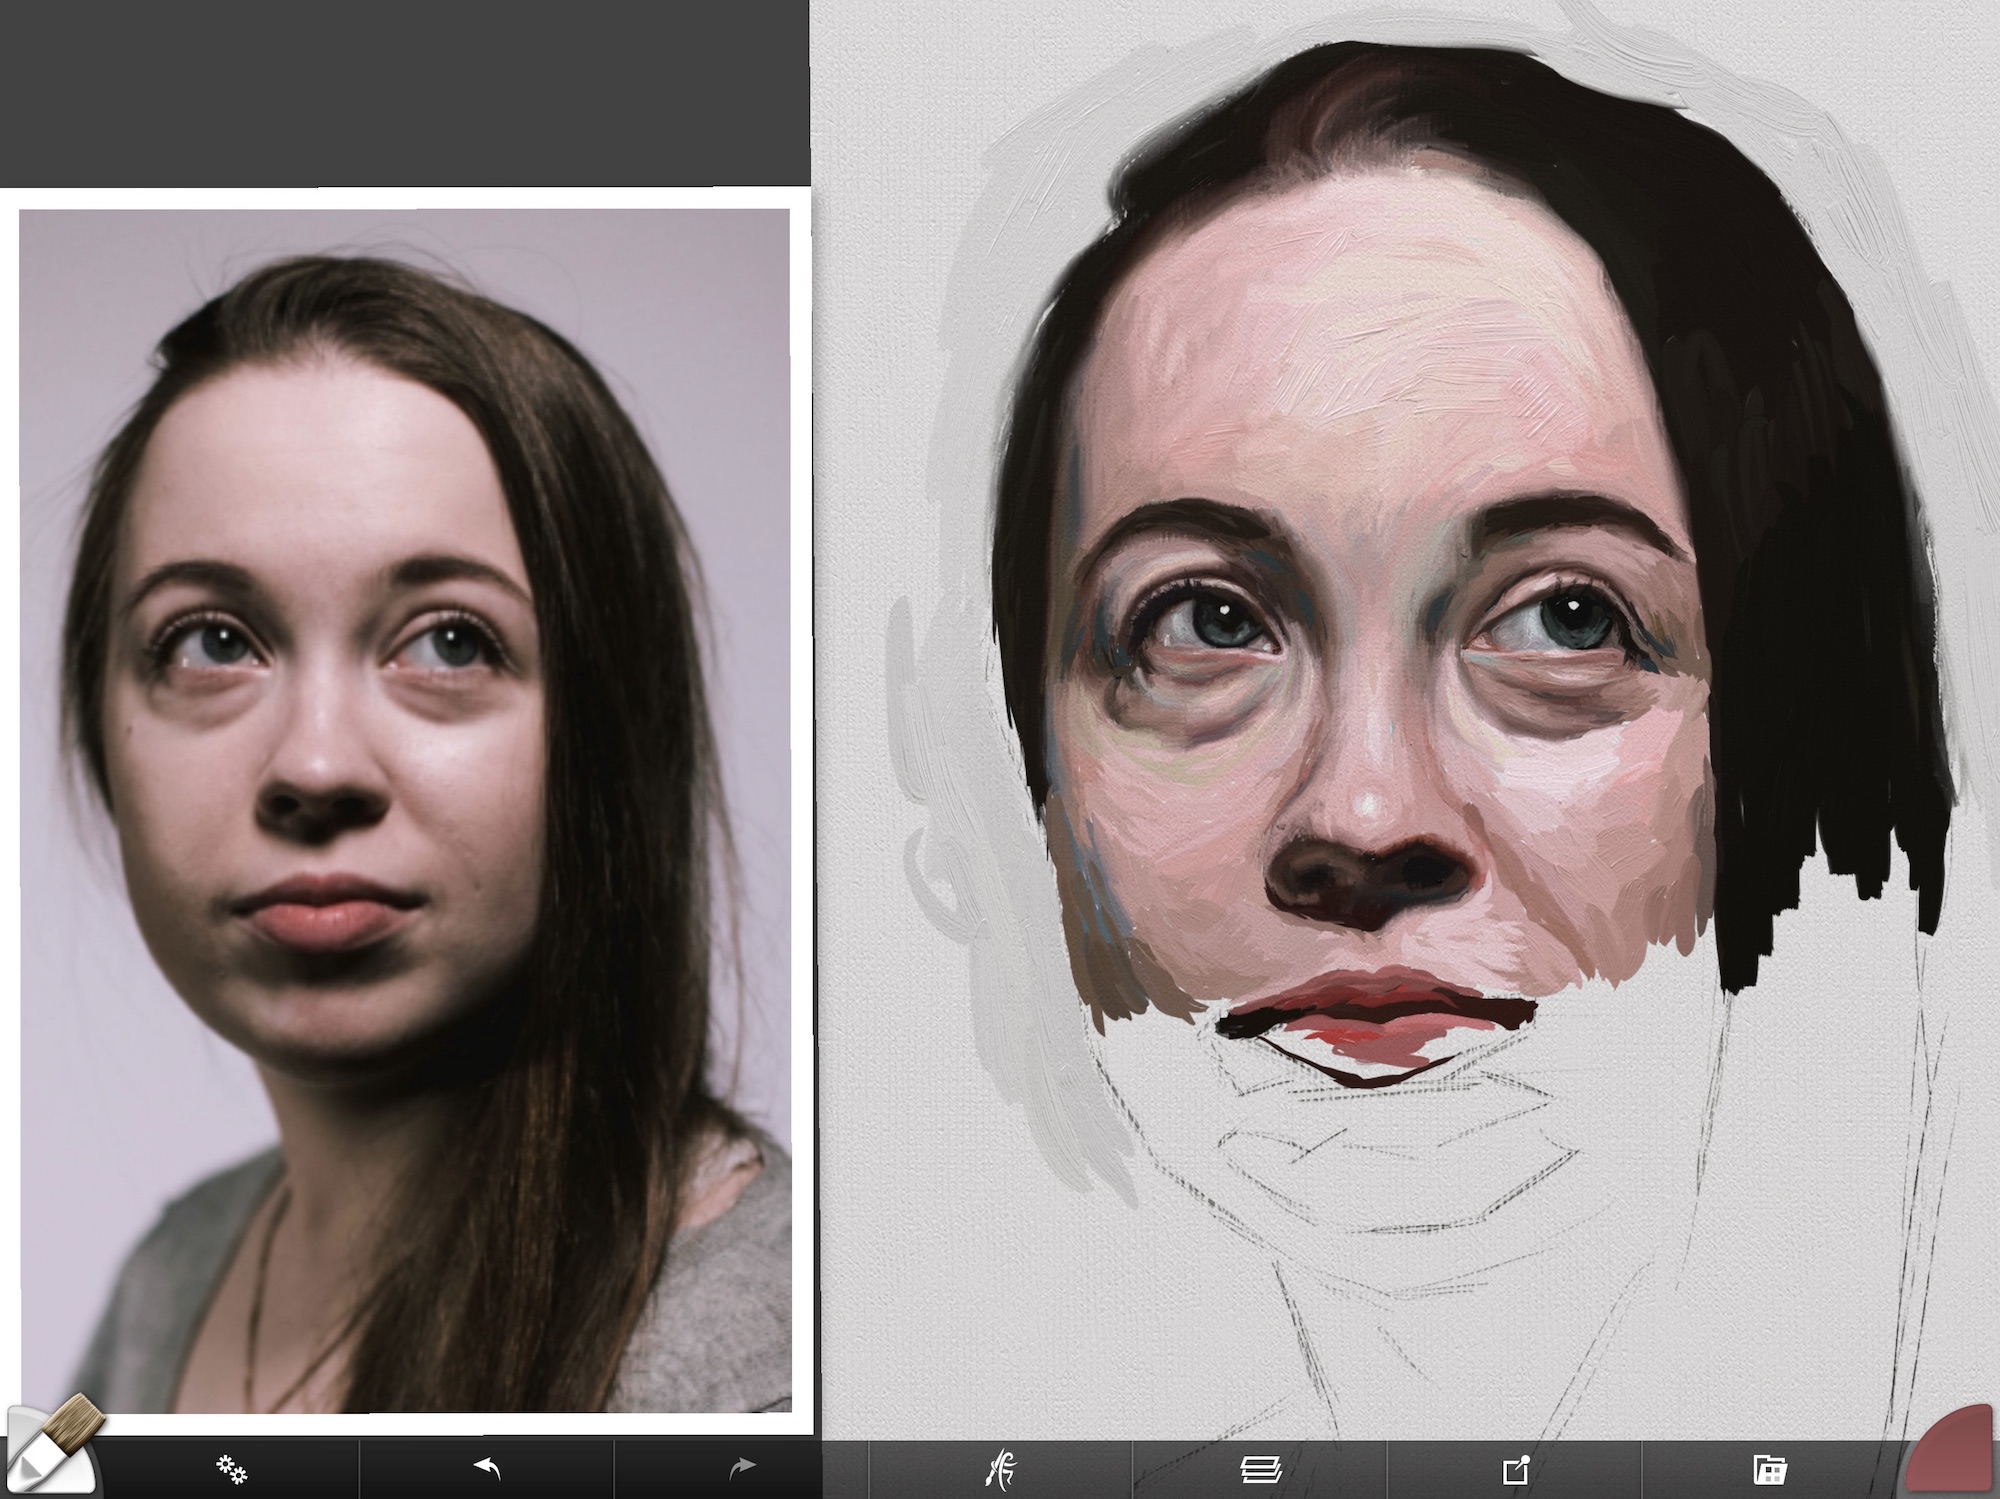
Reestablishing Darks Under The Eye
As I started to paint in the shadow in the eye socket above the eye, I noticed that the shadows were not dark enough underneath her eye. Because I hadn’t painted with too light of a paint color too soon, I was still able to go in a reestablish these darker shadow areas. I can guarantee you I was squinting the whole time I was doing this. It is the only way I can see values accurately.

Adding Cool Colors In The Shadows In A Digital Portrait
In the shot above, you can see where I’m adding in cool colors into the shadow areas. As a rule of thumb, cast shadows are cooler in tone and areas that receive light are warmer in tone. I also was feeling this image I was working from was a little grey or dull in its overall color and wanted to add a little life to the painting.
Once I added in the blue-grey tones, the yellow tones in the lighter portions of the skin under her eye started to become more evident. This is a case of pairing the complementary colors blue and yellow, even though they were toned down. When you do this, the painting becomes more lively as the colors play off of each other.
Below you can see that I’ve lightly blended all of these colors. The variations in skin tone add a lot more interest to the viewer.
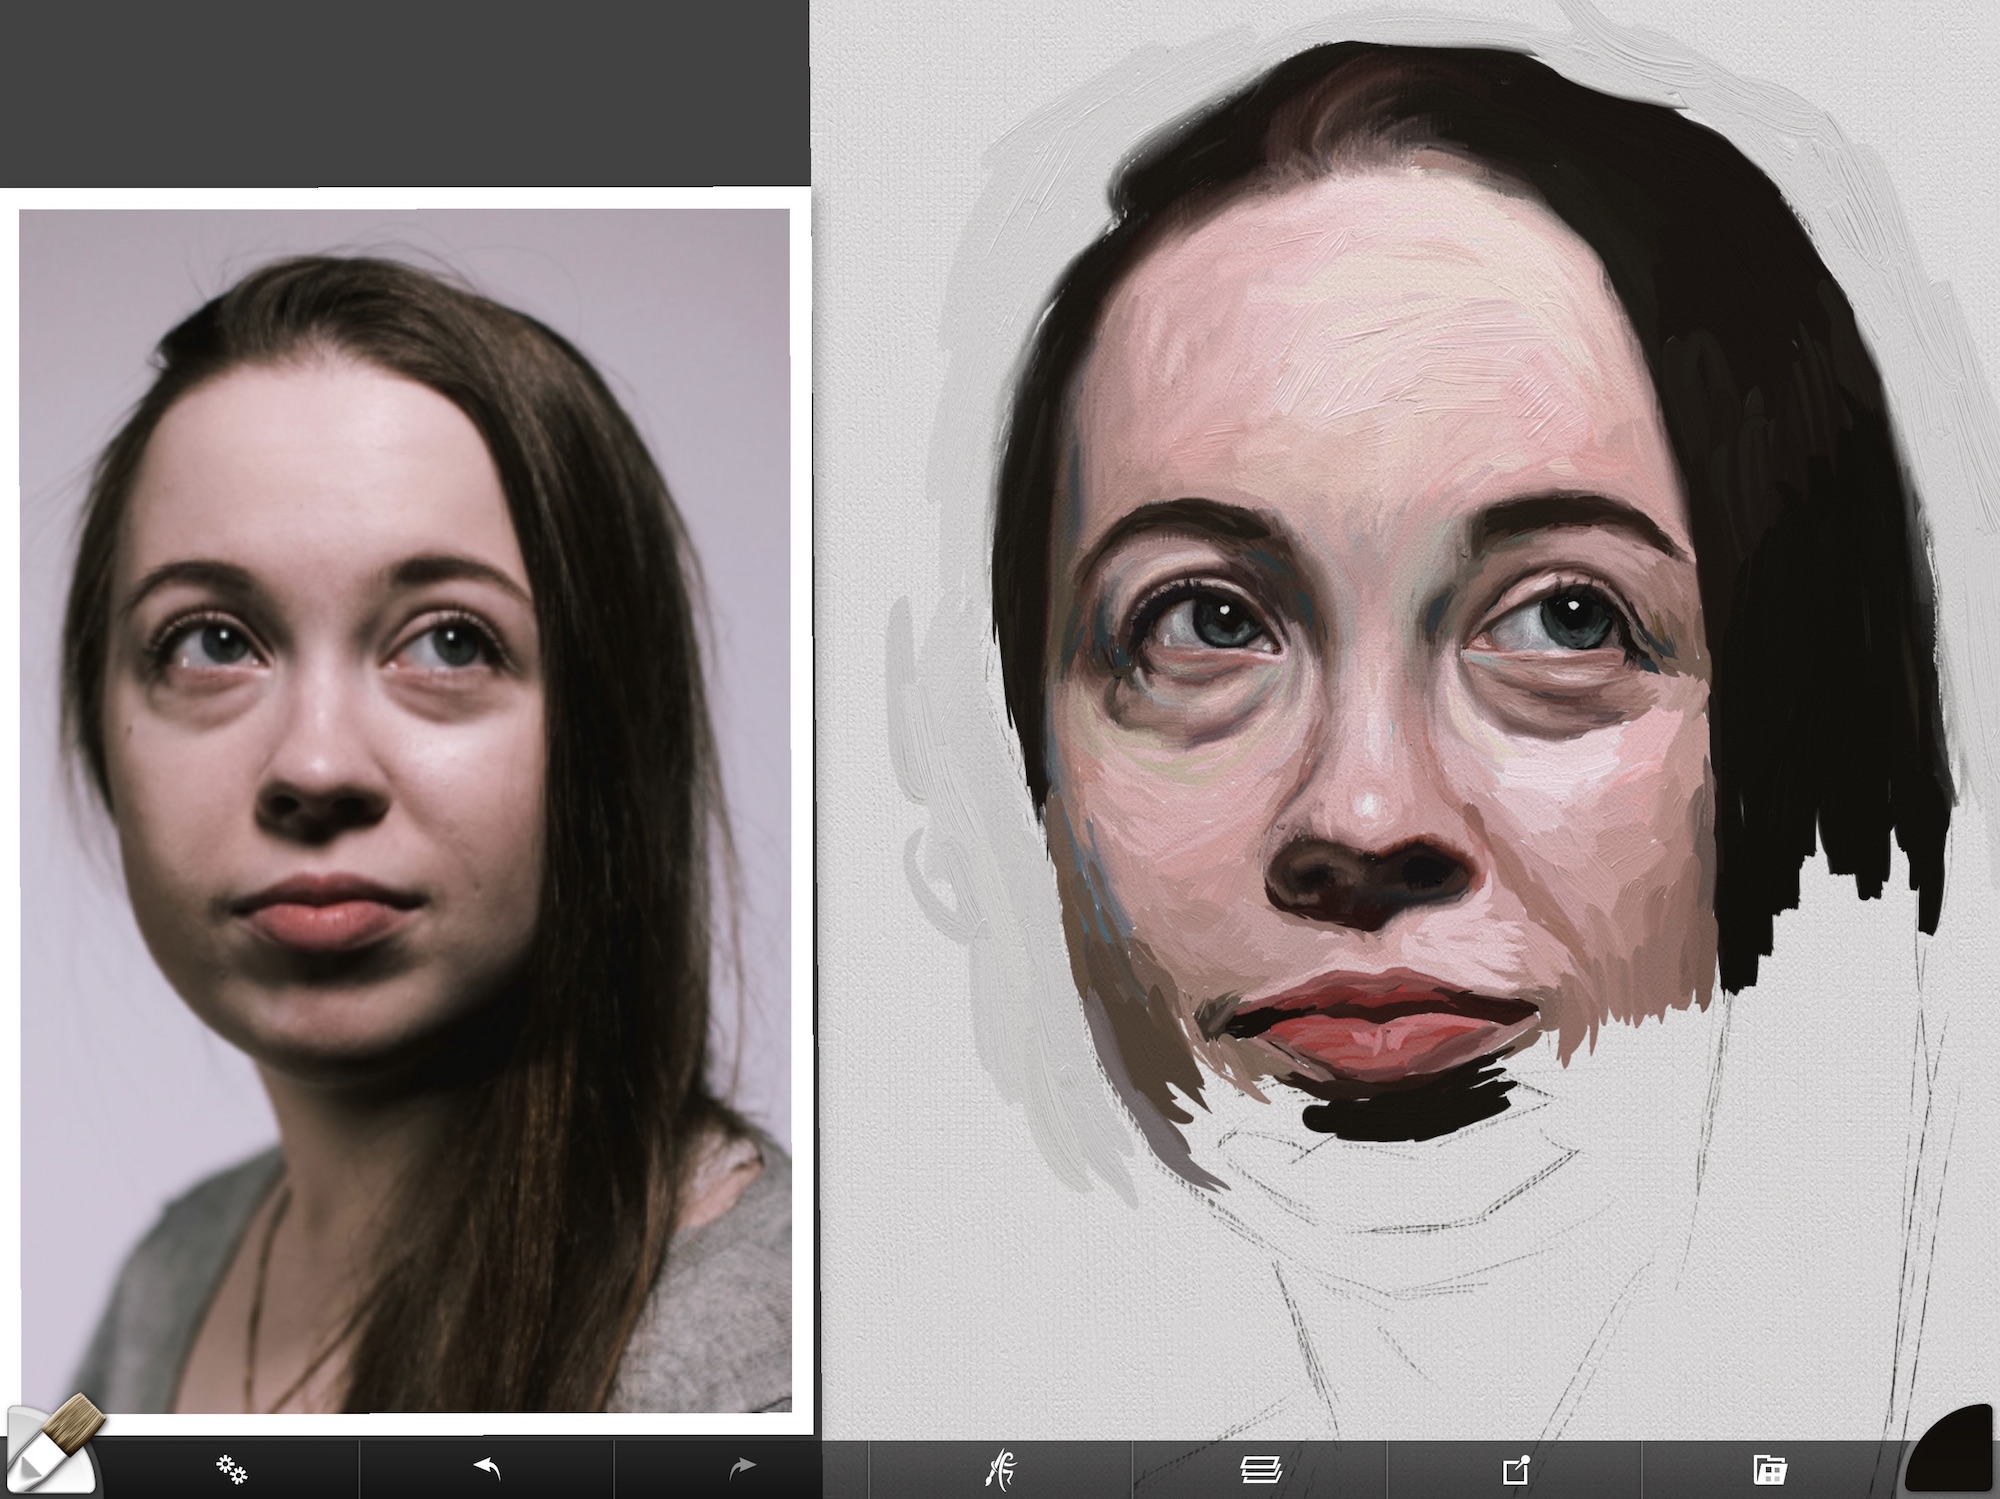
Moving On To The Other Eye
As I stated above, when I originally started to do this digital portrait I thought I would only paint the eye. I think I was feeling lazy after drawing in her face. But after I got one eye in I couldn’t help but start in on the other. I used the same process as the first eye starting with painting in the darkest areas first.
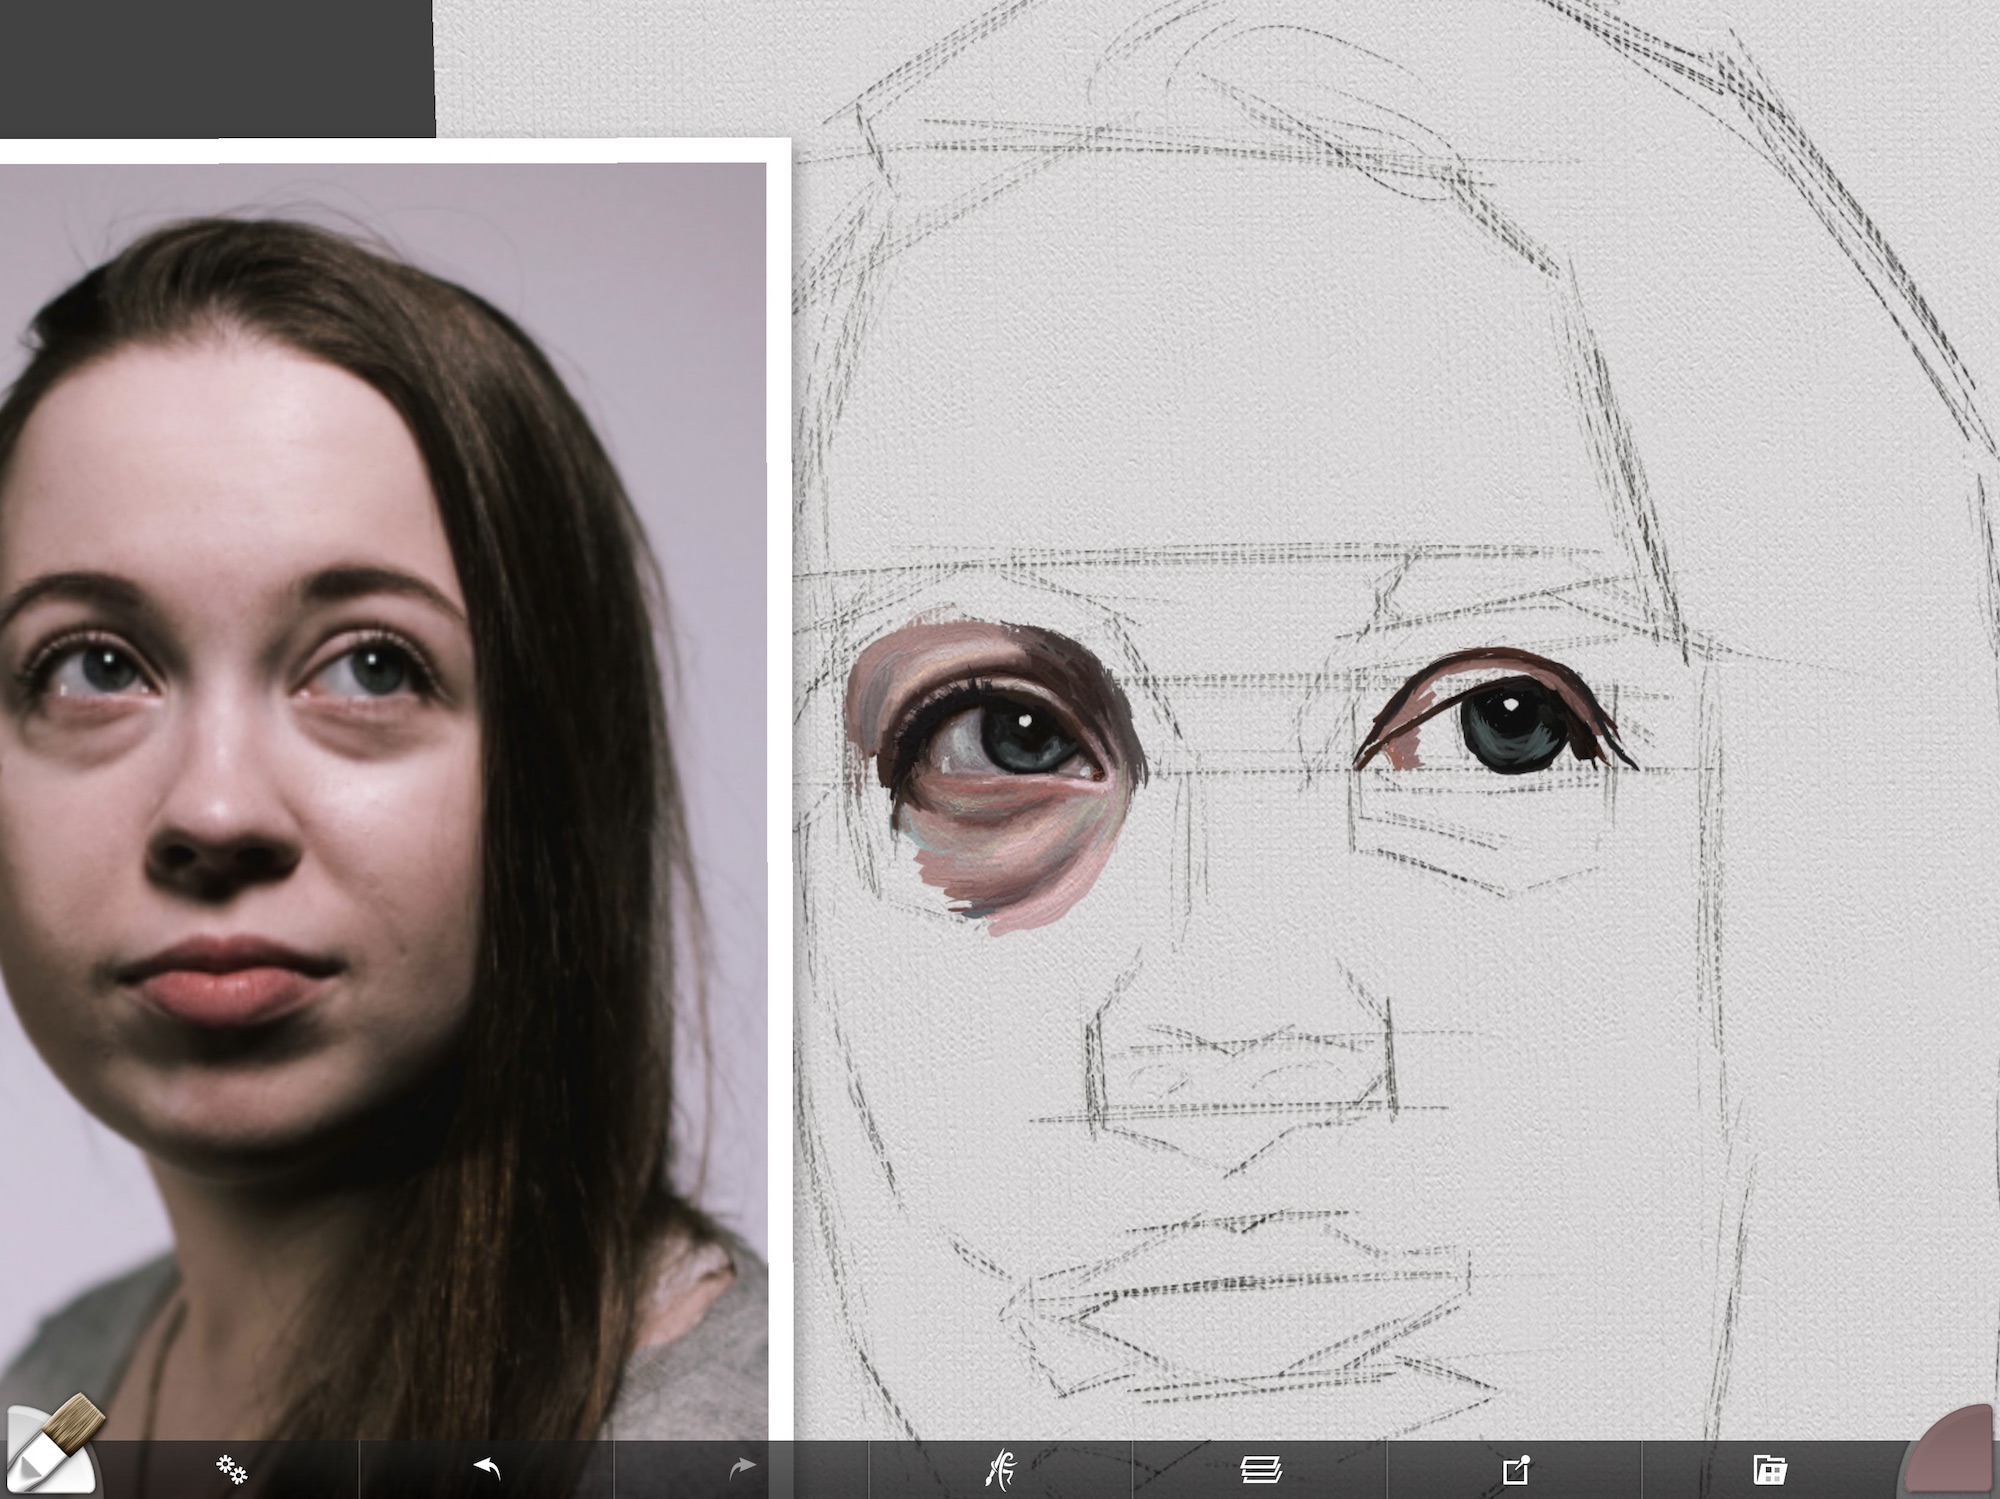
Then I added in the grey-blue of the iris and started with the darker tones on the eyelid and inner corner of the white of the eye. Many times that portion of the eye will have a reddish tone to it as it is a highly vascular area.
Below I started with the darker shadows under her eye to begin to build form.
I should note at this point that I think it is much more interesting to paint faces that aren’t magazine perfect. Whenever I paint someone that looks like a supermodel, I find I am incredibly bored with the painting. Those faces are great for selling makeup and fashion, but not as interesting for painting portraits. That’s just my opinion. Many impossibly good looking people have had incredible portraits painted of them. I simply like the character found in faces you see every day. Every face is a work of art.
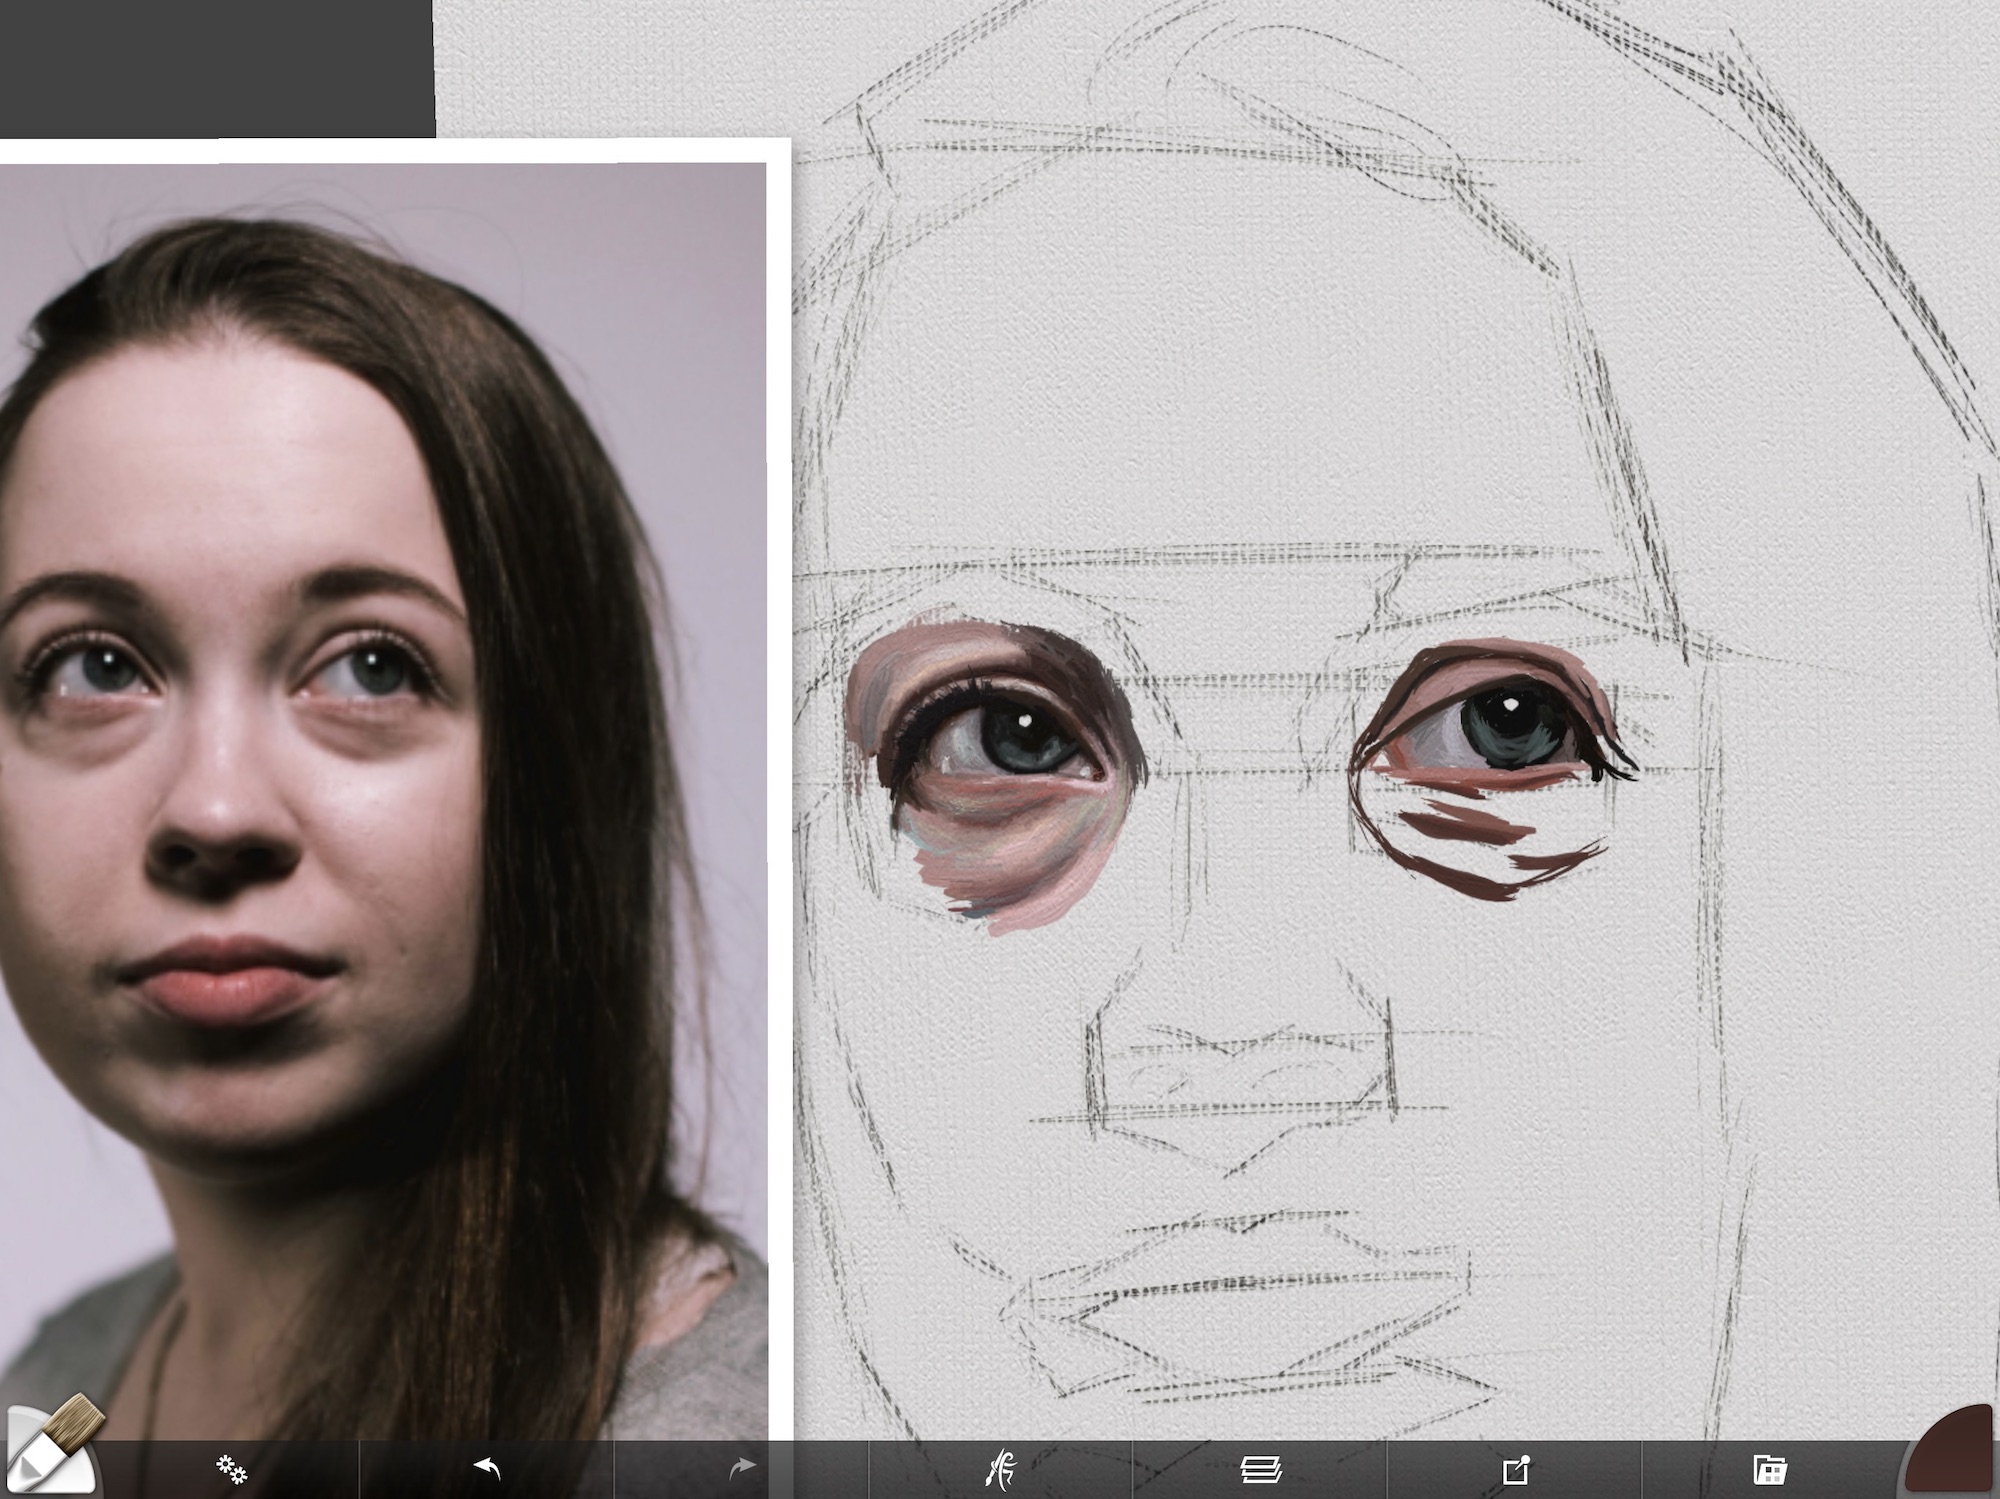
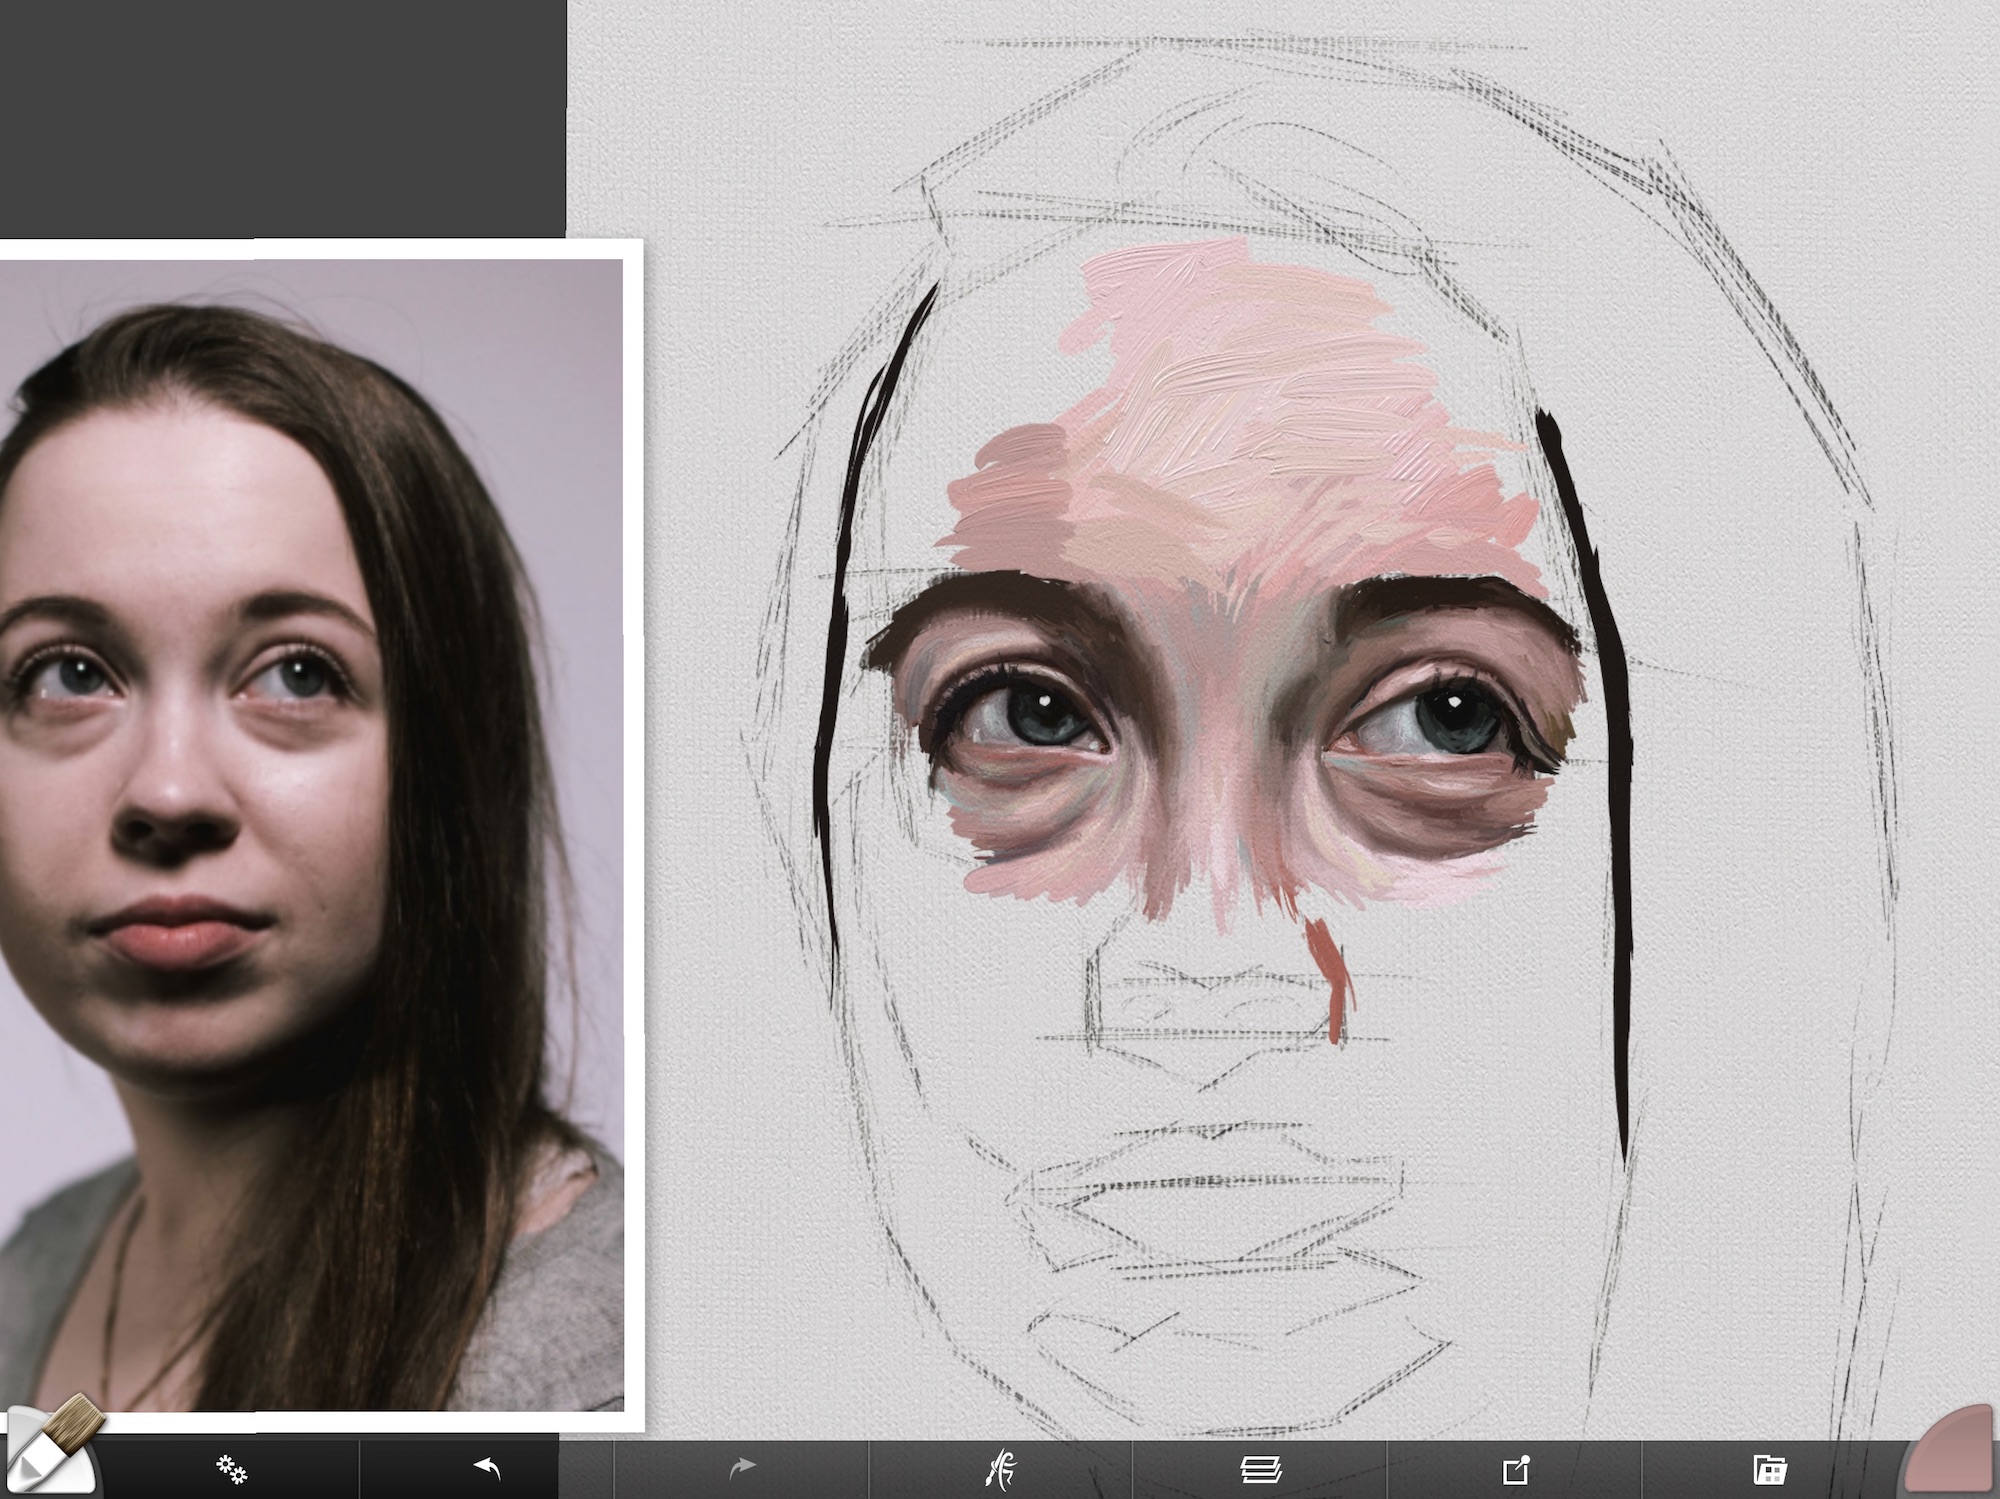
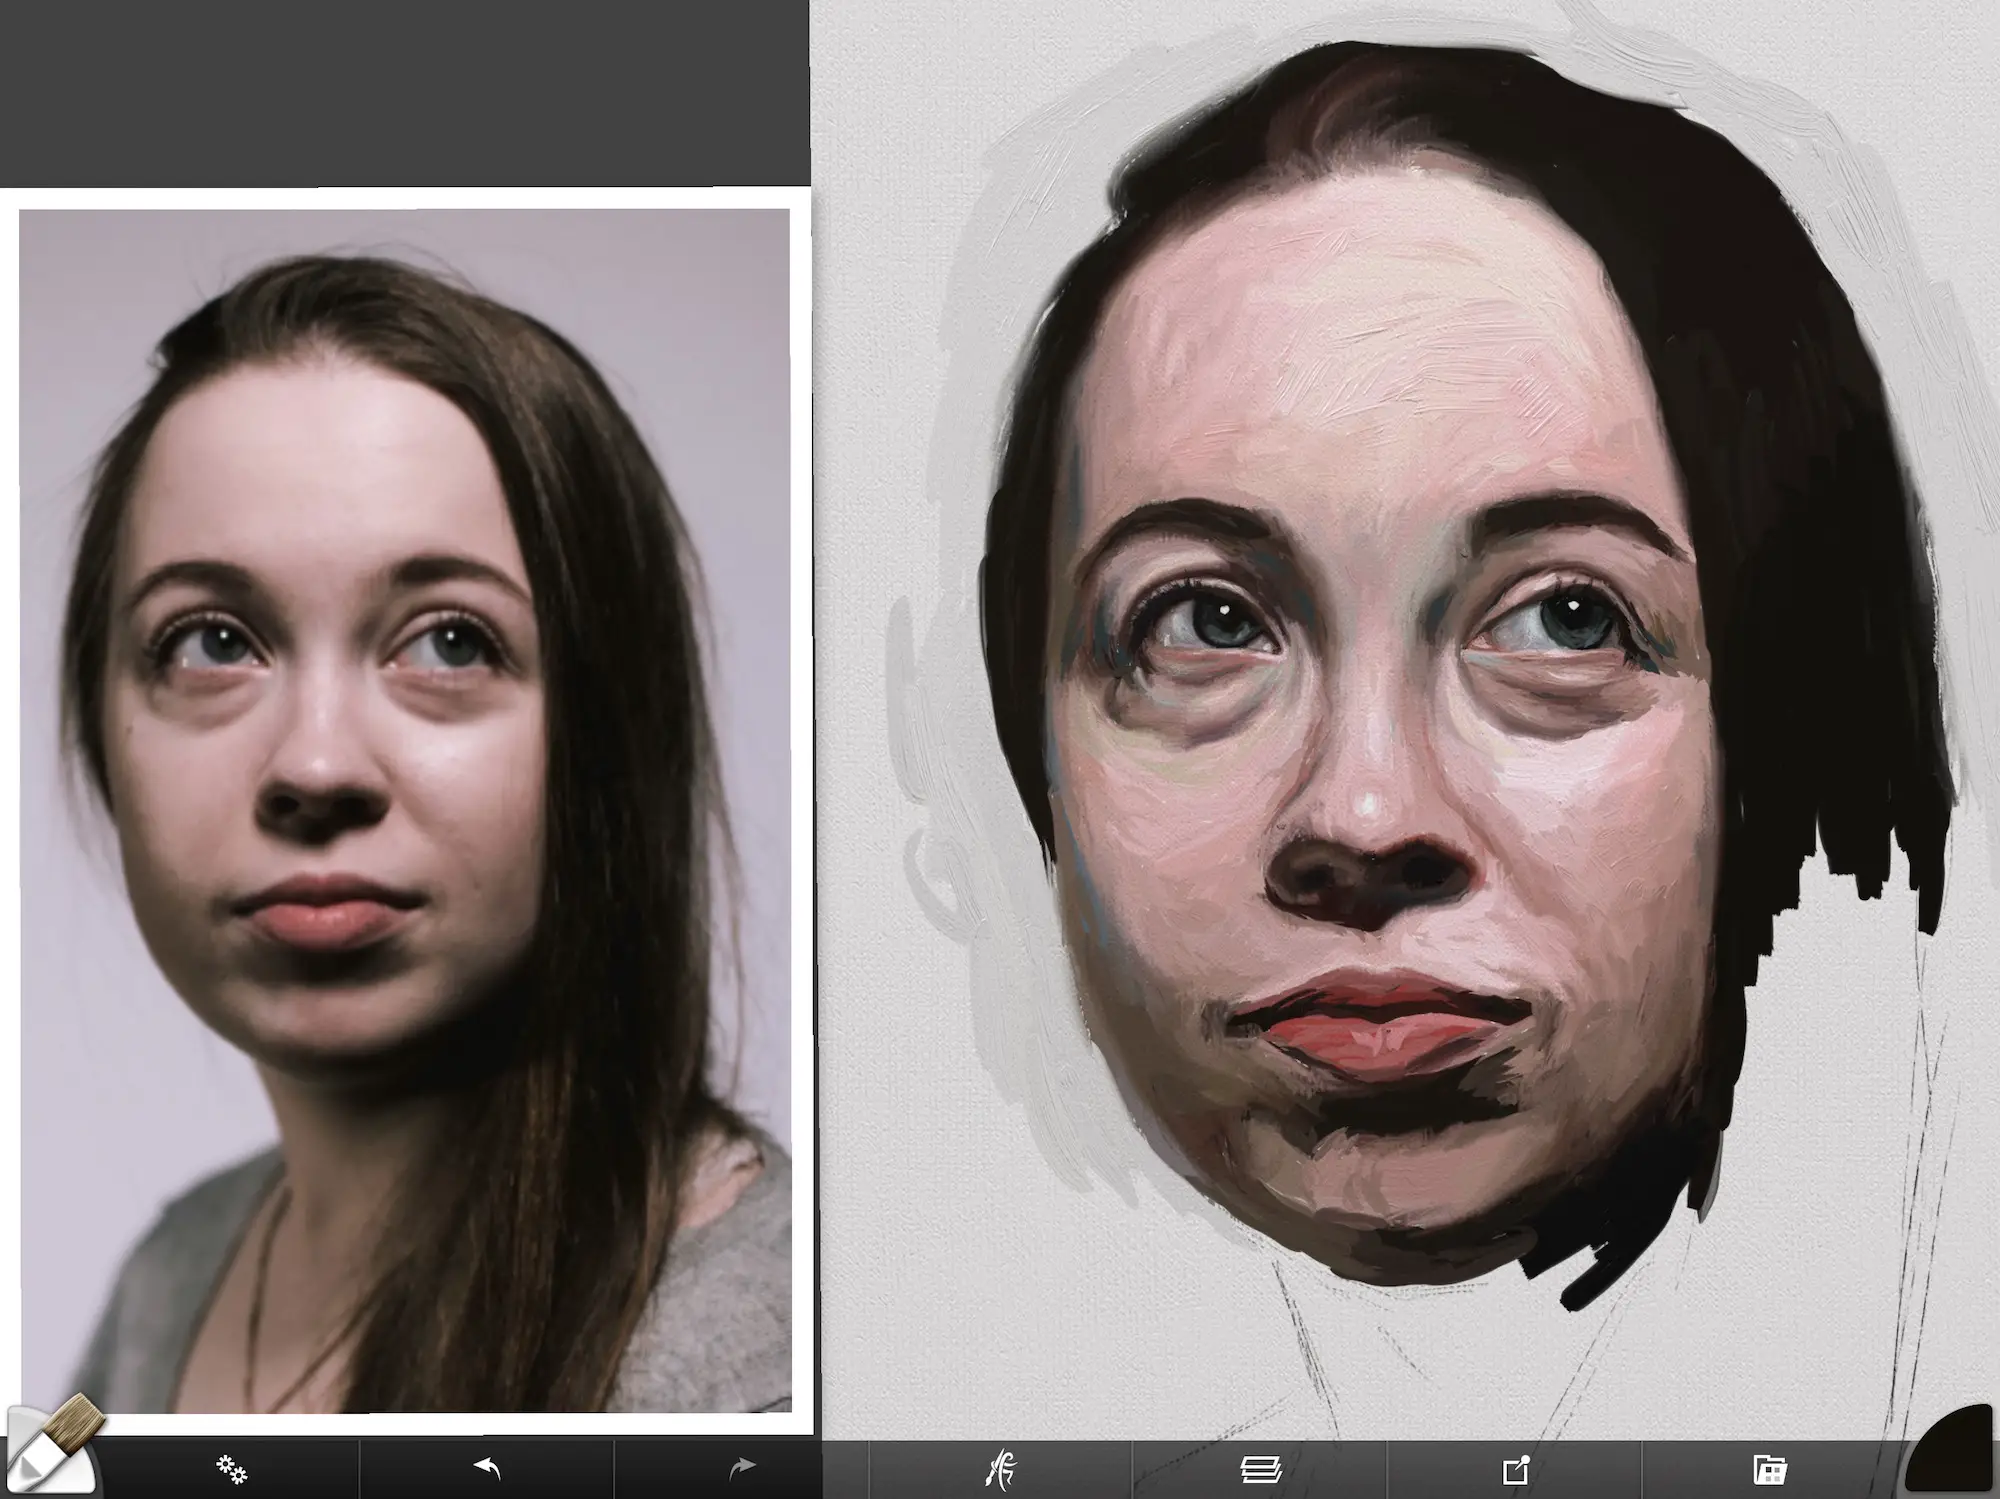
Finishing The Second Eye
Below the second eye is close to being finished. There is still some blending that needs to happen, but what I’m most looking at during this point is how bizarre the painting looks with two disconnected eyes. My thinking was that maybe if I connected the eyes over the bridge of the nose, it would be enough of a study and could then leave it alone. After all, I was just practicing. There was no way I was going to do this whole portrait, right?
Eyebrows Can Make A Huge Difference
After I connected the eyes over the bridge of the nose, I added the eyebrows (below). It’s amazing to me how much eyebrows help eyes to “stay in place”. When you look at the image above, the eyes look kind of crazy. This is because they aren’t connected over the nose and because they don’t have the eyebrows to anchor them.
Makeup artists know the importance of eyebrows in balancing facial features. Honestly, I think they go a little overboard these days. However, having a brow can make a difference in facial recognition.
In the image above her eyes look like eyes. However, they are starting to look like her eyes in the picture below. There is a lot that needs to happen to make this portrait have a strong likeness. But it’s on its way.
Connecting The Forehead
After I got the eyebrows in, it just made me want to push on and do a little more. I still wasn’t committed to finishing the portrait, but I was willing to take it a step at a time. At this point, I was wondering if I could actually get the portrait to look like her since I was piecing her features together.
Below you can see where I painted with the biggest brush possible in ArtRage. Unfortunately, there is a brush size limit on the iPad. There is no sense in being careful at this point. The thing I was most concerned about was getting the values right. Again, I was squinting during this entire process.
Painting In The Hairline In A Digital Portrait
One thing that never ceases to amaze me is how a hairline can start to create a strong likeness. When I would paint portraits from live models, many times after roughing in measurements of the eyes, nose, and chin, I found that quickly painting in the hairline would have a huge impact. You wouldn’t think a hairline could make such a big difference, but it does for a lot of people.
In the image below, her dark brown hair outlining her face is working its magic. It’s looking like her. When I paint this in oil, I will probably be establishing her hairline much earlier on in the process.
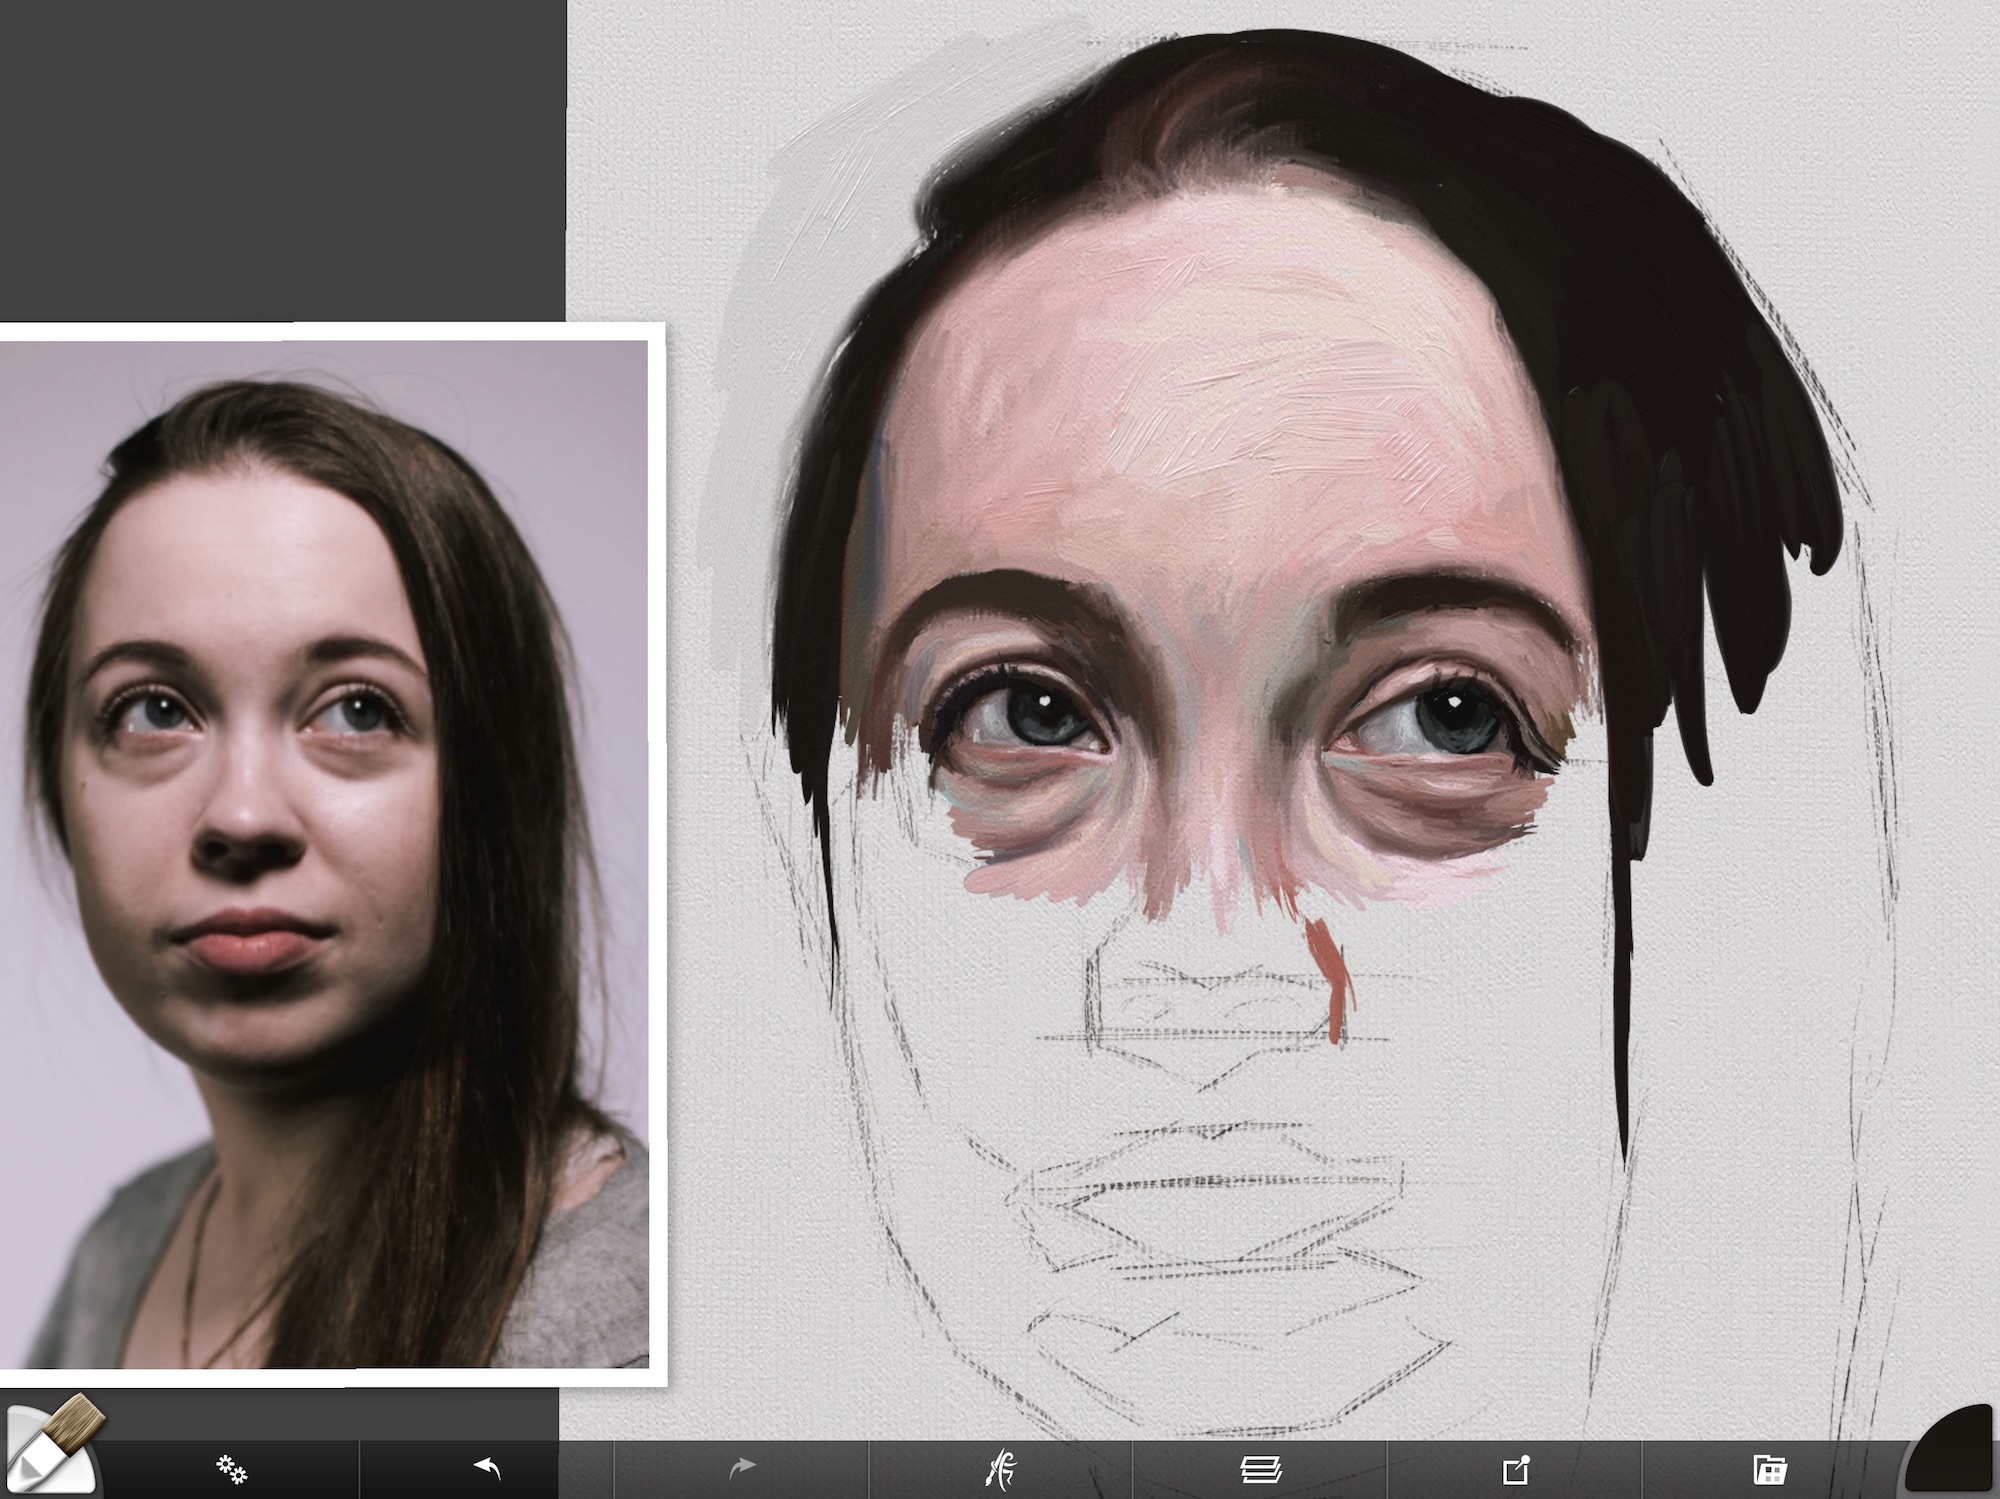
Noses Are Weird
This image has a strong light source from above and to the right, creating some very strong shadows. This is great for painting portraits, but it can also create some weird shadows. These types of shadows don’t seem to make sense in our rational minds.
Squint your eyes and look at the shape of the shadow at the bottom of her nose. It kind of looks like a squished heart. Nobody thinks there are heart shapes under noses, but there it is and it needs to be represented that way.
Now squint your eyes and look back and forth between the photograph below and the painting. Only looking at the shadow under the nose. I will look back and forth like this many times to make sure I’m getting that shape correct. Otherwise, I may start to paint what I think should be there instead of what really is there.

Painting The Mouth
Even though all mouths are different, most of them have a similar structure. Since the light is from above, the top lip will be in shadow. This will make it darker than the top of the bottom lip which will catch the light.
What I like to do regardless of whether I’m doing a digital painting or traditional painting, is paint a dark line where the lips meet in the middle. This is usually done in a very dark red color. I will use burnt umber with traditional paint. It usually needs to be darkened with alizarin crimson and ultramarine blue. Sometimes I will use ivory black and cad red. It all depends on where my palette is heading.
After I establish that centerline, which always has some sort of curve to it, I block in the top lip with a dark red. Then I start to add in the lighter color of the center of the bottom lip.
Cheeks
I’m going to be all over the place describing the bottom of the face since I’m painting this in such an unusual way. But as I was blocking in the mouth, I was also adding the “tiling” for the values in the cheeks. Particularly on the right side of the painting, you can see that the cheek has almost individual tiles of color. Again, I was squinting and throwing paint down, trying to match the values I was seeing in the photograph.
I needed to add in skin color around the mouth so that I could see how dark my values should be. After adding in the color above the lips, it’s clear that the top lip needs to be darkened.
I’m not concerned at all about the brushstrokes. I now I can go back and move the color around a bit. The values of the color are my biggest priority.
Creating Form Through Shadows In A Digital Portrait
As I worked my way down the face, the light source was falling off dramatically. Because of that, I’m encountering some very dark colors. I’m all in at this point – this portrait is getting painted!
Using a Grey Scale & Value Finder like this one on Amazon, even with a digital portrait, can be very useful to see how dark you need to go with color. I talk about this in my article on why value in painting is so important. If you want all the tools, this link to Amazon includes the value finder, a color wheel, a proportional divider and a viewfinder with a grid. If you do traditional art, these are great tools to have in your toolbox and are very inexpensive.
When doing a digital portrait, sampling the color can be helpful for establishing the values. But again, I would adjust the color and not rely completely on the sample. As you can see below, I have some very dark colors I added to the bottom of the face. I also darkened the bottom and sides of the upper lip. Lips are curved around the face, so they tend to be lighter in the middle and darker at the edges. I still have some darkening to do under the bottom lip.
Continuing To Rough In The Hair And Neck
Now that I have gotten the bottom of the face blocked in, I have a rather strange floating head on my canvas. I need to get a portion of the neck and bring her hair down a bit so the portrait makes a little more sense.
After I get those colors blocked in, I can go back in and start to blend and adjust my colors.

Changing The Overall Color
After the last stage of the painting, I took a little break and decided to look at all of the portraits I loved on Instagram and Pinterest. What master portrait artists do is create a yellow zone along the forehead, a red zone in the middle, and a blue/grey/green zone on the bottom.
I chose some colors I wanted to use to strengthen this portrait and move it beyond the photograph. You can see my swatches on the left side of the canvas below.
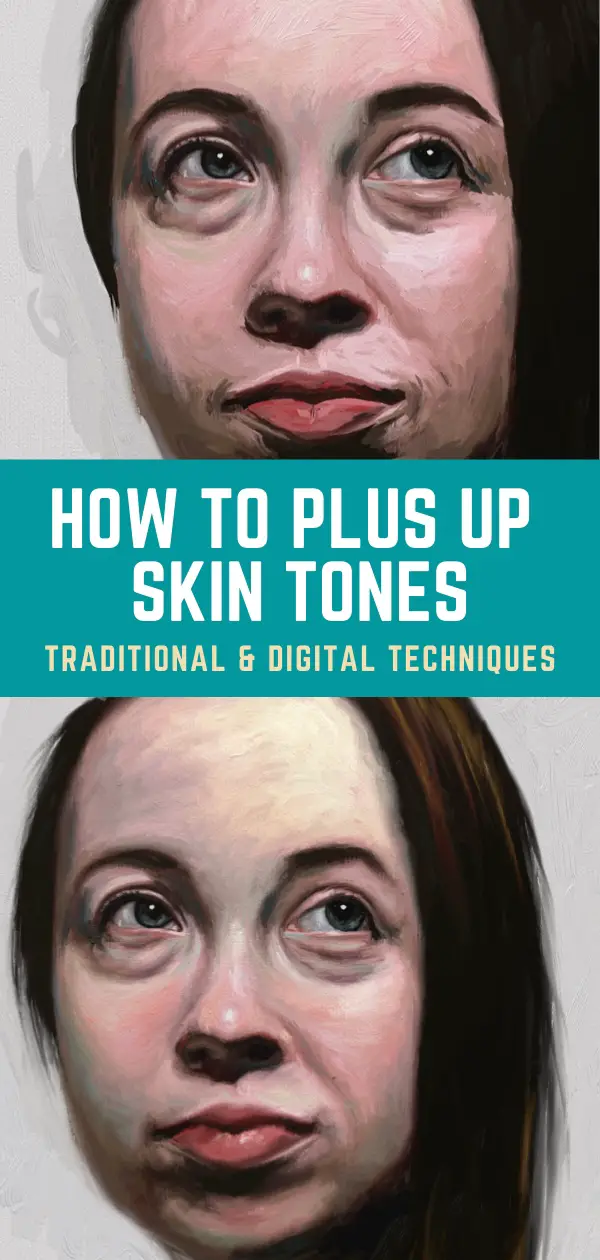
By incorporating these colors into the portrait, I was able to elevate the subject and increase the emotion of the painting. I like to match colors when I paint, but sometimes at the end, I know the painting needs to be “plussed up”. These are the kinds of decisions artists make to move their art to the next level.
How Digital Portrait Painting Can Improve Your Traditional Painting Practice
Recently I wrote an article about whether digital painting could be considered real art. While I’m not painting digitally and selling my digital paintings in a gallery, I do use digital painting in my process to help me practice and explore my craft. It’s not exactly like traditional oil painting, but it is fun and gives me another way to practice art.
Digital portrait painting is being more widely used by traditional artists all the time. I think anything that keeps you practicing art is a viable tool. It’s really great for studies. Plus, I don’t get paint all over myself when I paint digitally.

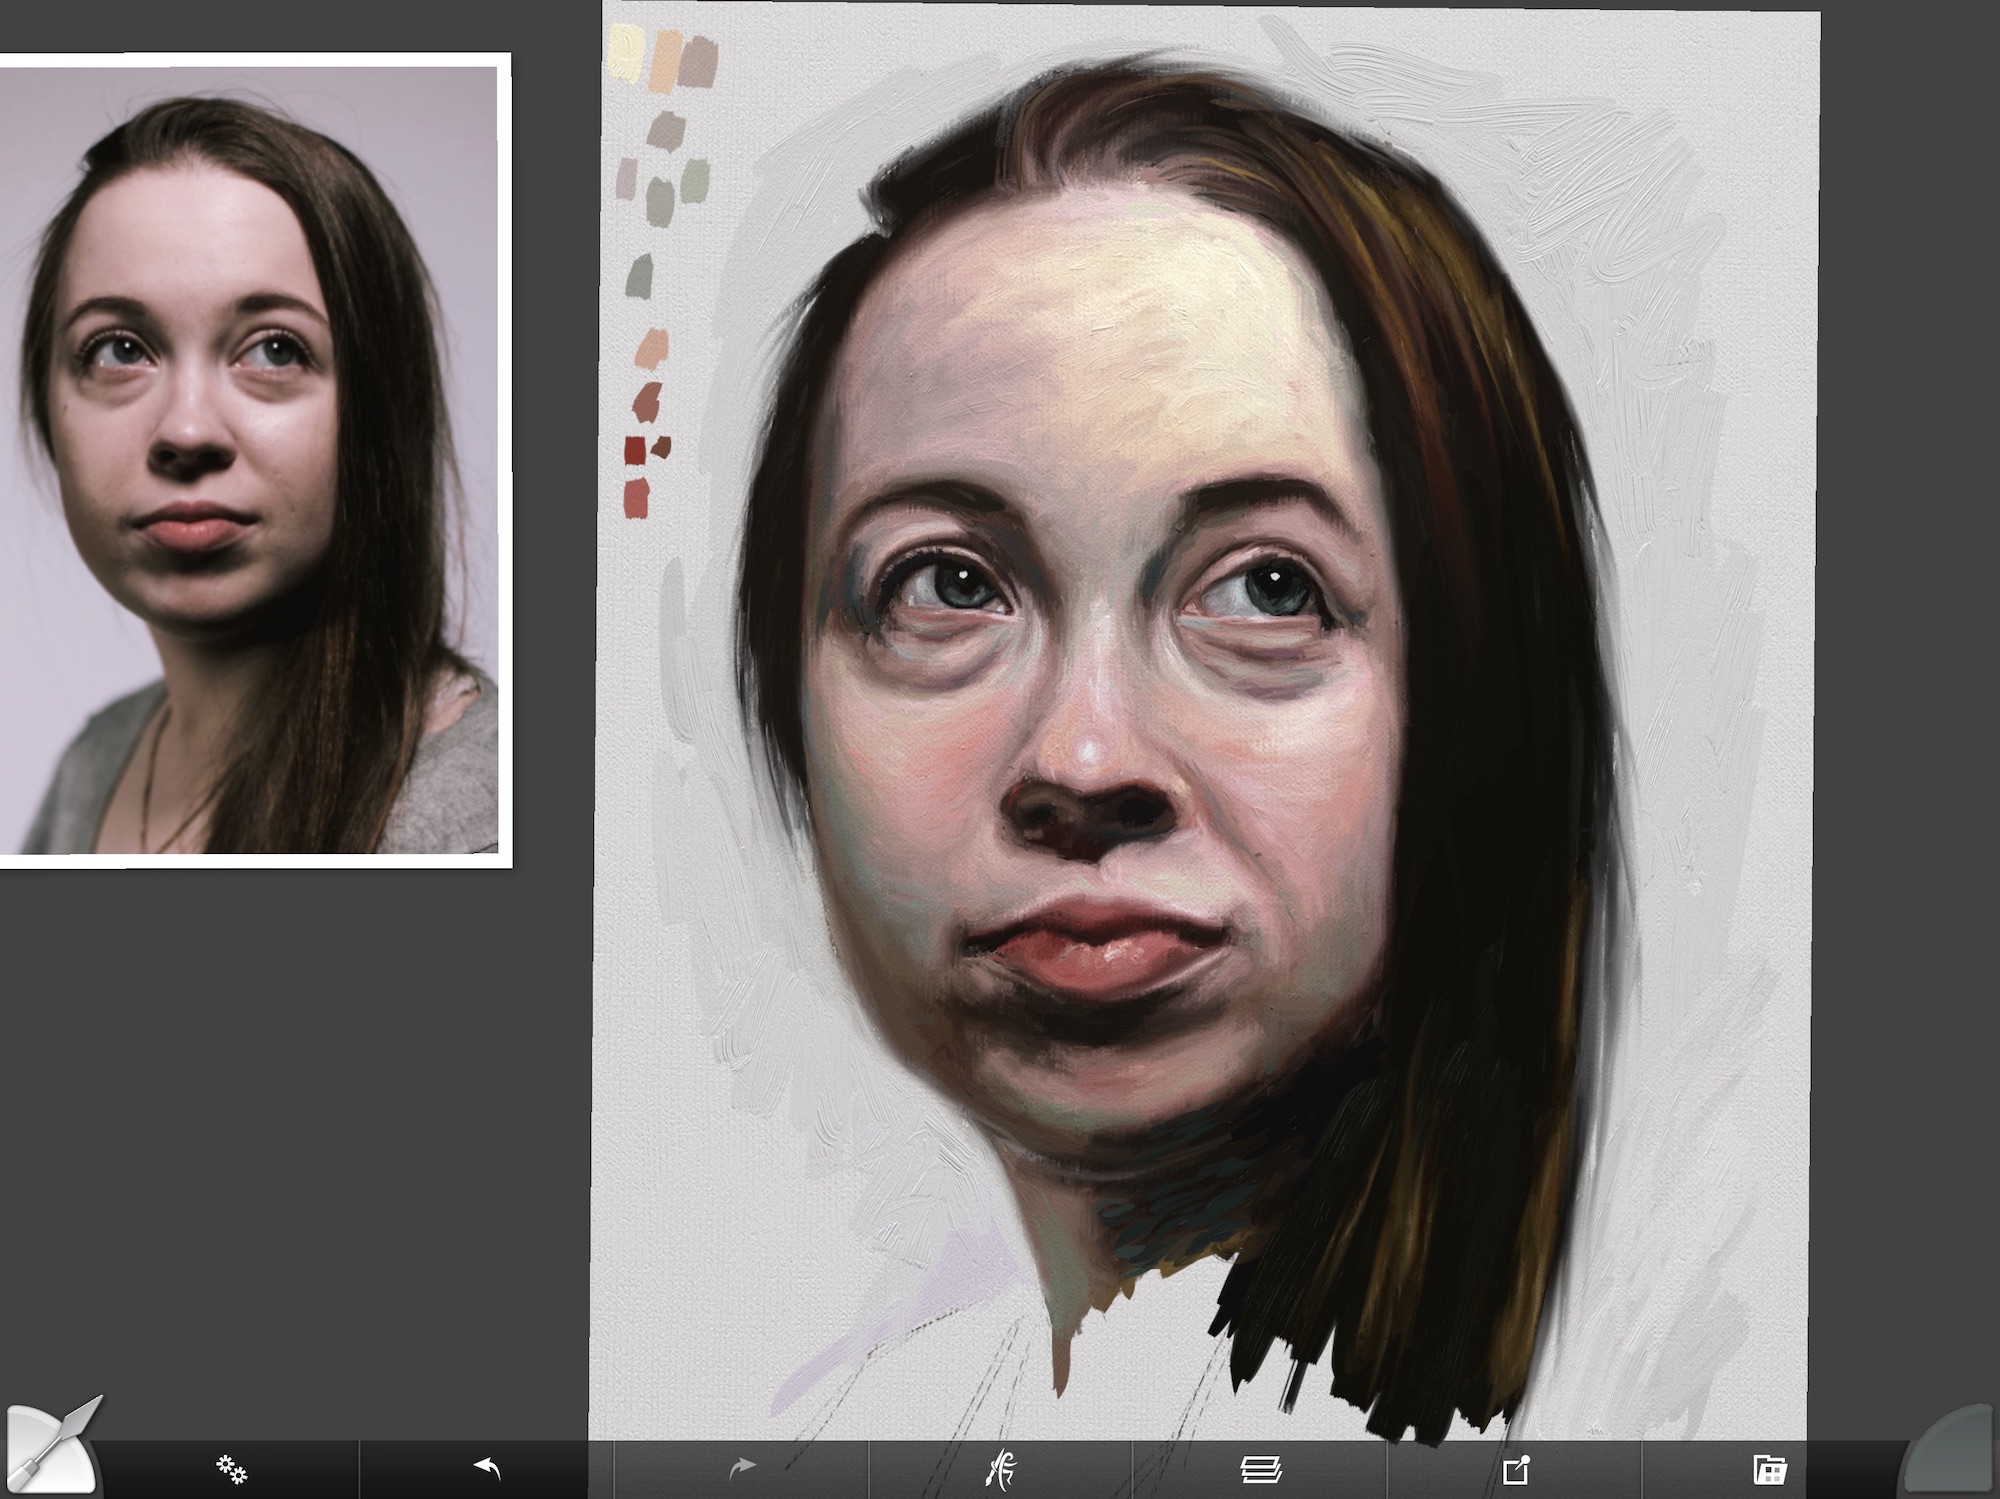
The Finished Portrait Study
Above is where I left my digital portrait study. I’m really happy with the color choices I made and am looking forward to painting this in oil. I may still change up my palette again or I might use this tutorial as my guide. That is the great thing about being an artist. You get to create what you want.
Thank you for stopping by!
If you enjoyed this article, below are some other popular tutorials you may like that I’ve done both digitally and traditionally: